Skip to content
Parallax Learn

Parallax Learn

  • Welcome
  • Tutorials
        • Tutorial Series head tag

          Tutorial Series
        • Tutorial Series

          The special, classroom-ready series pages are organized collections of tutorials for our most popular hardware and/or languages. The tutorials for each topic are conveniently accessible from a single page, shown in the order it is recommended that they be completed.
        • Robotics Series Head tag

          Robotics Series
        • Robotics Series

          • Artificial Intelligence
          • Cybersecurity: Radio Data tutorialCybersecurity
          • cyber:bot + Python
          • cyber:bot + MakeCode
          • Boe-Bot Tutorial SeriesBoe-Bot
          • Arduino Shield-Bot
          • ActivityBot with C TutorialsActivityBot + C
          • ActivityBot with BlocklyProp Tutorial SeriesActivityBot + BlocklyProp
          • Scribbler 3 Tutorial SeriesScribbler 3
        • Electronics & Programming Series Head tag

          Electronics & Programming Series
          • BS2 Board of Education Tutorial SeriesBS2 Board of Education
          • Propeller C-Language BasicsPropeller C Basics
          • FLiP Try-It Kit C Tutorial SeriesFLiP Try-It Kit + C
          • FLiP Try-It Kit BlocklyProp TutorialsFLiP Try-It Kit + BlocklyProp
          • Badge WX Tutorial SeriesBadge WX
          • Propeller BlocklyProp Basics and ProjectsPropeller BlocklyProp Basics
          • View All Tutorial Series »
        • Browse Tutorials
        • Browse Tutorials

          Individual tutorials sorted by robot or kit, and language.
        • By Robot or Kit
          • ActivityBot
          • SumoBot WX
          • Boe-Bot
          • Shield-Bot
          • cyber:bot
          • Badge WX
          • ELEV-8
          • ARLO
        • By Language
        • By Language

          • Propeller C
          • Arduino
          • BlocklyProp
          • PBASIC
          • Python
          • MakeCode
          • View All Tutorials »
  • Educators
  • Reference
  • Downloads
  • Home
  • All Courses

Parallax WX Wi-Fi Module for Prop C

Curriculum

  • 1 Section
  • 19 Lessons
  • Lifetime
Expand all sectionsCollapse all sections
  • Parallax WX Wi-Fi Module for Prop C
    19
    • 1.0
      Wi-Fi Module Firmware
    • 1.1
      Connect WX Wi-Fi Module to Your Propeller
    • 1.2
      Join the Module’s Wi-Fi
    • 1.3
      Update the Module Firmware
    • 1.4
      Configure Module Communication
    • 1.5
      Load and View a Test Page
    • 1.6
      Test the Propeller to Webpage Connection
    • 1.7
      Join Another Wi-Fi Network
    • 1.8
      Get Started With HTML
    • 1.9
      Get Started With JavaScript
    • 1.10
      Relay Information with JavaScript
    • 1.11
      Send Web Page Event Info to the Propeller
    • 1.12
      Motor Control with Sliders
    • 1.13
      Page Requests Info from Propeller
    • 1.14
      Display Pushbutton States
    • 1.15
      Program the Propeller over Wi-Fi
    • 1.16
      Print and Scan Function Review
    • 1.17
      Web Page Controlled LED Lights
    • 1.18
      Display Light Levels with Canvas

Print and Scan Function Review

The wifi library examples make liberal use of wifi_print and wifi_scan.  They behave similarly to print and scan, so let’s have a quick review on how those work.  The scan function can be used to pick characters, values, and strings from characters you type in the terminal and place them in variables.  Conversely, the print function can be used to display the values of characters, values and strings in the terminal.

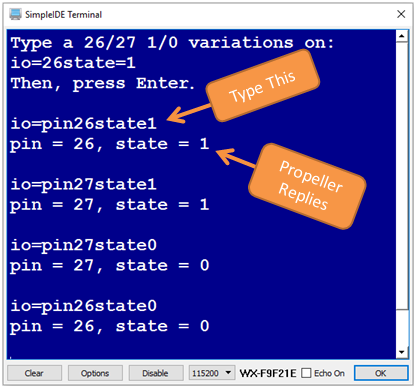
Let’s say that you are expecting to type something like io=pin26state1 to control the Propeller Activity Board’s P26 and P27 LEDs. The goal is for your program to load the number (26 or 27) into a variable named pin, and another number (1 or 0) into a variable named state.  You could use this to go capture the two values with the %d formatting flag and put them in the variables. 

scan("%d%d", &pin, &state);

Don’t forget to use the & with the variables.  The scan function needs variable addresses, not variable values.

Then, if you want to print the variable values to the terminal, you can use the print function:

print("pin = %d, state = %d", pin, state);

Unlike the scan function, the print function requires variable values in most cases, so the pin and state variables do not have the & character.

Let’s try this in a program that controls LEDs.

#include "simpletools.h"

int pin, state;

int main()
{
  set_direction(26, 1);        // 1 -> output
  set_direction(27, 1);

  print("Type a 26/27 1/0 variations on:\r");
  print("io=26state=1\r");
  print("Then, press Enter\r\r");

  while(1)
  {
    scan("%d%d", &pin, &state);
    print("pin = %d, state = %d\r\r", pin, state);
    set_output(pin, state);
  }
}

There are lots more examples of using print and scan with format flags in Propeller C – Start Simple.


Printer-friendly version
Program the Propeller over Wi-Fi
Prev
Web Page Controlled LED Lights
Next

DISCUSSION FORUMS | PARALLAX INC. STORE

About | Terms of Use | Feedback: learn@parallax.com | Copyright©Parallax Inc. 2024

© 2026 Parallax Learn • Built with GeneratePress