Create a Timer Program
To be fair, using a synchronized loop to print a message to the terminal is more work than necessary, so let’s do something practical. We’re going to create a running milliseconds timer. The CNT register is great for very short events, but anything longer than about 28 seconds puts us into a situation where we’re dealing with math tricks required to handle signed values; it can be done, but it’s not fun. One millisecond (1/1000th of a second) is a very practical unit of time for, well, a lot of things!
- Download the blocks file archive, unzip it, and open “BackgroundMillisecondTimer” in BlocklyProp Solo.
Now we’re getting into what makes the Propeller so special; we’re going to create a synchronized loop that runs every millisecond and keeps a timer updated for us. That loop is going to run independently of our normal code by launching into its own processor. These are the building blocks for that timer:
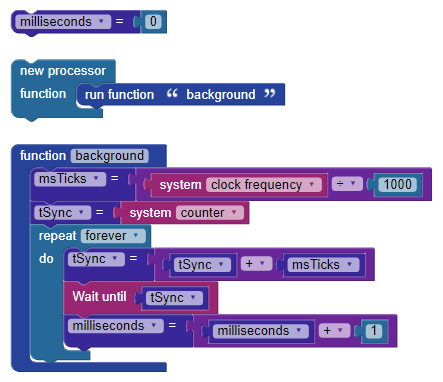
We start by defining our timer variable, logically called milliseconds. To update this variable while our foreground code is busy doing other things, we need to put the update loop into a function, and then run that function in a new processor. For the timer loop, we want it to run every millisecond, which is 1000 times per second. To make that clear, we’ve created a variable called msTicks. The value of msTicks is calculated from the system frequency divided by 1000.
The current version of BlocklyProp sets the system speed to 80MHz, but future versions may allow the programmer to change this (as we can with other languages). For this reason, we should read the system frequency and calculate msTicks versus hard-coding a value that my not be correct later.
The new processor block is intended to call a function, and not run additional blocks. Define the background function first, and then insert a run function block in the new processor block as shown.
As in our message example, we set the initial synchronization point in tSync before dropping into the loop. Inside the loop, the target for the wait until block is derived by adding msTicks into the current value of tSync. Then we wait. When the wait until block finishes we add one to the value of milliseconds and run the loop again. It will continue to run – at a rate of exactly 1000 times per second – until the Propeller is shut-down.
Let’s add some blocks so that we can see the timer working:
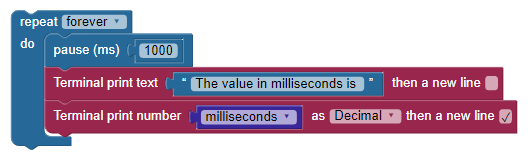
This is a simple repeat forever loop like we started out with, but it’s printing the value of our milliseconds timer about every second.
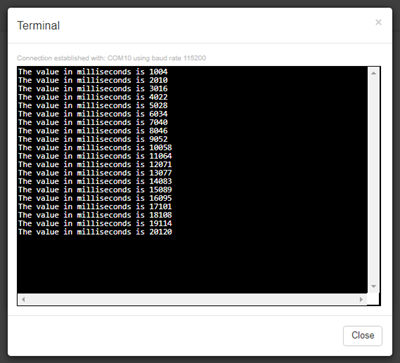
Question: Why is there more than 1000 milliseconds between each line?
Answer: Because the display loop is using pause instead of wait until, so the loop overhead is not accounted for. It takes about 6ms to print the string and convert the value of milliseconds for terminal output.
Challenge
- Modify the loop so that the line-to-line change is exactly 1000ms.