Create and Test the Library
Create Library Archives
When your applications call the simpletools library’s pause function, the compiler doesn’t actually get anything from the .c file. Instead, it goes looking for a file named libsimpletools.a. The .a is short for archive, and the file is a binary image of the compiled C language source code. These files can help reduce the size of your program code.
Let’s make the archive for your awesome library.
- Click the Show Project Manager button at the bottom left of the SimpleIDE window.
The Project Manager windowpane that opens up should look like this:
Propeller GCC is designed to work with several different memory models. In the Propeller C Learning System tutorials, we’ve been sticking with CMM (compact memory model). We’ll start by compiling the library for that memory model first.
- Under the Project Options tab, make sure the Memory Model dropdown menu is set to CMM Main RAM Compact.
- Make sure the Board Type is set to ACTIVITYBOARD.
Using a different board? Look for it by name in the Board Type list. If it’s not there, click Help and look up Board Types in the SimpleIDE User Guide.
The next step is important; we need to configure the project to generate the library archive files.
- Click the Project Manager pane’s Linker tab.
- Put a checkmark in the Create Project Library checkbox (if there isn’t one already).
- Make sure Tiny Lib and Pthread Lib are unchecked.
After you have configured the project settings to create a project library and selected the memory model, you’re ready to build the project and create a library archive for the compact memory model.
- Click the top toolbar’s Build Project icon.
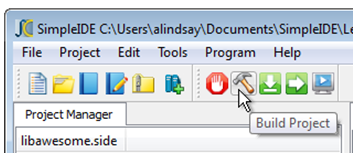
After you do this, there’ll be a file named libawesome.a inside a cmm subfolder.

Try This – Another Memory Model
You can compile your code for other memory models. Let’s try LMM (large memory model), which executes the code faster, but also takes more memory for the same program (compared to compact memory model).
- Set the Memory Model dropdown to LMM.
- Click the Build project button.
- Use your file browser to verify that libawesome now has two subfolders, and that each one has a libawesome.a binary archive.
- Set the Compiler Type dropdown menu back to CMM and re-save the project.
Did You Know?
Memory models are different ways to store and execute the program code on the Propeller microcontroller and connected memory devices. The CMM Main Ram Compact memory model used most often the Propeller C Tutorials puts all the program code into a 32 KB file that gets loaded into the Propeller chip’s main RAM, either directly or from an EEPROM chip like the one on the Activity Board (original or WX version). Other memory models might use a very large EEPROM, Flash memory, or just the memory in a single cog.
For more information on this advanced topic, see the user guide (click Help and select SimpleIDE User Guide).
Your Turn – Verify with a New Project
SimpleIDE will have to be restarted before it can become aware of this library for use by other projects. After that, it’s a good idea to test and make sure a different project can use it.
- Close and reopen SimpleIDE. (Important! This step is required for SimpleIDE to be ready to use the new library you have created.)
- Click New Project.
- Save it as Test Awesome Library to the My Projects folder.
- Paste the code below over the blank template code New Project gives you.
- Click Run with Terminal, and verify that #include “awesome.h” now gives your program access to the awesome and epic functions.
/*
  Test Awesome Library.c
*/

#include "simpletools.h"                      // Include simple tools
#include "awesome.h"                          // Include awesome library

int main()                                    // main function

{
  print("Ken");                               // Print a name
  awesome();                                  // Append with "is awesome!\n"

  print("Stephanie");                         // Print another name
  epic();                                     // Append with "is epic!\n"
}