Skip to content
Parallax Learn

Parallax Learn

  • Welcome
  • Tutorials
        • Tutorial Series head tag

          Tutorial Series
        • Tutorial Series

          The special, classroom-ready series pages are organized collections of tutorials for our most popular hardware and/or languages. The tutorials for each topic are conveniently accessible from a single page, shown in the order it is recommended that they be completed.
        • Robotics Series Head tag

          Robotics Series
        • Robotics Series

          • Artificial Intelligence
          • Cybersecurity: Radio Data tutorialCybersecurity
          • cyber:bot + Python
          • cyber:bot + MakeCode
          • Boe-Bot Tutorial SeriesBoe-Bot
          • Arduino Shield-Bot
          • ActivityBot with C TutorialsActivityBot + C
          • ActivityBot with BlocklyProp Tutorial SeriesActivityBot + BlocklyProp
          • Scribbler 3 Tutorial SeriesScribbler 3
        • Electronics & Programming Series Head tag

          Electronics & Programming Series
          • BS2 Board of Education Tutorial SeriesBS2 Board of Education
          • Propeller C-Language BasicsPropeller C Basics
          • FLiP Try-It Kit C Tutorial SeriesFLiP Try-It Kit + C
          • FLiP Try-It Kit BlocklyProp TutorialsFLiP Try-It Kit + BlocklyProp
          • Badge WX Tutorial SeriesBadge WX
          • Propeller BlocklyProp Basics and ProjectsPropeller BlocklyProp Basics
          • View All Tutorial Series »
        • Browse Tutorials
        • Browse Tutorials

          Individual tutorials sorted by robot or kit, and language.
        • By Robot or Kit
          • ActivityBot
          • SumoBot WX
          • Boe-Bot
          • Shield-Bot
          • cyber:bot
          • Badge WX
          • ELEV-8
          • ARLO
        • By Language
        • By Language

          • Propeller C
          • Arduino
          • BlocklyProp
          • PBASIC
          • Python
          • MakeCode
          • View All Tutorials »
  • Educators
  • Reference
  • Downloads
  • Home
  • All Courses
  • Propeller C Programming with the ActivityBot 360°

Propeller C Programming with the ActivityBot 360°

Add Whisker Indicator Lights

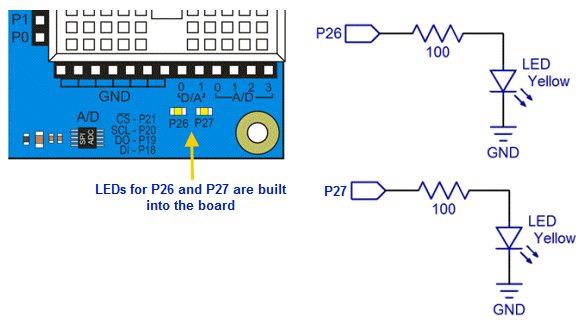
As you built the whisker circuits on your board, you connected two Propeller I/O pins to LEDs that are built into the circuit board.  That means you can program the Propeller to send high/low signals to these I/O pins, which will turn the connected LEDs on/off. 

  • Recall that the Propeller Activity Board WX uses built-in P26 and P27 LEDs for the LED circuits.

  • Open Test Whiskers With LEDs.side.
  • Click the Run with Terminal button. 
  • Try pressing each whisker.  The P26 light should turn on while the left whisker is pressed, and the P27 light should turn on while the right whisker is pressed.


How it Works

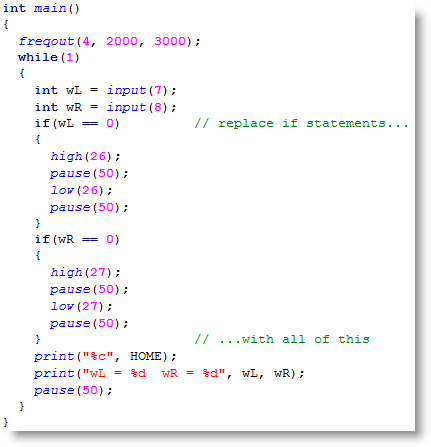
Test Whiskers with LEDs.c is just the previous program with two if…else statements added.  First, if(wL == 0) high(26); else low(26) does one of two things.  If wL stores 0, it means the left whisker is pressed, so high(26) turns on the P26 LED.  If wL stores 1, it means the whisker is not pressed.  In that case, low(26) turns the LED off.  The second line that was added is if(wR == 0) high(27); else low(27).  It does the same job, except that it turns the P27 LED on/off depending on whether wR stores a 1 or 0.

/*
  Test Whiskers with LEDs.c
 
  Display whisker states in terminal.  1 = not pressed, 0 = pressed.
 
*/

#include "simpletools.h"                      // Include simpletools header

int main()                                    // main function
{
  freqout(4, 2000, 3000);                     // Speaker tone: P4, 2 s, 3 kHz
  while(1)                                    // Endless loop
  {
    int wL = input(7);                        // Left whisker -> wL variable
    int wR = input(8);                        // Right whisker -> wR variable
    if(wL == 0) high(26); else low(26);       // Light for left whisker
    if(wR == 0) high(27); else low(27);       // Light for right whisker
    print("%c", HOME);                        // Terminal cursor home (top-left)
    print("wL = %d  wR = %d", wL, wR);        // Display whisker variables
    pause(50);                                // Pause 50 ms before repeat
  }
}

Try This

You can modify the program to make the lights blink when the whiskers are pressed like this:

  • Click the Save As Project button. 
  • Name the project Test Whiskers with Blinking LEDs.
  • Update the main function so that it matches the one above.
  • Click the Run with Terminal button. 
  • Press and hold each whisker to verify that it makes each light blink. 


Your Turn

Your challenge is to modify the Your Turn code to make it blink 10 times each time you press a whisker. 
Hint: Review Counting Loops.  You can nest a for loop inside an if statement.


Printer-friendly version
Inside the Whisker Circuit (Optional)
Prev
Whisker-Wheel Response
Next

DISCUSSION FORUMS | PARALLAX INC. STORE

About | Terms of Use | Feedback: learn@parallax.com | Copyright©Parallax Inc. 2024

© 2025 Parallax Learn • Built with GeneratePress