Beeps
Even though the Propeller chip can play WAV files and synthesize speech, sometimes a simple beep is all the noise you need to get the job done. Many devices beep to get your attention. Microwave ovens let you know your food is ready, alarm system keypads respond when you press a number key, and smoke alarms warn you something is burning. These devices often use piezospeakers because they are inexpensive, yet make clear, audible tones.
The first breadboard circuit we’ll build for the ActivityBot is a simple piezo speaker.
Parts
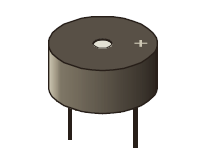
(1) Piezo speaker (#900-00001)
(2) Jumper wires
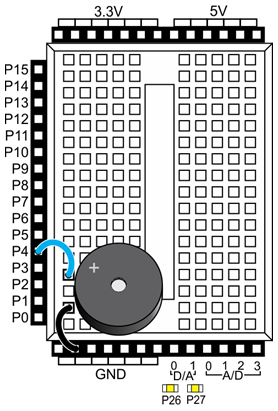
- Build the piezo speaker circuit in the exact position on your ActivityBot’s breadboard, as shown below. This will leave room to add a variety of sensor circuits later on.
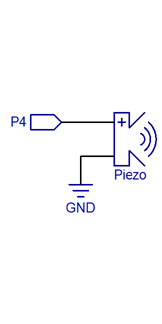
- Make sure the piezo speaker pin under the (+) sign on the case goes into the same breadboard row as the jumper wire connected to the P4 socket.
- Make sure the other speaker pin is in a different row, with a jumper wire connected to GND.
It is very easy to make this speaker beep with a single line of code:
freqout(4, 1000, 3000); // pin, duration, frequency
You can optionally add this line code at the beginning of your ActivityBot example programs. Then, If your robot’s batteries run low, the Propeller microcontroller will reset and restart the program—the beep will let you know if this has happened. We include it because it can be very helpful when experimenting with navigation programs, and trying to figure out why your robot is behaving in an unexpected manner.
Let’s try it.
Test Code
The test code will make the piezospeaker beep for one second with fairly high-pitched tone.
- Click SimpleIDE’s Open Project button.
- Open Piezo Beep from …DocumentsSimpleIDELearnExamplesCircuits.
- Set the power switch to position 1 (if applicable for your board).
- Click the Load RAM & Run button.
- Verify that the speaker made a one-second beep.
How it Works
The freqout function has parameters of pin, msTime, and frequency. The function call freqout(4, 1000, 3000) sends an alternating high/low signal to pin 4, for 1000 ms (or 1 second), at a frequency of 3000 Hz (3000 times per second). Since the speaker is connected to P4, this rapid 3.3 V to 0 V high/low sequence makes the piezoelectic element in it vibrate 3000 times per second. The result is a high-pitched tone.
/*
  Piezo Beep.c

  Beep a piezo speaker connected to P4.
*/

#include "simpletools.h"                      // Include simpletools

int main()                                    // main function
{
  freqout(4, 1000, 3000);                     // pin, duration, frequency
}
If you want to make your code do something while it’s broadcasting the tone, use the squre_wave function instead. It’s the “set it and forget it” version of freqout. Check the simpletools library documentation for more info. You can find it at: …DocumentsSimpleIDELearnSimple LibrariesUtilitylibsimpletoolsDocumentation simpletools Library.html
Did You Know?
- Frequency is a measure of how many times something happens in a second, and it is measured in hertz (Hz).
- kilo — k is an exmaple of a metric or SI prefix. This one abbreviates kilo, which means 1000.
- kHz — In the case of our piezospeaker, it received an on/off signal that repeated 3000 times per second, so that’s 3000 Hz, or 3 kHz.
- Human-audible sound vibrations range from around 20 Hz (very low pitch) to 20 kHz (very high pitch). Test your hearing!
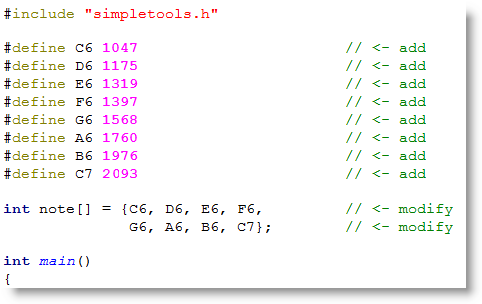
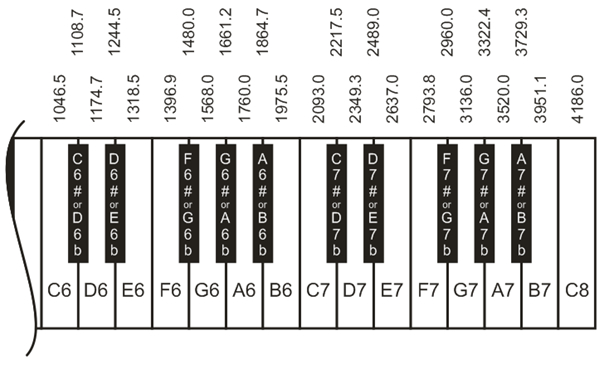
When you press a key on a piano, it makes a small hammer strike a tightly pulled wire, causing the wire to vibrate at a certain frequency. Here are the frequencies of some higher keys to the right side of the piano keyboard:
Try This
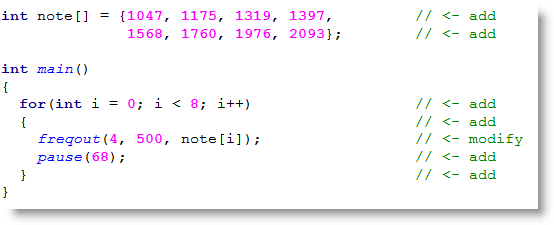
You can use an array to store note values, and then play them with a for loop. (See Array Variables for a refresher.)
- Use the Save Project As button to save a copy of your project in …DocumentsSimpleIDEMy Projects.
- Make the additions and modification shown here.
- Run the program, and it should play a familiar tune.
Your Turn
You can also use #define to give your frequencies note names, and then you can use those note names in your array in place of the numbers. It’ll make your digital composing a lot easier.
- Try your hand at composing your own short tune by combining sequences of notes and durations.