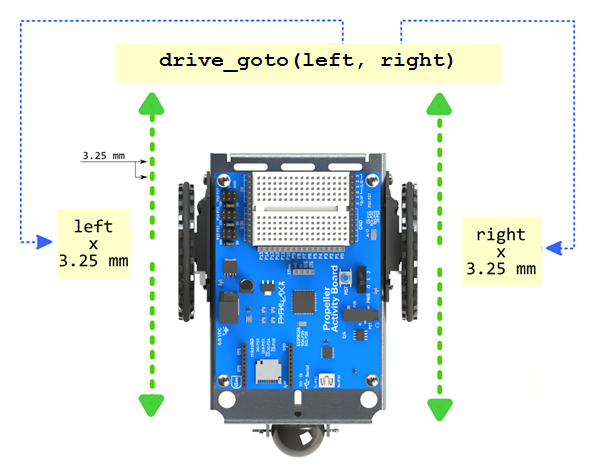
Go Certain Distances
Although it’s possible to go a certain distance by choosing a speed and calculating the time, there is an easier way. Fortunately, the abdrive360 library has a function that takes care of all that. It’s called drive_goto, and you can use it to tell the ActivityBot how far each wheel should turn in terms of 3.25 mm increments.
Straight Lines, Turns, and Encoder Ticks
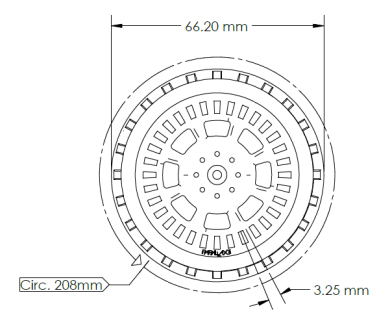
Recall that the term “tick” indicates 1/64th of a wheel rotation. If the wheel turns 64 ticks, it makes one complete revolution. That would make the robot travel the distance of its wheel circumference, which is 208 mm. So, if the wheel turns 1/64th of a turn—that’s a tick’s worth—it will travel 3.25 mm.
If you know how far you want your ActivityBot to roll, just divide the distance by 3.25 mm (or 0.325 cm or 0.00325 m) to find out how many ticks your program needs to tell the ActivityBot to travel.
ticks = distance mm ÷ 3.25 mm/tick
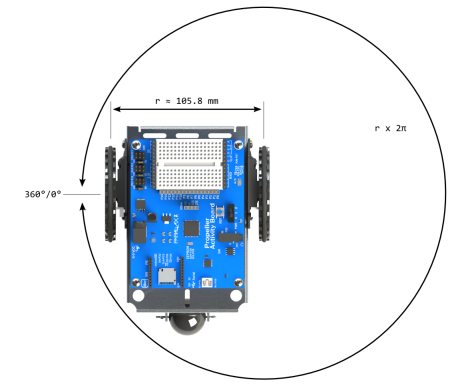
The ActivityBot’s turning radius is typically 105.8 mm.
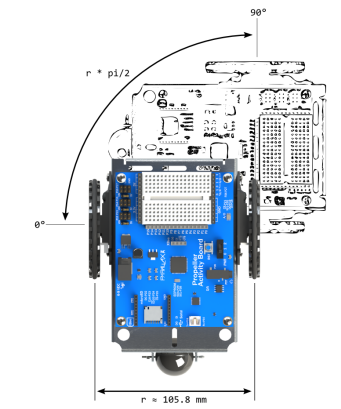
If you hold the right wheel still and make the left wheel turn, it will have to turn 2 × π × r. In this case, the r is the turning radius, so that’s 2 × π × 105.8 mm ≈ 664.76 mm. If you want the ActivityBot to make a ¼ turn, that would be 664.76 mm ÷ 4 ≈ 166.2 mm. How many wheel ticks is that? 166.2 mm ÷ 3.25 mm/tick ≈ 51.14 ticks ≈ 51 ticks.
TIP: If you make one wheel go forward 26 ticks, and the other go backwards 25 ticks, that’s still a total of 51 ticks for ¼ of a turn.
Test Code
This test code makes the ActivityBot go forward 256 ticks, and then turn and face 90-degrees to the right.
- Click SimpleIDE’s Open Project button, and navigate to Open Forward Stop Face Right.side for the ActivityBot 360.
- Set the PWR switch to 1.
- Click the Load EEPROM & Run button. Set the PWR to 0 after loading has finished.
- Disconnect from programming cable, set the ActivityBot on the floor and switch the PWR to position 2.
- Verify that the ActivityBot goes forward four wheel turns, stops, and faces right.
How it Works
The program makes the ActivityBot go forward by 256 ticks (four wheel turns). Then, drive_goto(26, -25) makes the ActivityBot execute a 90-degree right turn.
#include "simpletools.h"
#include "abdrive360.h"

int main()
{
  drive_goto(256, 256);
  pause(200);
  drive_goto(26, -25);
}
Did You Know?
Overshoots — If the drive_goto function overshoots, it backs up to the correct number of ticks.
Try This
Expand the program to make the ActivityBot retrace its path back to where it started, after going forward and turning right. There are two ways you could accomplish this:
- Have your ActivityBot turn left by 90 degrees and then reverse back into its starting position.
- Turn an additional 90 degrees to the right, and drive forward into its original starting position.
Your Turn
Simple waypoint navigation challenges involve programming your robot to drive a pre-determined course. An example course is shown below. To run this course, you would need to program your ActivityBot for the following manueuvers (this will take a bit of math):
- From START, go straight 41.6 cm forward to X.
- Turn 45 degrees right, and 41.6 cm to the next X.
- Turn 90-degrees left, and go 31.2 cm to finish X.
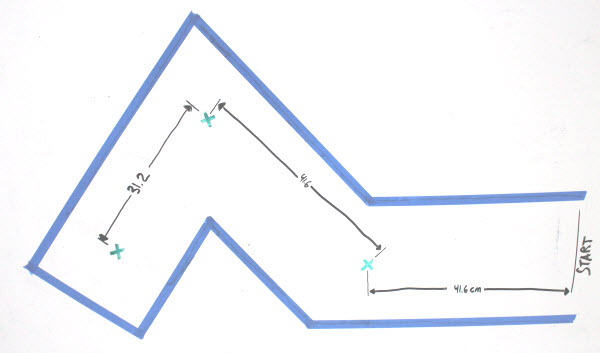
- Make a waypoint maze — masking tape corridors work well — and write a program to navigate from start to finish.