Roaming with Whiskers
Now that you’ve learned how to make the robot react to its whiskers, let’s expand on that and make it roam with whiskers.
To roam, the robot needs to go forward until it bumps into something. When that happens, it needs to back up, turn away from the obstacle, and then go forward again. While the robot is going forward, it should repeatedly check its whiskers with minimal delays between whisker checks. That way, it can know right away when it has encountered an obstacle.
Run the Example Code
- Navigate to …DocumentsSimpleIDELearnExamplesRobotsActivityBot360.
- Open Roaming with Whiskers.side.
- Set the PWR switch to 1.
- Click the Load EEPROM & Run button, and once it has finished loading, set PWR to 0 (off).
- Disconnect the robot from the USB cable.
- Set the robot on the ground in an area with a few obstacles high enough for the whiskers to bump into.
- Set the power switch to 2.
- Observe its roaming behavior.
How it Works
Look at the two lines inside the while(1) loop. drive_speed(100, 100) makes the robot go full speed forward for a 50th of a second.
The next two lines copy the whisker states to the wL and wR variables.
Next, two else if statements check in turn to see if just one whisker or the other is pressed. If just one whisker is pressed, the robot will back up straight for one second, and then turn away from the pressed-whisker side for 0.6 seconds. If both whiskers are pressed, the robot will back up and then decide to turn either left or right.
If no whiskers are pressed, none of the conditions in the entire set of if…else if…else if statements will be true, so none of those code blocks will get executed. The result is that the robot just keeps rolling forward and checking its whiskers every 20 ms.
/*
  Roaming with Whiskers.c
  Go forward until object detected by whisker(s).  Then, back up, turn
  and go a new direction.
*/

#include "simpletools.h"                        // Include simpletools library
#include "abdrive360.h"                         // Include abdrive360 library

int main()                                      // main function
{
  freqout(4, 2000, 3000);                       // Speaker tone: 2 s, 3 kHz

  while(1)                                      // main loop
  {
    // Go forward for 1/50th of a second.
    drive_speed(100, 100);                      // Go forward

    // Check whisker states.
    int wL = input(7);                          // Left whisker -> wL variable
    int wR = input(8);                          // Right whisker -> wR variable

    // If whisker(s) pressed, avoid obstacle.
    if(wR == 0)                                 // Just right whisker
    {
      drive_speed(-100, -100);                  // Back up 0.5 seconds
      pause(500);
      drive_speed(-100, 100);                   // Turn left 0.22 seconds
      pause(220);
    }
    else if(wL == 0)                            // Just left whisker
    {
      drive_speed(-100, -100);                  // Back up 0.5 seconds
      pause(500);
      drive_speed(100, -100);                   // Turn right 0.22 seconds
      pause(220);
    }
  }
}
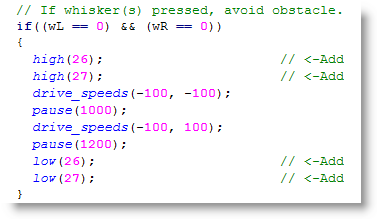
Try This
It’s nice to have the lights turn on to indicate which whisker the robot is avoiding. Here is a modified code block for the if… statement that makes the LEDs light up for the whiskers that have been pressed.
- Use Save Project As to give your project a new name.
- Update the if… condition code block as shown, and reload the program.
- See if you can press both whiskers at exactly the same time to make both of the LEDs light up.
Your Turn
- Modify the program so that it detects if both whiskers are pressed, and turns further. For this you will need to add a 30 ms pause between each while loop repetition, change the if condition to else if, and precede it with an if condition that check whether both whiskers are pressed.