Using the Measurements
Making the Measurements Useful
For ActivityBot navigation, the raw sensor values don’t matter directly. What matters is the difference between the light levels detected by each sensor, so the the ActivityBot can turn to the side of the one sensing brighter light. It is also nice to have values that will fall into a predictable range that can integrate easily with code to drive the servo motors.
Accomplishing this is surprisingly simple. First, just divide one sensor measurement into the sum of both. The result will always be in the 0 to 1 range. This technique is an example of a normalized differential measurement. Here’s what it looks like as an equation:

Two more simple operations will make the result easier to use. First, multiplying the result by 200 will make the result a whole number. Second, subtracting 100 from that whole number will always return values from -100 to 100. If the phototransistors sense the same level of light, regardless of how bright or dim, the final whole number will be zero. This is an example of a zero-justfied normalized differential measurement, let’s call it “ndiff” for short. Now our equation looks like this:

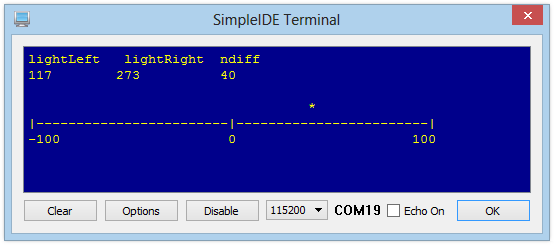
The example code below will display the lightRight and lightLeft measurements, and also show the value of ndiff as an asterisk over a number line. This makes it easier to visualize how the ActivityBot navigation program uses the sensor values to aim for a new trajectory towards the brighter light.
Graphical Test Code
- Click SimpleIDE’s Open Project button.
- Open Test Light Sensors Graphical.side from …Documents\SimpleIDE\Learn\Examples\Robots\ActivityBot.
- Click the Run with Terminal button.
- Rotate the ActivityBot towards and away from a light source to see the position of the asterisk change.
Display Troubles?
If you have resized your SimpleIDE Terminal window smaller than this example program needs it to be, you will likely get garbled results. Just resize the terminal wider and then click Run with Terminal again.
How it Works
It’s a long read, but an interesting one if you want to understand how the graphical display was generated using print statements with the simpletools library.
This program builds on Test Light Sensors. Two more variables are declared in addition to lightLeft and lightRight; ndiff holds the result of the fancy-named equation, and position will be used to place the asterisk in the SimpleIDE terminal.
Inside main, a set of three print statements define the display layout for the SimpleIDE Terminal.
The first print displays the value of the variables listed, and the \n (new line) formatters make three blank lines to make room for the asterisk that will display over the number line.
The second print displays the number line, followed by a \n formatter.
The third print displays the labels for the number line, followed by a \n formatter.
Then, a char array named s is declared and initialized with 51 space characters, which will be used to position the asterisk over the number line.
Next, the code enters a while(1) loop. The next 8 lines, which obtain the raw phototransistor measurements, should be familiar by now.
The next line beginning with ndiff is the same as the ndiff equation shown above.
The three print statements below the ndiff expression (1) position the cursor, (2) display the updated decimal values of lightRight, lightLeft, and ndiff, and clear out any characters left from last time, and (3) move the cursor to the line the asterisk will use.
Next, position = (ndiff + 100) / 4; offsets ndiff with +100 to ensure it is a positive number, and then scales it with /4 to fit the scale of the number line. The result is a number that is useful for positioning an asterisk in the SimpleIDE Terminal, and it is assigned to the position variable.
This is how the asterisk gets placed: s[position] = ‘*’; redefines the “position-th” element in the s array to be an asterisk instead of a space. Then, the asterisk is displayed in the proper position with print(s); which displays all of the elements in the s array – a series of spaces with just one asterisk.
Immediately, s[position] = ‘ ‘; redefines the “position-th” element to be an empty space again, so the asterisk can be re-positioned on the next run through the loop. Without this line, the display would start accumulating asterisks.
The loop finishes up with pause(350); before repeating. If you read this far, thank you for your perseverance!
/*
  Test Light Sensors Graphical.c
*/

#include "simpletools.h"


int lightLeft, lightRight, ndiff, position;

int main()
{
  print("lightLeft   lightRight  ndiff\n\n\n\n");
  print("|------------------------|------------------------|\n");
  print("-100                     0                      100\n");
  char s[51] = {"                                                   "};

  while(1)
  {
    high(9);
    pause(1);
    lightLeft = rc_time(9, 1);

    high(5);
    pause(1);
    lightRight = rc_time(5, 1);

    ndiff = 200 * lightRight / (lightRight + lightLeft) - 100;

    print("%c%c", HOME, CRSRDN);
    print("%d        %d          %d", lightLeft, lightRight, ndiff);
    print("%c%c%c", CLREOL, CRSRDN, CR);

    position = (ndiff + 100) / 4;
    s[position] = '*';
    print(s);
    s[position] = ' ';

    pause(350);
  }
}
Did You Know?
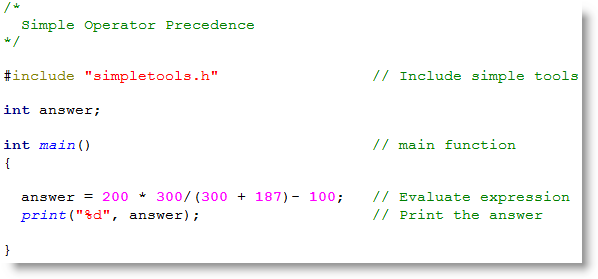
Parentheses Matter. In C language mathematical expressions, like the one in this example program, multiplication and division operations are performed before addition and subtraction. However, surrounding an operation with parentheses causes it to be evaluated first, working from innermost operation on out in the case of nested parentheses. These rules are part of a larger ruleset called operator precedence; each programming language has its own operator precedence ruleset.
Try This
To see what difference a set of parentheses makes, create this small project that uses the same mathematical expression as the program above.
- Close the Test Light Sensor Graphical project.
- Click New Project, name it something like Simple Operator Precedence, and save it to …\SimpleIDE\My Projects.
- Enter the code shown below, click Run with Terminal, and make note of the answer displayed.
- Add parentheses around the numerator, like this: (200 * 300)
- Re-run the program. Did that change the answer?
- Now, try removing the parentheses around 300 + 187, and re-run the program. What is the answer now?
- Put the parentheses back in to the above statement, and then put a second set around the whole denominator, like this: ((300 + 187) – 100)
- Re-run the program a final time. What is the answer now?
Are you convinced that parentheses make a difference yet?
Your Turn
- Look up Operator Precedence in a C reference guide.