More Data Types and Devices
Now that we have done some basic communication with simple byte data and one I2C device, let’s expand on that. First, let’s modify the original code to work with other data types besides bytes. Then, if you are interested in going a bit further, the Advanced Topic section will show you a method you could use to put two additional EEPROM DIP chips (plugged into your breadboard) on a second I2C bus.
Try This – Data Types
Data is written to and read from I2C devices in the form of one or more eight-bit bytes. In many cases the data written to an I2C chip originated as a different data type, like maybe a 32-bit int or even a float.
Likewise, data bytes read from I2C chips may need to be reassembled back into the data those bytes actually represent. For example, a sensor might be returning a signed 16-bit short value with two bytes, or an EEPROM or other memory device might be storing and returning ints, floats, or some other type.
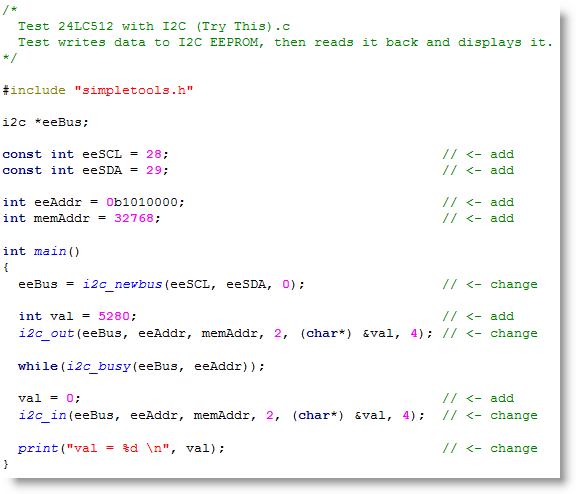
So, here is an example that shows how an int variable can be converted to bytes, stored in EEPROM, retrieved from EEPROM, and reassembled back into an int value. It does this process with the number 5280, stored in an int variable.
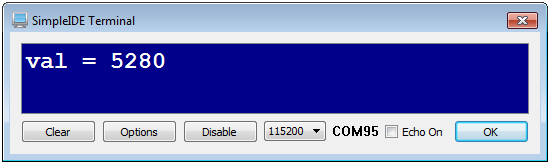
Along with storing and retrieving an int value, this program gives names to some of the constant values from the previous example. The main trick for the variable-to-bytes conversion is to pass the address of the variable in question, cast as a char pointer, and make sure to specify the correct number of bytes for the data type.
So, this program starts with int val = 5280. Notice how i2c_out(eeBus, eeAddr, memAddr, 2, (char*) &val, 4) uses (char*) &val to cast the address of the val int variable as a pointer to a character variable. The dataCount parameter following it is also set to 4, since an int variable has four bytes. The reverse of this process is accomplished with i2c_in(eeBus, eeAddr, memAddr, 2, (char*) &val, 4).
- Use the Save Project As button to save a copy of your project in …DocumentsSimpleIDEMy Projects.
- Modify the main function as shown below.
- Use Run with Terminal to verify the output.
Advanced Topic: Adding a Second I2C Bus
This is meant to be a theoretical exercise, not a hands-on activity. If you have the two additional EEPROMs required for this example and wish to try adding a second bus to your board, then the information provided here can be used as a guide.
Below is an example of an I2C bus you could add to your Activity Board’s breadboard (original or WX version). It has two more I2C EEPROMs just like the one on the Activity Board’s P28/P29 bus.
Please Note: The top 24LC512 shown in the schematic has its A0, A1 and A2 pins set the same as the one on P28 and P29. But keep in mind, it’s on a completely different bus, so it’s okay for it to have the same address. Since the bottom 24LC512 is on the same bus, it has to have a different address.
Additional Parts
(2) 24LC512 EEPROM

It’s easy to expand your program in order to communicate with all three EEPROMs; these two and the one built into your Propeller board. The steps are pretty much the same:
- Declare a second bus.
i2c *eeBus2;
- Intialize a second bus.
eeBus2 = i2c_newbus(7, 6, 0);
- Communicate with devices on the second bus.
// Write to upper EEPROM on second bus

i2c_out(eeBus2, 0b1010000, cmd, 2, "mnop", 5);

// Write to lower EEPROM on second bus

i2c_out(eeBus2, 0b1010001, cmd, 2, "qrstuvw", 8);

...