Array Variables
A variable array is a group of variables stored under the same name but with different index values. In the array declaration and initialization example below, you can think of the index value as the position of a specific variable in the list.
int p[] = {1, 2, 3, 5, 7, 11};
Each array element has a name (which is p in this example, the same as the array name) and an index (between brackets) that makes it possible to select an element.
This declaration sets aside six variables, each storing a prime number. This array has been initialized so that the p[0] array element stores 1. Likewise, the p[1] element stores 2. It continues for the rest of the array elements: p[2] stores 3, p[3] stores 5, p[4] stores 7, and p[5] stores 11.
- Use the Open Project button to open Array Variables.side.
- Examine the code and try to predict what the SimpleIDE Terminal will display.
- Set the power switch to position 1 if it isn’t already (if applicable for your board).
- Use the Run Project with Terminal button to display the programs outputs, and compare the actual results against your predicted results.
/*
  Array Variables.c

  Declare and initialize an array and display a couple of its elements.
*/

#include "simpletools.h"                      // Include simpletools

int main()                                    // main function
{
  int p[] = {1, 2, 3, 5, 7, 11};              // Initialize the array
  print("p[0] = %d\n", p[0]);                 // Display what p[0] stores
  print("p[3] = %d\n", p[3]);                 // Display what p[3] stores
}
How it Works
int p[] = {1, 2, 3, 5, 7, 11} initializes an array named p with a list of numbers between braces { }. Keep in mind that p[0] stores 1, p[1] stores 2, p[2] stores 3, p[3] stores 5, and so on. So, print(“p[0] = %d\n”, p[0]) displays the contents of p[0], which is 1. Likewise, print(“p[3] = %d\n”, p[3]) displays the contents of p[3], which is 5.
Did You Know?
- You can declare an array with six elements, but without initializing the values, like this: int p[6];
- You can assign and re-assign values to array elements at various points in your program like this: p[4] = 7;
Try This
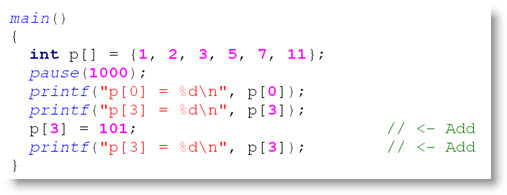
Here is an example that shows how the value of an array element can be reassigned. Take a look at the second to last statement in the main function. It’s p[3] = 101. After that, print(“p[3] = %d\n”, p[3]) will allow you to verify that the new value p[3] stores is 101.
- Click the Save Project As button and save your project as Array Variable Reassignment.
- Modify the program using the example below. (Just add the last two lines.)
- Click the Run Project with Terminal button, and verify that the program starts with p[3] being 5, and that it reassigns it to 101.
Your Turn
- Expand Array Variable Reassignment.c by adding commands to the end of the program that puts 11 in p[0], 7 in p[1], 5 in p[2], 3 in p[3], 2 in p[4], and 1 in p[5].
- Expand your program further so that it displays the values after they have been updated.