Skip to content
Parallax Learn

Parallax Learn

  • Welcome
  • Tutorials
        • Tutorial Series head tag

          Tutorial Series
        • Tutorial Series

          The special, classroom-ready series pages are organized collections of tutorials for our most popular hardware and/or languages. The tutorials for each topic are conveniently accessible from a single page, shown in the order it is recommended that they be completed.
        • Robotics Series Head tag

          Robotics Series
        • Robotics Series

          • Artificial Intelligence
          • Cybersecurity: Radio Data tutorialCybersecurity
          • cyber:bot + Python
          • cyber:bot + MakeCode
          • Boe-Bot Tutorial SeriesBoe-Bot
          • Arduino Shield-Bot
          • ActivityBot with C TutorialsActivityBot + C
          • ActivityBot with BlocklyProp Tutorial SeriesActivityBot + BlocklyProp
          • Scribbler 3 Tutorial SeriesScribbler 3
        • Electronics & Programming Series Head tag

          Electronics & Programming Series
          • BS2 Board of Education Tutorial SeriesBS2 Board of Education
          • Propeller C-Language BasicsPropeller C Basics
          • FLiP Try-It Kit C Tutorial SeriesFLiP Try-It Kit + C
          • FLiP Try-It Kit BlocklyProp TutorialsFLiP Try-It Kit + BlocklyProp
          • Badge WX Tutorial SeriesBadge WX
          • Propeller BlocklyProp Basics and ProjectsPropeller BlocklyProp Basics
          • View All Tutorial Series »
        • Browse Tutorials
        • Browse Tutorials

          Individual tutorials sorted by robot or kit, and language.
        • By Robot or Kit
          • ActivityBot
          • SumoBot WX
          • Boe-Bot
          • Shield-Bot
          • cyber:bot
          • Badge WX
          • ELEV-8
          • ARLO
        • By Language
        • By Language

          • Propeller C
          • Arduino
          • BlocklyProp
          • PBASIC
          • Python
          • MakeCode
          • View All Tutorials »
  • Educators
  • Reference
  • Downloads
  • Home
  • All Courses
  • QTI Line Following ActivityBot with BlocklyProp

QTI Line Following ActivityBot with BlocklyProp

Build the QTI Line Follower

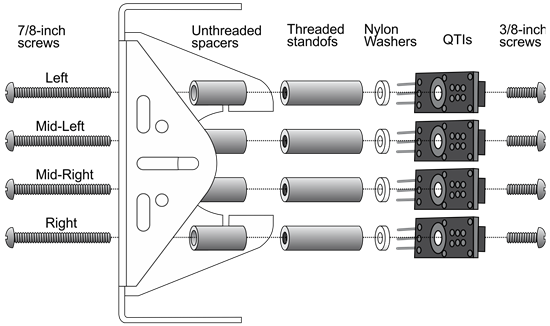
Each QTI sensor is connected to a post that is mounted on the underside of the chassis.  This positions the sensors right above the ground surface.

  • Assemble the QTI sensors and mount them to the underside of the ActivityBot chassis:
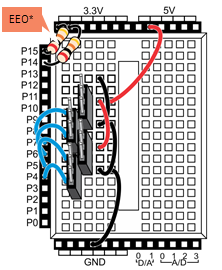
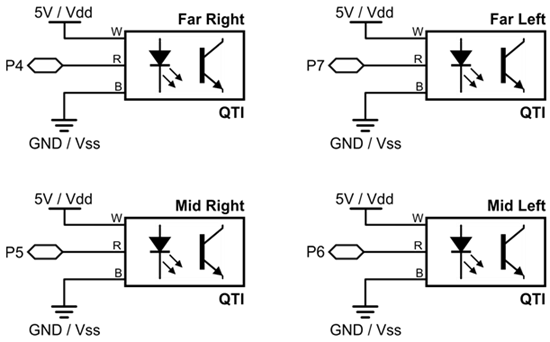
Each QTI sensor needs to connect to to 5 V power, a Propeller I/O pin, and ground. For this, you will use the four 3-pin headers from the kit to build ports on the breadboard for each sensor.

  • Build the header circuits as shown in the schematic and wiring diagram below. The 3-pin headers and jumper wires are in your QTI Line Follower kit.
  • Remember, DON’T use the 20 k-ohm resistors on P14 and P15 with the AB360°; they are for ActivityBot robots with External Encoders Only (EEO!).
  • Plug a 3-pin extension cable into each QTI sensor.  Match the color of the wires to the B R W (black, red, white) labels on the sensor.
  • Connect the extension cable from each QTI sensor and to its header circuit on the breadboard. Match the color of the wires to the diagram below.   Take your time!
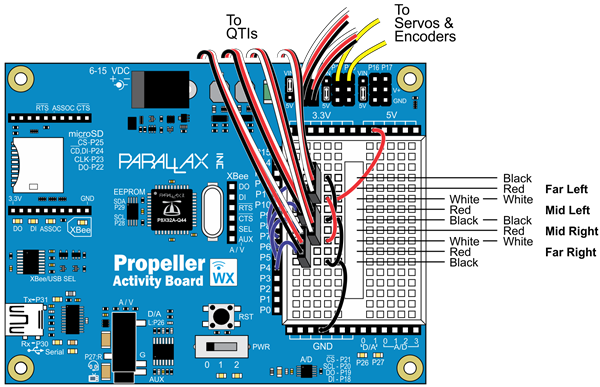
Once you have made all the connections, it is time to test them before trying line-following.


Printer-friendly version
Test the QTI Sensors
Next

DISCUSSION FORUMS | PARALLAX INC. STORE

About | Terms of Use | Feedback: learn@parallax.com | Copyright©Parallax Inc. 2024

© 2025 Parallax Learn • Built with GeneratePress