Infrared Light Signals
Infrared is abbreviated IR, and it is light the human eye cannot detect. The IR LEDs introduced in this chapter emit infrared light, just like the red LEDs we’ve been using emit visible light, but at a different wavelength.
The infrared receivers in this chapter detect infrared light, similar to the phototransistors in the tutorial Visible Light Navigation for the cyber:bot. But, there’s a difference—these infrared receivers are not just detecting ambient light, they are designed to detect infrared light flashing on and off very quickly.
The infrared LED that the cyber:bot will use as a tiny headlight is actually the same one you can find in just about any TV remote. The TV remote flashes the IR LED to send messages to your TV. The microcontroller in your TV picks up those messages with an infrared receiver like the one your cyber:bot will use.
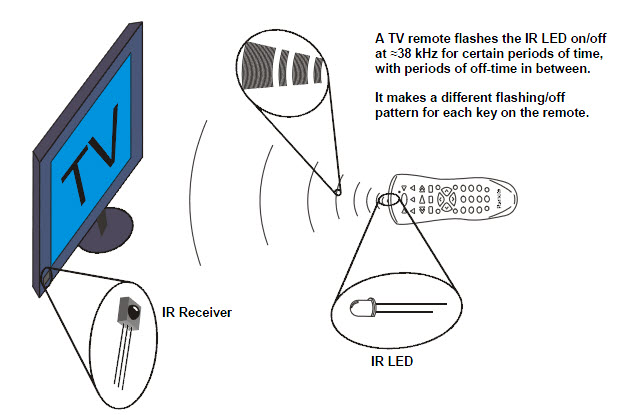
The TV remote sends messages by flashing the IR LED very fast, at a rate of about 38 kHz (about 38,000 times per second). The IR receiver only responds to infrared if it’s flashing at this rate. This prevents infrared from sources like the sun and incandescent lights from being misinterpreted as messages from the remote. So, to send signals that the IR receiver can detect, your Propeller chip will have to flash the IR LED on/off at 38 kHz.
Some fluorescent lights do generate signals that can be detected by the IR receivers.
These lights can cause problems for your cyber:bot’s infrared headlights. One of the things you will do in this chapter is develop an infrared interference “sniffer” that you can use to test the fluorescent lights near your cyber:bot courses.
The light sensors inside most digital cameras, including cell phones and webcams, can all detect infrared light. By looking through a digital camera, we can “see” if an infrared LED is on or off. These photos show an example with a digital camera and a TV remote. When you press and hold a button on the remote and point the IR LED into the digital camera’s lens, it displays the infrared LED as a flashing, bright white light.
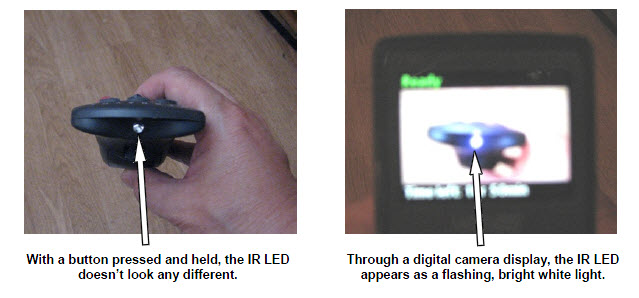
The pixel sensors inside the digital camera detect red, green, and blue light levels, and the processor adds up those levels to determine each pixel’s color and brightness. Regardless of whether a pixel sensor detects red, green, or blue, it detects infrared. Since all three pixel color sensors also detect infrared, the digital camera display mixes all the colors together, which results in white.
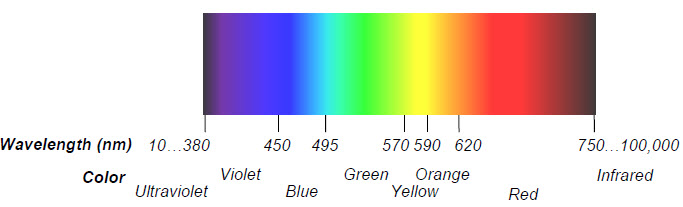
Infra means below, so infrared means below red.
The name refers to the fact that the frequency of infrared light waves is less than the frequency of red light waves. The wavelength our IR LED transmits is 980 nanometers (abbreviated nm), and that’s the same wavelength our IR receiver detects. This wavelength is in the near-infrared range. The far-infrared range is 2000 to 10,000 nm, and certain wavelengths in this range are used for night-vision goggles and IR temperature sensing.