Skip to content
Parallax Learn

Parallax Learn

  • Welcome
  • Tutorials
        • Tutorial Series head tag

          Tutorial Series
        • Tutorial Series

          The special, classroom-ready series pages are organized collections of tutorials for our most popular hardware and/or languages. The tutorials for each topic are conveniently accessible from a single page, shown in the order it is recommended that they be completed.
        • Robotics Series Head tag

          Robotics Series
        • Robotics Series

          • Artificial Intelligence
          • Cybersecurity: Radio Data tutorialCybersecurity
          • cyber:bot + Python
          • cyber:bot + MakeCode
          • Boe-Bot Tutorial SeriesBoe-Bot
          • Arduino Shield-Bot
          • ActivityBot with C TutorialsActivityBot + C
          • ActivityBot with BlocklyProp Tutorial SeriesActivityBot + BlocklyProp
          • Scribbler 3 Tutorial SeriesScribbler 3
        • Electronics & Programming Series Head tag

          Electronics & Programming Series
          • BS2 Board of Education Tutorial SeriesBS2 Board of Education
          • Propeller C-Language BasicsPropeller C Basics
          • FLiP Try-It Kit C Tutorial SeriesFLiP Try-It Kit + C
          • FLiP Try-It Kit BlocklyProp TutorialsFLiP Try-It Kit + BlocklyProp
          • Badge WX Tutorial SeriesBadge WX
          • Propeller BlocklyProp Basics and ProjectsPropeller BlocklyProp Basics
          • View All Tutorial Series »
        • Browse Tutorials
        • Browse Tutorials

          Individual tutorials sorted by robot or kit, and language.
        • By Robot or Kit
          • ActivityBot
          • SumoBot WX
          • Boe-Bot
          • Shield-Bot
          • cyber:bot
          • Badge WX
          • ELEV-8
          • ARLO
        • By Language
        • By Language

          • Propeller C
          • Arduino
          • BlocklyProp
          • PBASIC
          • Python
          • MakeCode
          • View All Tutorials »
  • Educators
  • Reference
  • Downloads
  • Home
  • All Courses
  • Robotics with the Board of Education Shield for Arduino

Robotics with the Board of Education Shield for Arduino

Ohm’s Law

Ohm’s Law

Ohm’s law is a mainstay in calculations related to circuits.  It doesn’t matter whether the circuit is simple or complex, nor does it matter whether the device is small and battery powered, or large and part of the national power grid. Engineers and technicians often end up using Ohm’s law equations to understand what is happening—or what is supposed to happen—in the circuit.

The Ohm’s law equations relate voltage, current and resistance.  It’s really just a single equation that can be rearranged one of three ways depending on what unknown you need to solve for:


In this activity, you will:

  • Calculate and write scripts for all three versions of the Ohm’s law equations.  
  • Save time and effort by solving for one quantity with others that are known or measured.
  • Observe it is used to design features into products/projects in the Calculate Resistance to Get the Most Current section.

In this activity, you won’t:

  • need to build or probe a circuit!

Calculate Current from Measured Voltage and Resistance

One application of Ohm’s law is calculating current through a resistor from measured voltage.  That way, you won’t have to worry about changing the circuit to measure current.  Just probe a resistor’s leads for the voltage across it, and then use I = V / R to calculate the current through it.  

Take a look at the resistor probed in the circuit below. From previous activities, you know the resistance is 220 Ω and the voltage is 1.20 V.

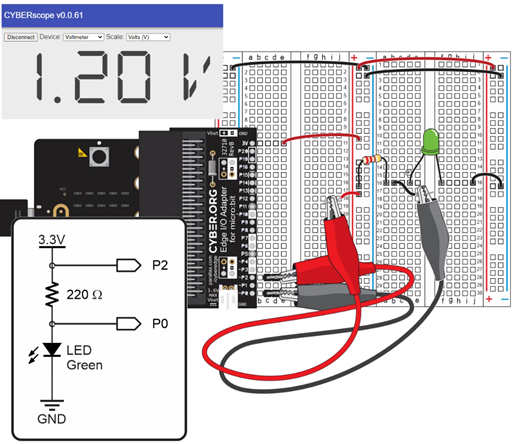
Instead of connecting the circuit to an ammeter, you can just use I = V / R to calculate the current through the circuit since you know that the resistance is 220 Ω and the voltage is 1.20 V.  Here’s the calculation:

I = V / R
  = 1.20 V / 220 Ω
  = 0.0054545… A
  ≈ 5.46 mA

You can also use Ohm’s law to calculate the smallest resistor to safely use with an LED circuit.  Why do that?  To get maximum brightness!  The LEDs in your kit are rated for up to 20 mA.


Printer-friendly version

DISCUSSION FORUMS | PARALLAX INC. STORE

About | Terms of Use | Feedback: learn@parallax.com | Copyright©Parallax Inc. 2024

© 2025 Parallax Learn • Built with GeneratePress