Using Array Elements
Using Array Elements
An array element doesn’t necessarily need to be copied to another variable to use its value. For example, your sketch could just print the value in note[3] to the Serial Monitor like this:
Serial.print(note[3]);
Since the values in the array are musical notes, we might as well play this note on the BOE Shield-Bot’s piezospeaker! Here’s how:
tone(4, note[3], 500);
Example Sketch – PlayOneNote
Here is an example that displays an individual array element’s value in the Serial Monitor, and also uses that value to make the BOE Shield-Bot’s piezospeaker play a musical note.
- Enter, save, and upload PlayOneNote to the Arduino.
- Open the Serial Monitor as soon as the sketch is done uploading.
- Verify that the Serial Monitor displays “note = 1397”.
- Verify that the speaker played a tone.
- Modify the sketch to play and print the value of 1568 using note[4].
- Test your modified sketch.
// Robotics with the BOE Shield – PlayOneNote
// Displays and plays one element from note array.

int note[] = {1047, 1147, 1319, 1397, 1568, 1760, 1976, 2093};

void setup()
{
  Serial.begin(9600);

  Serial.print("note = ");
  Serial.println(note[3]);

  tone(4, note[3], 500);
  delay(750);
}

void loop()
{
}
Example Sketch – PlayNotesWithLoop
Many applications use variables to access elements in an array. The next sketch PlayAnotherNote declares a variable named index and uses it to select an array element by its index number.
The familiar for loop can automatically increment the value of index. The code to play and display notes is inside the for loop, and index is used to select the array element. For the first trip through the loop, index will be 0, so the value stored in note[0] will be used wherever note[index] appears in a print or tone function. With each trip through the loop, index will increment until the sketch has displayed and played all the notes in the array.
- Enter, save, and upload PlayNotesWithLoop.
- Open the Serial Monitor as soon as the sketch is done uploading.
- Verify that the Serial Monitor displays each note in the array as the speaker plays it.
// Robotics with the BOE Shield – PlayNotesWithLoop
// Displays and plays another element from note array.

int note[] = {1047, 1147, 1319, 1397, 1568, 1760, 1976, 2093};

void setup()
{

  Serial.begin(9600);

  for(int index = 0; index < 8; index++)
  {
    Serial.print("index = ");
    Serial.println(index);

    Serial.print("note[index] = ");
    Serial.println(note[index]);

    tone(4, note[index], 500);
    delay(750);
  }
}

void loop()
{
}
- What do you think will happen if you change the for loop to match the one below? Try it!
for(int index = 7; index >= 0; index--);
Using the sizeof Function
Let’s say you want to compose a musical melody that has more, or fewer, notes. It’s easy to forget to update the for loop to play the correct number of notes. The Arduino library has a sizeof function that can help with this. It can tell you both the size of the array in bytes, and the size of the array’s variable type (like int). Your code can then divide the number of bytes for the variable type into the number of bytes in the array. The result is the number of elements in the array.
Here is an example of using this technique. It loads a variable named elementCount with the number of elements in the note array:
int note[] = {1047, 1147, 1319, 1397, 1568, 1760, 1976, 2093};
int elementCount = sizeof(note) / sizeof(int);
Later, your for loop can use the elementCount variable to play all the notes in the array, even if you add or delete elements:
for(int index = 0; index < elementCount; index++)
- Enter, save, and upload PlayAllNotesInArray.
- Open the Serial Monitor as soon as the sketch is done uploading.
- Verify again that the Serial Monitor displays each note in the array as the speaker plays it.
// Robotics with the BOE Shield – PlayAllNotesInArray
// Uses sizeof to determine number of elements int he array
// and then displays and prints each note value in the sequence.

int note[] = {1047, 1147, 1319, 1397, 1568, 1760, 1976, 2093};

void setup()
{
  Serial.begin(9600);

  int elementCount = sizeof(note) / sizeof(int);

  Serial.print("Number of elements in array = ");
  Serial.println(elementCount);

  for(int index = 0; index < elementCount; index++)
  {
    Serial.print("index = ");
    Serial.println(index);

    Serial.print("note[index] = ");
    Serial.println(note[index]);

    tone(4, note[index], 500);
    delay(750);
  }
}

void loop()
{
}
Your Turn – Add Notes
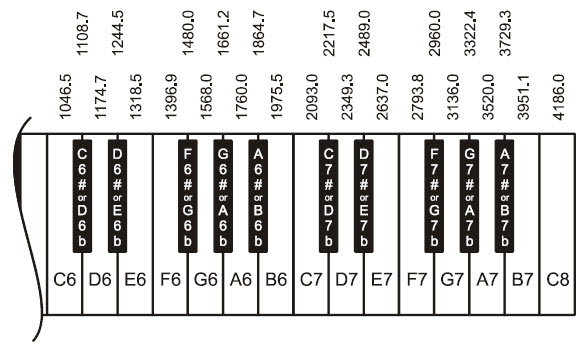
- Try adding the next two notes, D7 and E7, using the frequencies (rounded down) from the keyboard diagram. Your array can use more than one line, like this:
  int note[] = {1047, 1147, 1319, 1397, 1568, 1760,
                1976, 2093, 2349, 2637};
- If you are musically inclined, try writing an array that will play a very short tune.