Skip to content
Parallax Learn

Parallax Learn

  • Welcome
  • Tutorials
        • Tutorial Series head tag

          Tutorial Series
        • Tutorial Series

          The special, classroom-ready series pages are organized collections of tutorials for our most popular hardware and/or languages. The tutorials for each topic are conveniently accessible from a single page, shown in the order it is recommended that they be completed.
        • Robotics Series Head tag

          Robotics Series
        • Robotics Series

          • Artificial Intelligence
          • Cybersecurity: Radio Data tutorialCybersecurity
          • cyber:bot + Python
          • cyber:bot + MakeCode
          • Boe-Bot Tutorial SeriesBoe-Bot
          • Arduino Shield-Bot
          • ActivityBot with C TutorialsActivityBot + C
          • ActivityBot with BlocklyProp Tutorial SeriesActivityBot + BlocklyProp
          • Scribbler 3 Tutorial SeriesScribbler 3
        • Electronics & Programming Series Head tag

          Electronics & Programming Series
          • BS2 Board of Education Tutorial SeriesBS2 Board of Education
          • Propeller C-Language BasicsPropeller C Basics
          • FLiP Try-It Kit C Tutorial SeriesFLiP Try-It Kit + C
          • FLiP Try-It Kit BlocklyProp TutorialsFLiP Try-It Kit + BlocklyProp
          • Badge WX Tutorial SeriesBadge WX
          • Propeller BlocklyProp Basics and ProjectsPropeller BlocklyProp Basics
          • View All Tutorial Series »
        • Browse Tutorials
        • Browse Tutorials

          Individual tutorials sorted by robot or kit, and language.
        • By Robot or Kit
          • ActivityBot
          • SumoBot WX
          • Boe-Bot
          • Shield-Bot
          • cyber:bot
          • Badge WX
          • ELEV-8
          • ARLO
        • By Language
        • By Language

          • Propeller C
          • Arduino
          • BlocklyProp
          • PBASIC
          • Python
          • MakeCode
          • View All Tutorials »
  • Educators
  • Reference
  • Downloads
  • Home
  • All Courses

Running Lights for your ELEV-8 v3

Curriculum

  • 1 Section
  • 10 Lessons
  • Lifetime
Expand all sectionsCollapse all sections
  • Running Lights for your ELEV-8 v3
    10
    • 1.0
      Running Lights – Materials
    • 1.1
      Solder the Surface Mount Parts
    • 1.2
      Solder the Through-Hole Parts
    • 1.3
      Test the Running Lights
    • 1.4
      Edit the FC Firmware for LEDs
    • 1.5
      Install the Running Lights
    • 1.6
      Saftey Test After Customizing
    • 1.7
      Install the Cables
    • 1.8
      Understand and Expand the Running Light Modes
    • 1.9
      Using the Running Lights

Test the Running Lights

Now you are ready to test your running lights.

Make sure that your work surface is clear of any metal including wire, tools, or hardware.  The Power Distribution Board, Running Light PCBs and Flight Controller all have exposed electrical connections that can easily short across exposed metal surfaces or objects.

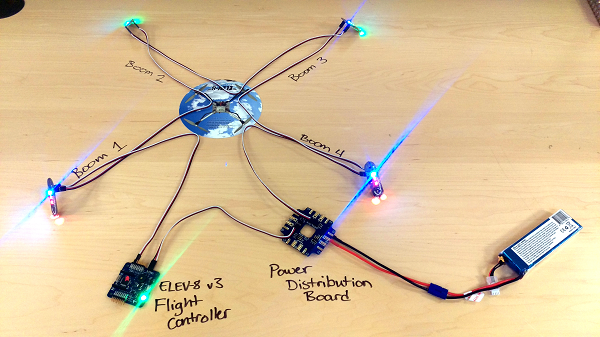
  • Plug a 16″ 3-pin cable into the RGB port on the flight controller with the white wire up.
  • Plug the other end of the cable into the header marked “IN  RED  BLK” on the number 1 running light PCB, matching the colors on the wires to the labels on the board.
  • Plug a 24″ 3-pin cable into the header marked “OUT  RED  BLK” on the number 1 running light PCB, matching the colors on the wires to the labels on the board.
  • Plug the other end of the cable into the header marked “IN  RED  BLK” on the number 2 running light PCB, matching the colors on the wires to the labels on the board.
  • Plug a 24″ 3-pin cable into the header marked “OUT  RED  BLK” on the number 2 running light PCB, matching the colors on the wires to the labels on the board.
  • Plug the other end of the cable into the header marked “IN  RED  BLK” on the number 3 running light PCB, matching the colors on the wires to the labels on the board.
  • Plug a 24″ 3-pin cable into the header marked “OUT  RED  BLK” on the number 3 running light PCB, matching the colors on the wires to the labels on the board.
  • Plug the other end of the cable into the header marked “IN  RED  BLK” on the number 4 running light PCB, matching the colors on the wires to the labels on the board.
  • Plug a 16″ 3-pin cable into the header marked “OUT  RED  BLK” on the number 4 running light PCB, matching the colors on the wires to the labels on the board.
  • Plug the other end of the cable into one of the 3 pin headers on the ELEV-8 v3 Power Distribution Board.

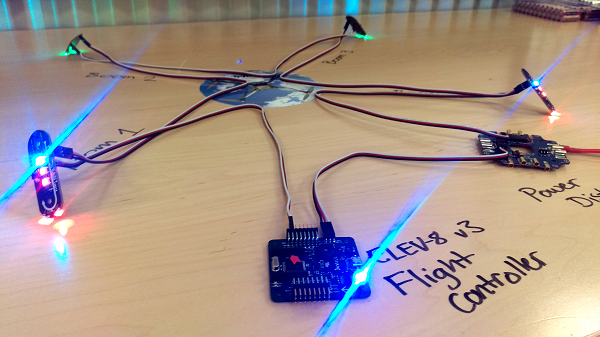
Double check all of your connections, making sure that the correct PCBs are in the order shown.  Connecting the running light PCBs incorrectly can permanently damage the running lights and your Flight Controller!

  • Connect a battery to the ELEV-8 v3 Power Distribution Board.

Your running lights should all be glowing:


Printer-friendly version
Solder the Through-Hole Parts
Prev
Edit the FC Firmware for LEDs
Next

DISCUSSION FORUMS | PARALLAX INC. STORE

About | Terms of Use | Feedback: learn@parallax.com | Copyright©Parallax Inc. 2024

© 2026 Parallax Learn • Built with GeneratePress