Input Register and Decisions
Did You Know? Input Registers
A light that a microcontroller turns on and off can be considered a binary (2-state) output circuit. Likewise, a pushbutton circuit can be considered a binary input circuit. The microcontroller monitors the pushbutton circuit to find out which of two states the button is in: pressed or not pressed. The microcontroller does this by monitoring the voltage that changes at a certain point in the circuit in response to the pushbutton being pressed.
A pin.read_digital() call sets a micro:bit I/O pin to input. As an input, an I/O pin monitors the voltage of a circuit that’s connected to it without affecting the circuit. The circuit behaves the same regardless of whether the I/O pin is connected or not.
Inside the micro:bit’s microcontroller, there is memory—like a variable—called an input register that stores the voltages measured by I/O pins as 1s and 0s. Each memory element that stores a 1 or 0 is called a bit. Likewise, a register bit refers to each memory element that stores a 1 or 0 to indicate the voltage applied to an I/O pin set to input.
When an I/O pin input register bit stores a 1, it means the pin detected a voltage that was above 2.3 V. If it instead stores a 0, it means the voltage was below 1 V. If the voltage is in the 1 to 2.3V range, the register just keeps the most recent measurement that was above 2.3 V or below 1 V. The pin6.digital_read() method returns that binary value (1 or 0) that the P6 input register bit stores.
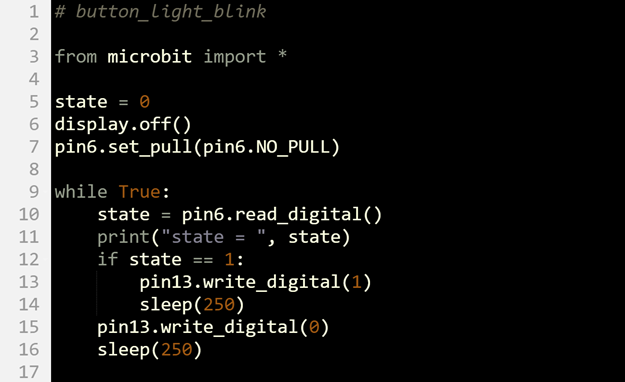
Your Turn: button_light_blink
The binary (1 or 0) value returend by the pin6.read_digital() method returns can be used in decision making with if statements. When state is 1 because the button is pressed, code in this example script’s if statement will make the light turn on for 0.25 seconds. After that, the light is turned off for another 0.25 seconds. When state is 0, the statements that turn the light on are skipped, and the while True loop just repeatedly turns the P13 light off. The end result is that the light blinks while the button is pressed and held, and stays off when it is not pressed.
- Set the project name field to button_light_blink.
- Enter the script below into the micro:bit Python Editor, then click Save.
- Click Send to micro:bit.
- Verify that the green light connected to P13 stays off when the button is not pressed.
- Press and hold the button. Verify that the P13 light blinks while the button is held down.