Skip to content
Parallax Learn

Parallax Learn

  • Welcome
  • Tutorials
        • Tutorial Series head tag

          Tutorial Series
        • Tutorial Series

          The special, classroom-ready series pages are organized collections of tutorials for our most popular hardware and/or languages. The tutorials for each topic are conveniently accessible from a single page, shown in the order it is recommended that they be completed.
        • Robotics Series Head tag

          Robotics Series
        • Robotics Series

          • Artificial Intelligence
          • Cybersecurity: Radio Data tutorialCybersecurity
          • cyber:bot + Python
          • cyber:bot + MakeCode
          • Boe-Bot Tutorial SeriesBoe-Bot
          • Arduino Shield-Bot
          • ActivityBot with C TutorialsActivityBot + C
          • ActivityBot with BlocklyProp Tutorial SeriesActivityBot + BlocklyProp
          • Scribbler 3 Tutorial SeriesScribbler 3
        • Electronics & Programming Series Head tag

          Electronics & Programming Series
          • BS2 Board of Education Tutorial SeriesBS2 Board of Education
          • Propeller C-Language BasicsPropeller C Basics
          • FLiP Try-It Kit C Tutorial SeriesFLiP Try-It Kit + C
          • FLiP Try-It Kit BlocklyProp TutorialsFLiP Try-It Kit + BlocklyProp
          • Badge WX Tutorial SeriesBadge WX
          • Propeller BlocklyProp Basics and ProjectsPropeller BlocklyProp Basics
          • View All Tutorial Series »
        • Browse Tutorials
        • Browse Tutorials

          Individual tutorials sorted by robot or kit, and language.
        • By Robot or Kit
          • ActivityBot
          • SumoBot WX
          • Boe-Bot
          • Shield-Bot
          • cyber:bot
          • Badge WX
          • ELEV-8
          • ARLO
        • By Language
        • By Language

          • Propeller C
          • Arduino
          • BlocklyProp
          • PBASIC
          • Python
          • MakeCode
          • View All Tutorials »
  • Educators
  • Reference
  • Downloads
  • Home
  • All Courses
  • Sense Pushbutton Presses

Sense Pushbutton Presses

Inside the Pushbutton

Let’s take a look inside the pushbutton to better understand how and why it changes the circuit when you press it.  In this activity, you will:

  • Measure continuity between various combinations of the pushbutton’s pins while it is pressed and not pressed.
  • Look inside the pushbutton to see how pressing it makes the electrical connections change.
  • Examine the functions of the resistors in the pushbutton circuit.

Parts

In this activity, you will connect new parts, as well as make use of parts from a previous activity.

Parts You Will Connect in This activity:

(1) Resistor – 220 Ω  (red-red-brown-gold)
(1) Resistor – 10 kΩ  (brown-black-orange-gold)
(1) Jumper wire – black
(1) Pushbutton

Setup from Previous Activity:

You will be using the alligator clip leads again in this activity.  The 3 LED circuits are not used in this activity, but will be used again in the next one.

Circuit

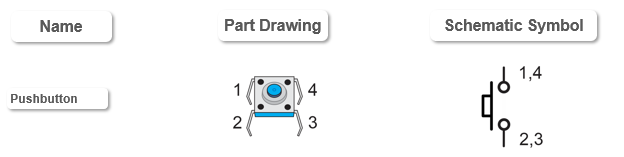
Remember from the Parts list in the Build & Test a Pushbutton activity’s Parts section that it has a pin map with pins 1, 2, 3, and 4?  Since you will be probing various pairs of those pins with the micro:bit continuity tester, here it is again for reference.

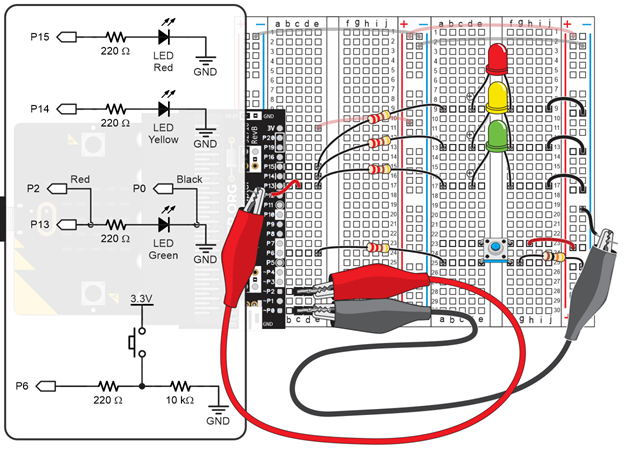
  • Disconnect the USB cable.
  • Add a pushbutton to the breadboard’s right terminal strip.  It’s pins should go into rows 19 and 21.  
  • Like in the previous activity, make sure the:
    • Pushbutton’s pins stick out of the left/right sides of the button body
    • Pushbutton’s pins sink all the way into the sockets
    • Pushbutton bridges the valley that runs down the middle of the right terminal strip
  • Connect the red alligator clip lead from the 3-pin header at P2 to the same row as the pushbutton’s pin 4.  As shown, it’s connected to (j, 19), but any unoccupied socket in that row-of-five would be fine.
  • Connect the black alligator clip lead from the 3-pin header at P0 to the same row as the pushbutton’s pin 3.  As shown, it’s connected to (j, 21), but again, any unoccupied socket in that row-of-five would be fine.
  • Reconnect the USB cable.


Printer-friendly version
Solutions
Prev
Script and Tests
Next

DISCUSSION FORUMS | PARALLAX INC. STORE

About | Terms of Use | Feedback: learn@parallax.com | Copyright©Parallax Inc. 2024

© 2025 Parallax Learn • Built with GeneratePress