Skip to content
Parallax Learn

Parallax Learn

  • Welcome
  • Tutorials
        • Tutorial Series head tag

          Tutorial Series
        • Tutorial Series

          The special, classroom-ready series pages are organized collections of tutorials for our most popular hardware and/or languages. The tutorials for each topic are conveniently accessible from a single page, shown in the order it is recommended that they be completed.
        • Robotics Series Head tag

          Robotics Series
        • Robotics Series

          • Artificial Intelligence
          • Cybersecurity: Radio Data tutorialCybersecurity
          • cyber:bot + Python
          • cyber:bot + MakeCode
          • Boe-Bot Tutorial SeriesBoe-Bot
          • Arduino Shield-Bot
          • ActivityBot with C TutorialsActivityBot + C
          • ActivityBot with BlocklyProp Tutorial SeriesActivityBot + BlocklyProp
          • Scribbler 3 Tutorial SeriesScribbler 3
        • Electronics & Programming Series Head tag

          Electronics & Programming Series
          • BS2 Board of Education Tutorial SeriesBS2 Board of Education
          • Propeller C-Language BasicsPropeller C Basics
          • FLiP Try-It Kit C Tutorial SeriesFLiP Try-It Kit + C
          • FLiP Try-It Kit BlocklyProp TutorialsFLiP Try-It Kit + BlocklyProp
          • Badge WX Tutorial SeriesBadge WX
          • Propeller BlocklyProp Basics and ProjectsPropeller BlocklyProp Basics
          • View All Tutorial Series »
        • Browse Tutorials
        • Browse Tutorials

          Individual tutorials sorted by robot or kit, and language.
        • By Robot or Kit
          • ActivityBot
          • SumoBot WX
          • Boe-Bot
          • Shield-Bot
          • cyber:bot
          • Badge WX
          • ELEV-8
          • ARLO
        • By Language
        • By Language

          • Propeller C
          • Arduino
          • BlocklyProp
          • PBASIC
          • Python
          • MakeCode
          • View All Tutorials »
  • Educators
  • Reference
  • Downloads
  • Home
  • All Courses
  • Sense Pushbutton Presses

Sense Pushbutton Presses

Trigger on Rising or Falling Edges


Did You Know: Trigger on Rising or Falling Edge

Sometimes, you have no way of knowing when an event like the button press will happen.  If it happens when the plot is close to the right edge of the screen.  After the signals leave the right side of the screen, they’ll actually wrap around to the left.  

  • Repeat your button test, but this time, wait until the points are plotting in the 7k to 9k range before pressing the button for a blink or two.

The CYBERscope trigger feature you experimented with in the Measure Lights with an Oscilloscope activity’s Your Turn section is designed for situations like these because it can keep the plot activity that needs to be analyzed in the right position in the plot area.

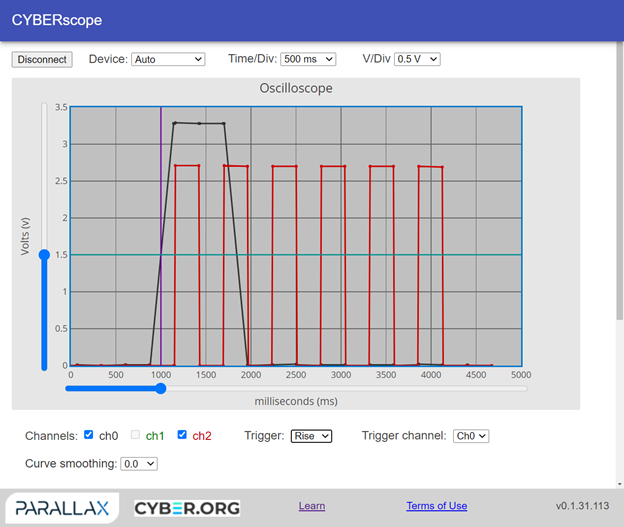
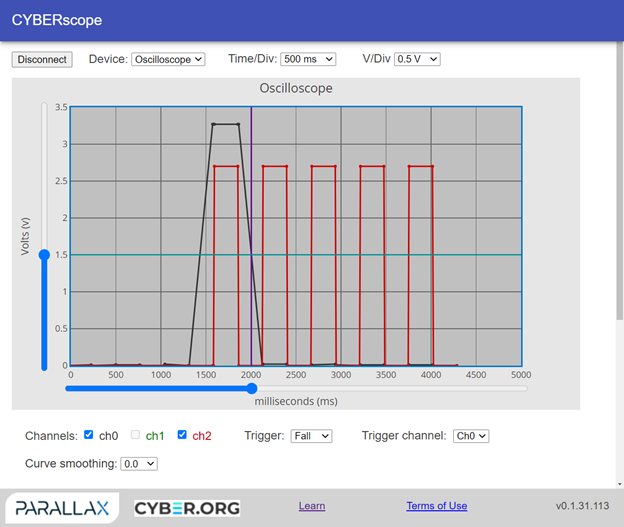
The CYBERscope trigger has rising and falling edge settings.  A trigger edge is simply any part of the plot that passes the voltage trigger level.  On the CYBERscope, the default trigger voltage is 1.5 V.  It can be adjusted with a slider to the left of the plot, and is indicated by a turquoise horizontal line.  

With its trigger set to Rise, an oscilloscope waits for two things:

  1. The trigger event.  
    • If Trigger is set to Rise, the oscilloscope waits for a pair of data points, one below the trigger voltage, and the next above.  
    • If Trigger is set to Fall, it waits for one point above the trigger voltage, and the next below.
  2. Enough points after the trigger event to fill the rest of the plot.

After the oscilloscope has all that data, it positions the plot so that the voltage edge lines up with the trigger time.  The CYBERscope’s default trigger time is 1/5th of the way into the plot.  For example, if the total time axis is 5000 ms, the trigger time would be at 1000 ms.  The time trigger is indicated by a vertical purple line, and can be adjusted by a slider below the plot.


Your Turn: Set the Trigger

  • Set Time/Div to 500 ms.
  • Set Trigger to Rise.
  • Press the button down for at least one blink, then wait 10 seconds.
  • Did the plot self-adjust to show you this?
  • Try to predict how the plot will change if you changed the Trigger setting to Fall and repeated the button press.


  • Test your predictions by setting the Trigger to Fall and repeating the button press for at least one blink.  
  • Drag the trigger slider right so that the vertical purple line lines up with 2000 ms.  
  • Repeat the button press for at least one blink.

  • When you are done, click the CYBERscope’s Disconnect button.


Printer-friendly version
How it Works
Prev
Review and Practice
Next

DISCUSSION FORUMS | PARALLAX INC. STORE

About | Terms of Use | Feedback: learn@parallax.com | Copyright©Parallax Inc. 2024

© 2025 Parallax Learn • Built with GeneratePress