Skip to content
Parallax Learn

Parallax Learn

  • Welcome
  • Tutorials
        • Tutorial Series head tag

          Tutorial Series
        • Tutorial Series

          The special, classroom-ready series pages are organized collections of tutorials for our most popular hardware and/or languages. The tutorials for each topic are conveniently accessible from a single page, shown in the order it is recommended that they be completed.
        • Robotics Series Head tag

          Robotics Series
        • Robotics Series

          • Artificial Intelligence
          • Cybersecurity: Radio Data tutorialCybersecurity
          • cyber:bot + Python
          • cyber:bot + MakeCode
          • Boe-Bot Tutorial SeriesBoe-Bot
          • Arduino Shield-Bot
          • ActivityBot with C TutorialsActivityBot + C
          • ActivityBot with BlocklyProp Tutorial SeriesActivityBot + BlocklyProp
          • Scribbler 3 Tutorial SeriesScribbler 3
        • Electronics & Programming Series Head tag

          Electronics & Programming Series
          • BS2 Board of Education Tutorial SeriesBS2 Board of Education
          • Propeller C-Language BasicsPropeller C Basics
          • FLiP Try-It Kit C Tutorial SeriesFLiP Try-It Kit + C
          • FLiP Try-It Kit BlocklyProp TutorialsFLiP Try-It Kit + BlocklyProp
          • Badge WX Tutorial SeriesBadge WX
          • Propeller BlocklyProp Basics and ProjectsPropeller BlocklyProp Basics
          • View All Tutorial Series »
        • Browse Tutorials
        • Browse Tutorials

          Individual tutorials sorted by robot or kit, and language.
        • By Robot or Kit
          • ActivityBot
          • SumoBot WX
          • Boe-Bot
          • Shield-Bot
          • cyber:bot
          • Badge WX
          • ELEV-8
          • ARLO
        • By Language
        • By Language

          • Propeller C
          • Arduino
          • BlocklyProp
          • PBASIC
          • Python
          • MakeCode
          • View All Tutorials »
  • Educators
  • Reference
  • Downloads
  • Home
  • All Courses
  • Servo Position Control with Python and micro:bit

Servo Position Control with Python and micro:bit

How it Works

How servo_buttons_control Works

For pushbutton monitoring, the micro:bit display needs to be turned off.  Also, since we have pull-down resistors connected to the pushbuttons, micro:bit I/O pin internal pull resistors should be set to NO_PULL.   

display.off()
pin9.set_pull(pin9.NO_PULL)
pin6.set_pull(pin6.NO_PULL)

The servo control signal to P16 is set up with this statement.  Later, pin16.write_analog calls will adjust the signal to make the servo turn its horn to various positions.

pin16.set_analog_period(20)

The value variable will be used to set the servo’s position.  This script starts it at 77, for a 90° horn position (the halfway point in the servo’s position range).

value = 77

The first thing that happens in the main loop is that the pushbutton states are checked and stored in state9 and state6.

while True:
    state9 = pin9.read_digital()
    state6 = pin6.read_digital()

If the P9 pushbutton is pressed, state9 will be 1.  When this happens, it will increase the value by 1, and check if it is above 128.  If so, set it back to 128.  The 128 value restricts the servo’s position to a maximum of 128.

    if state9 is 1:
        value = value + 1
        if value > 128:
            value = 128

If the P6 pushbutton is pressed, state6will be 1.  When this happens, it will decrease the value by 1, and check if it is below 26.  If so, set it back to 26.  The 26 value restricts the servo’s position to a minimum of 26.

   if state6 is 1:
        value = value - 1
        if value < 26:
            value = 26

Each time through the loop, it updates the servo signal using the number stored in the value variable then waits 20 ms (1/50th of a second) before repeating the main loop.

    pin16.write_analog(value)
    sleep(20)


Try This – Restrict the Range

The upper angle limit of 180° for the servo horn was determined by:

        if value > 128:
            value = 128

Likewise, the lower 0° angle limit for the servo horn was determined by:

        if value < 26:
            value = 26

These values can be changed to limit the servo to a smaller range of angles.  For example:

        if value > 102:
            value = 102

…would set the upper angle limit to 135°.  The lower angle limit could also be limited to 45° with this:

        if value < 51:
            value = 51

Let’s try it:

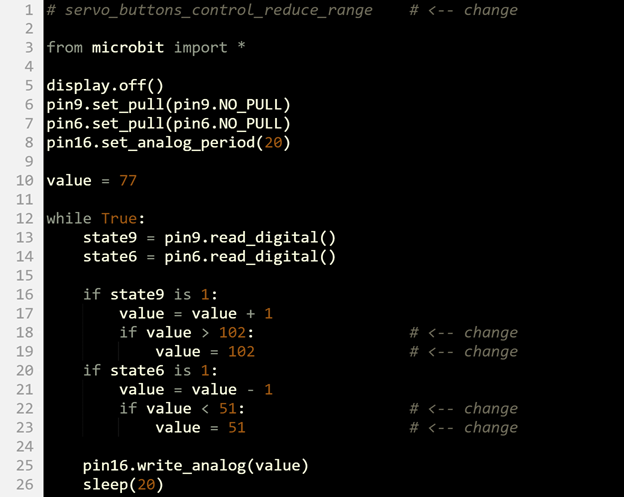
  • Set the project name field to servo_buttons_control_reduce_range.  
  • Change the name in the comment on line 1 to servo_buttons_control_reduce_range.
  • Change both 128 values to 102.
  • Change both 26 values to 51.
  • Verify that your script matches the one below, then click Save.
  • Click Send to micro:bit.
  • Verify that the servo horn’s range is now restricted 45° through 135°.


Printer-friendly version
Script and Tests
Prev
Angle and Angular Velocity
Next

DISCUSSION FORUMS | PARALLAX INC. STORE

About | Terms of Use | Feedback: learn@parallax.com | Copyright©Parallax Inc. 2024

© 2025 Parallax Learn • Built with GeneratePress