Script and Tests
Script
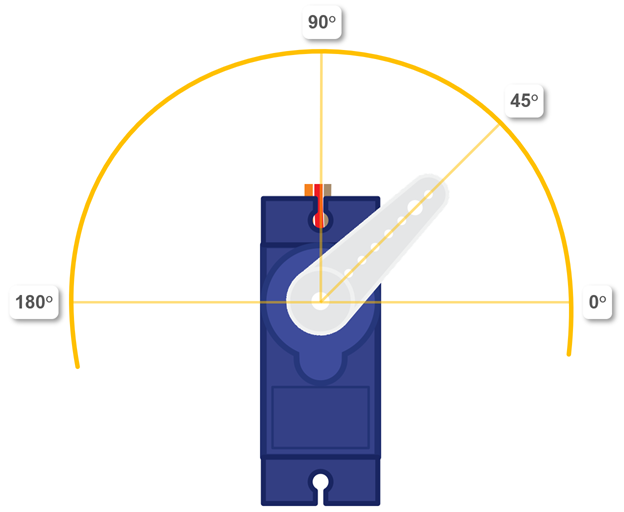
If you got the assembly instructions right, the servo_test_angles should make the servo horn point at 0°, 45°, 90°, and 180°. Don’t expect it to be precise, just reasonably close.
- If you do not already have the micro:bit Python Editor open, browse to python.microbit.org in a Google Chrome or Microsoft Edge browser.
- Set the project name field to servo_test_angles, enter the script below, and click Save.
(See Save & Edit Scripts.) - Click Send to micro:bit.
(See Flash Scripts with Python Editor.)
Example script: servo_test_angles
# servo_test_angles

from microbit import *

pin16.set_analog_period(20)

while True:
    pin16.write_analog(26)      # 25.6 -> 500 us -> 0 degrees
    sleep(4000)
    pin16.write_analog(51)      # 51.2 -> 1000 us -> 45 degrees
    sleep(4000)
    pin16.write_analog(77)      # 76.8 -> 1500 us -> 90 degrees
    sleep(4000)
    pin16.write_analog(128)     # 128.0 -> 2500 us -> 180 degrees
    sleep(4000)
Tests
THE ANGLES WILL NOT BE PRECISE. If the horn points somewhere near each angle shown, that’ll be fine for now.
- Connect the battery pack to the Edge I/O Adapter.
- Verify that the horn points to somewhere near 0°, then 45°, then 90°, and lastly 180° before it repeats, restarting with 0°.
- If your servo’s horn didn’t seem to even try to reach either 0° or 180°, follow the instructions below the diagram.
- When you are done, disconnect the battery pack from the Edge I/O Adapter.
If your servo didn’t try to reach 180° or 0°.
- If the horn only turns to 0°, 45°, and 90°, but not 180°, try changing pin16.write_analog(128) to pin16.write_analog(127), re-flash the script, and retest. If that doesn’t work, try 126, then 125…
- If the horn only turns to 45°, 90°, and 180°, but not 0°, try changing pin16.write_analog(26) to pin16.write_analog(27), re-flash the script and retest. If that doesn’t work, try 28, then 29…
Let’s say you had to reduce the statement that positions the servo at 180° from pin16.write_analog(128) to pin16.write_analog(126). You could also try subtracting 2 from the other pin16.write_analog statements. For example, instead of 77, 51, and 26, you could try 75, 49, and 24.
Why do some micro hobby servos need these adjustments?
Electrical and electronic parts typically have “manufacturing variations”. These are differences in the way an electrical or electronic part behaves. For example, the resistors in your kit all have gold bands, which means that they will be within 5% of the color coded value. Other resistors might have silver bands with 10%, or no band for 20%.
In the case of the hobby micro servo, one of them might measure a control signal from the micro:bit a little differently than another servo might. Even though the micro:bit, which has fairly precise timing, is sending the right signal, the servo might think the signal is “out of range”. When this happens, it holds the position of the most recent signal that was in-range.