Program with a Sweet Song
If you are going for something sweet, the Servo Angel code download below might be a good choice. Instead of a scary sound effect, it plays the first 8 notes in a tune called Antioch, perhaps better known as the carol “Joy To The World.” You can change the note frequencies and durations for any tune you like; see the Circuit Practice with BlocklyProp – Piezo Beep tutorial for more information.
- Download the Servo Angel project file above.
- Open the project in BlocklyProp Solo, connect your board to your computer with the USB cable, and make sure the Launcher is running and can see the board’s COMM port.
- Connect the external power supply to your your Activity Board WX, since the USB power does not supply enough current to run the servos.
- With the 2-position switch in position 1 to disable the servos, save the code to EEPROM.
- Hold up your Servo Spirit so the shoulders and hips can swivel freely, then put the switch in Position 2.

How the Code Works
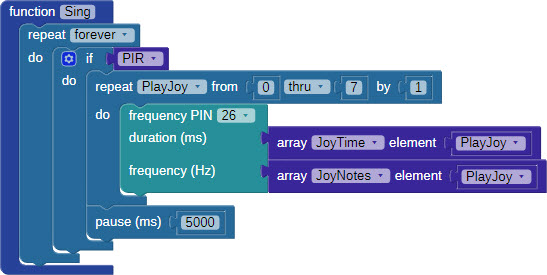
First, the code initializes and fills up two arrays with 8 elements each. JoyNotes holds a list of frequencies that will be played in order on the speaker. JoyTime holds a list of durations that determines how long to play each note, in milliseconds. These values will be used in the Sing function to play the tune.
Next, the code initializes the RGB LEDs in the Neopixel ring, noting it has 12 LEDs and its input is connected to P1.
Before we get to the main code, a new processor block launches the function “Sing.” It goes in its own processor so the speaker can play the notes at the same time the servos move.
The rest of the code is in a repeat forever loop. First thing in the loop, the check PIN 3 block checks if the PIR sensor has detected motion. If it has, a 1 is stored in the PIR variable.
Next is an if…do condition. If the PIR variable holds a 1, the RGB LED set and RGB LED update blocks turn on the Neopixel ring. That is followed by two repeat loops. The first repeat item block counts from 45 to 135 using the variable named up. The value of up increments the servo angles to swivel hips and shoulders. The second repeat item block does much the same thing with a variable named down. This time however, down is subtracted from 180 to set the servo angles, so they start at 135 where they left off in the previous loop. The pause 20 in each block sets the appropriate servo signal refresh rate.
Afer the servos are done moving, or if the PIR variable was holding a 0 instead of a 1, the code executes the lower RGB LED set and RGB LED update blocks turn off the Neopixel ring. Then, the code starts over at the top of the repeat forever loop.
Meanwhile the Sing function is executing its own repeat forever loop in a separate processor. It also holds an if…do condition that starts by checking if the PIR variable holds a 1. If it does, a repeat loop increments the PlayJoy variable from 0 to 7, making 8 trips through the loop. PlayJoy is used as an index to select values from the JoyTime and JoyNotes arrays for the frequency block. PlayJoy starts at 0, because arrays start counting elements at zero, not at 1!