First micro:bit program
Now, you are ready to write your first program for your micro:bit module. Follow the same procedure for all the programs you write with your chosen micro:bit software.
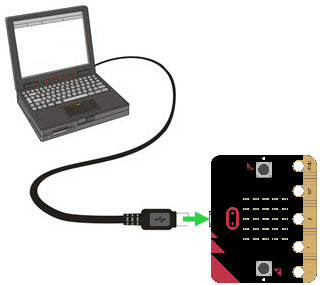
- Connect your micro:bit module to your computer with a USB cable.
Online Python Editor
- Open a browser and navigate to the Online Python Editor site (or click the link below).
- In the code editor window, delete all the text that is there.
- Type in the following text exactly:
from microbit import *
display.scroll("Hello")
You have two choices for transmitting your program to the micro:bit module:
- Click the Download button and drag the downloaded .hex file onto your MICROBIT drive.
— OR—
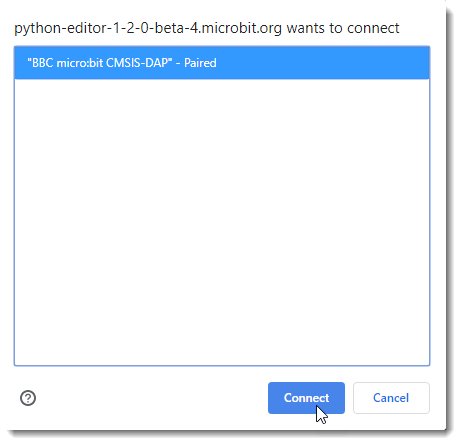
- Click the Connect button, and select the device in the connect dialog, and click the Connect button.
- After connecting, the top-left button that used to Download will now be Flash. Click it, and your computer will transmit the program to your micro:bit.
- Watch the LED matrix display!
No compatible device found?
If you see a message saying “No compatible device found” you can use the Download button as noted above. If you are on Windows, you can follow the directions here for a possible fix.
Mu Editor
- Run the Mu Editor software on your computer.
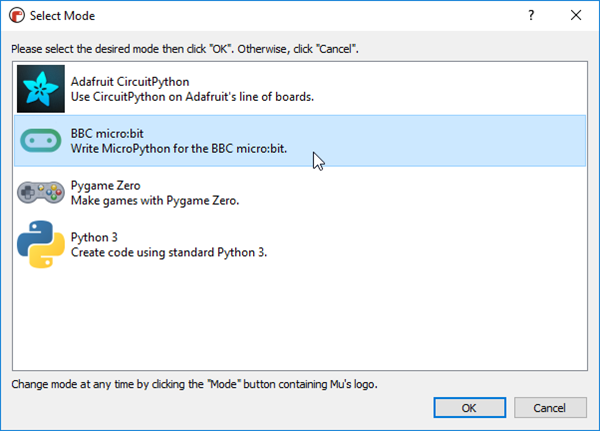
- Set the programming mode to BBC micro:bit, and click OK. (If the Select Mode dialog does NOT appear, click the Mode button in the upper left corner.)
- In the code editor window, delete all the text that is there.
- Type in the following text exactly:
from microbit import *
display.scroll("Hello")
You have two choices for transmitting your program to the micro:bit module:
- Click the Download button and drag the downloaded .hex file onto your MICROBIT drive.
— OR—
- Click the Flash button.
Your computer will transmit the program to your micro:bit. Watch the LED matrix display!
How the Program Works
A program made up of one or more instructions for a processor to execute. Here, the instruction display.scroll(“Hello”) made the letters H e L L o scroll across the micro:bit module’s LED matrix one at a time.
In the Python language, you can use specialized instructions just for the micro:bit that are grouped into modules. For one of these instructions to be used, its module must be named and imported as part of the program. The display.scroll instruction is part of the microbit module. So, the program begins with from microbit import * to make that instruction available. Click the link below to see all of the instructions in the microbit module group.