Place the Piezospeaker
It is time to add a piezospeaker to your cyber:bot board.
Parts Required
(1) piezospeaker from the Small Robot Electronics Component Pack. (Just peel off the “Remove the seal after washing” sticker if it has one).
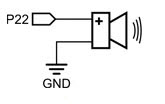
The picture above shows the schematic for the piezospeaker connected to P22. Notice that the cyber:bot board has two slots that fit the piezospeaker, and will connect it to P22.
Long Leads or Short?
The cyber:bot board was designed for a piezospeaker with long leads, like the one on the left. But due to supply chain challenges, some kits may include a piezospeaker with short leads, like the one shown on the right. Either will work!

For Long-Lead Piezospeakers
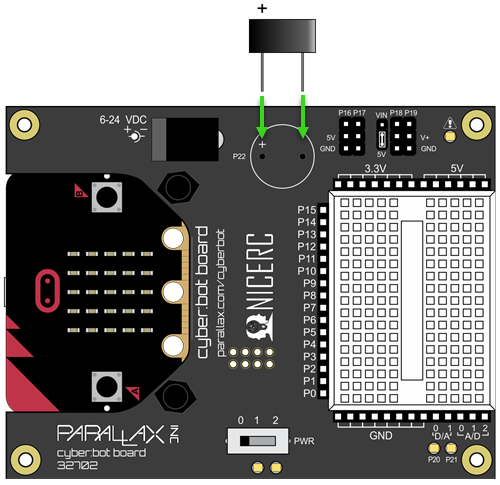
- Look for the (+) symbol on the top of the piezospeaker case. The positive leg of the speaker is approximately underneath.
- Gently insert the positive leg into the cyber:bot board hole by the P22 label. The other leg goes into the hole near the GND label. The pins will go through the board and into sockets underneath.
- Put the cyber:bot board power switch in position 1 (or 2) when you want to run a program that uses the piezospeaker.
The speaker should stay in place for the rest of the activities as it does not interfere with any other circuits since it’s not positioned on the breadboard.
For Short-Lead Piezospeakers
If your piezospeaker has short leads, it may fall out of the socket when inserted from the top of the cyber:bot board. But that is okay, it can still be plugged into the socket from the bottom of the board.
- Look for the (+) symbol on the top of the piezospeaker case. The positive leg of the speaker is approximately underneath.
- Look for the 4-pin socket on the underside of the cyber:bot board, directly underneath the piezospeaker label. The piezospeaker leads will go in the outermost holes of this socket.
- Gently insert the piezospeaker leads into the socket, with the aligning positive lead with the plus symbol on top of the board.
- Put the cyber:bot board power switch in position 1 (or 2) when you want to run a program that uses the piezospeaker.
![]()
Note: you can also build a piezospeaker circuit on the breadboard.
To use a piezospeaker on the breadboard, make sure its legs go in different breadboard rows. Using jumper wires, connect its (+) leg to an I/O pin socket (P4 for example) and connect its other leg to a GND socket. In your scripts, you will need to change bot (22) to bot (4) or the number for whichever pin you used.