Skip to content
Parallax Learn

Parallax Learn

  • Welcome
  • Tutorials
        • Tutorial Series head tag

          Tutorial Series
        • Tutorial Series

          The special, classroom-ready series pages are organized collections of tutorials for our most popular hardware and/or languages. The tutorials for each topic are conveniently accessible from a single page, shown in the order it is recommended that they be completed.
        • Robotics Series Head tag

          Robotics Series
        • Robotics Series

          • Artificial Intelligence
          • Cybersecurity: Radio Data tutorialCybersecurity
          • cyber:bot + Python
          • cyber:bot + MakeCode
          • Boe-Bot Tutorial SeriesBoe-Bot
          • Arduino Shield-Bot
          • ActivityBot with C TutorialsActivityBot + C
          • ActivityBot with BlocklyProp Tutorial SeriesActivityBot + BlocklyProp
          • Scribbler 3 Tutorial SeriesScribbler 3
        • Electronics & Programming Series Head tag

          Electronics & Programming Series
          • BS2 Board of Education Tutorial SeriesBS2 Board of Education
          • Propeller C-Language BasicsPropeller C Basics
          • FLiP Try-It Kit C Tutorial SeriesFLiP Try-It Kit + C
          • FLiP Try-It Kit BlocklyProp TutorialsFLiP Try-It Kit + BlocklyProp
          • Badge WX Tutorial SeriesBadge WX
          • Propeller BlocklyProp Basics and ProjectsPropeller BlocklyProp Basics
          • View All Tutorial Series »
        • Browse Tutorials
        • Browse Tutorials

          Individual tutorials sorted by robot or kit, and language.
        • By Robot or Kit
          • ActivityBot
          • SumoBot WX
          • Boe-Bot
          • Shield-Bot
          • cyber:bot
          • Badge WX
          • ELEV-8
          • ARLO
        • By Language
        • By Language

          • Propeller C
          • Arduino
          • BlocklyProp
          • PBASIC
          • Python
          • MakeCode
          • View All Tutorials »
  • Educators
  • Reference
  • Downloads
  • Home
  • All Courses
  • SumoBot WX Movement Basics

SumoBot WX Movement Basics

Maneuver Basics

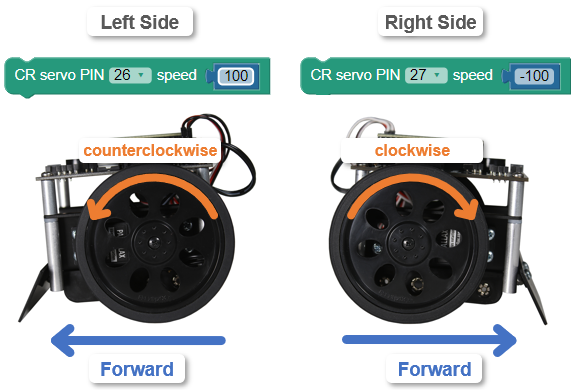
For the SumoBot WX to roll forward, the left and right wheels have to turn in opposite directions.  It may sound counterintuitive, but take a look at the left side of your SumoBot.  See how the left wheel has to roll counterclockwise if it’s going forward?  Now, look at the right side.  The right wheel has to turn clockwise for forward motion.  

Each wheel is independently controlled by its own block.  The next diagram shows some examples of wheel speeds and how they relate to forward and backward with speed control. 

For example, to make the SumoBot roll full speed forward, one block has to have its PIN set to 26 to control the left servo, with a speed of 100 for counterclockwise wheel rotation.  A second block with its PIN set to 27 to control the right servo and speed -100 for clockwise rotation.  For full speed reverse, one block would need PIN 26 and speed -100 for the left servo and PIN 27 and speed 100 for the right servo.  To make the SumoBot stop, set both P26 and P27 block speeds to 0.

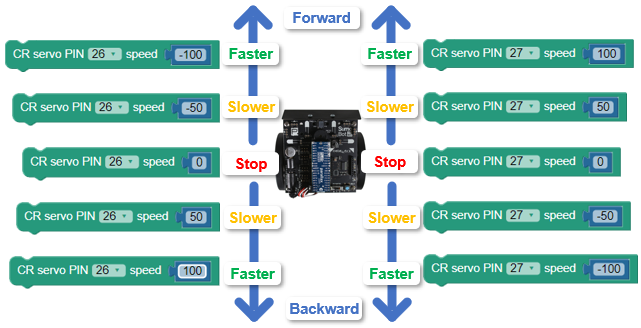
Since the wheels are controlled independently, you can get pretty creative with maneuvers.  This animation shows the results of various combinations using -100, -50, 0, 50, and 100 for speed.  Watch it carefully, and think about which direction and how fast each wheel turns in response to the speed values.

In this activity, you will test some of the pin and speed combinations.

Parts

  • SumoBot, built up at least through the end of the Build your SumoBot WX pages
  • USB A to micro-B cable
  • 4 AA batteries (in the SumoBot Robot’s battery pack)

Prep

  • 3-position POWER switch set to 1.  (You will set it to 2 after loading the program.)
  • 4 AA batteries in the battery pack.
  • BATT LOW light off.  If it’s on, that means it’s time for fresh batteries!
  • SumoBot connected to your computer’s USB port.
  • BlocklyProp Launcher running, and BlocklyProp Solo launched.
  • Ports dropdown set to your SumoBot’s port number like you did in Connect, Power & Run.

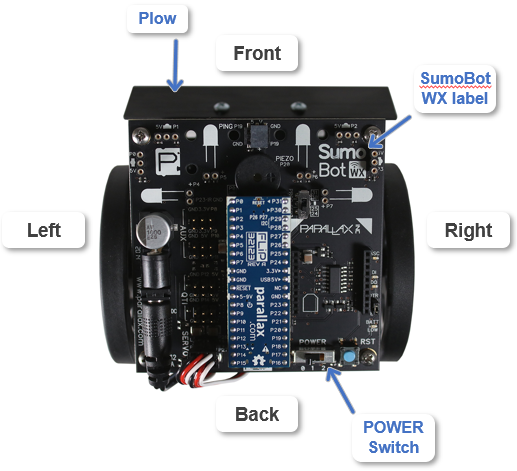
Looking at the SumoBot from the above, its plow is attached to the front.  If the SumoBot board is mounted correctly, the POWER switch should be at the back, and the SumoBot WX label should be at the front-right.

  •  Verify that your board is mounted correctly, with the POWER switch at the back and the SumoBot WX logo at the front-right.
  • If the SumoBot WX board is not mounted correctly, take a few minutes to detach the board and mount it correctly.


Printer-friendly version
Try This: RPM
Prev
Maneuver Program
Next

DISCUSSION FORUMS | PARALLAX INC. STORE

About | Terms of Use | Feedback: learn@parallax.com | Copyright©Parallax Inc. 2024

© 2026 Parallax Learn • Built with GeneratePress