The Candy Dispenser and Keybox
The Dispenser
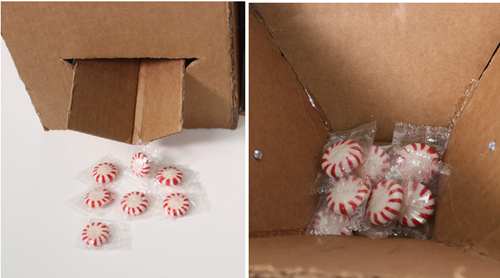
The candy dispenser incorporates a simple funnel and trapdoor that can be controlled by a servo. This allows candy to be easily loaded from the top, and it is released when the correct PIN is input into the KeyBox.
- Make a cardboard box without a bottom and give it a detachable lid.
- Make a funnel in the top with a hole in the middle, with a hatch that can swing open and closed
- Attach rubber bands to either side of the hatch so that it stays closed
- Attach a string to the underside of the hatch, so that pulling on it will open the hatch
- Make a ramp out of cardboard that the candy will fall from the funnel into, and attach it to the inside of the box
- Punch a hole in the ramp for the string to thread through
- Attach a servo under the ramp so that the horn is perpendicular to the hatch
- Attach the string to the servo, so that 0 degrees on the servo is open and 180 degrees is closed
The Keybox
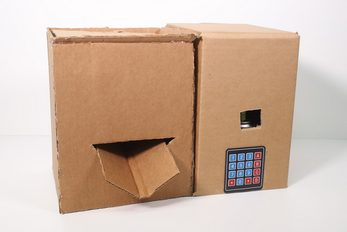
The Key Box is the key to getting your well deserved candy. There is a keypad mounted on the box for users to put in the code that they received, it should be 329 if you followed the code as set up in this project (you can make your own code if you make a few adjustments along the way). If they get the key correct, they get a candy! If they do not, a silly string sprayer, hidden in this box, sprays them.
The Silly String Sprayer is an optional part of this project. It needs mechanical parts made from a rigid material. We used a laser cutter and ¼”acrylic, but you could also use thin wood or other firm material. A servo activates the sprayer.
- Cut a slit in a cardboard box for the 4×4 keypad cable to slip through
- Hot glue the 4×4 keypad to the outside of the box
- Cut out and assemble the Silly String Sprayer (instructions provided on their own page, optional)
- Cut a hole in the box for the silly string to spray out of (optional, for use with silly string sprayer)
Wire it:
- You will be using the KeyboxDispenser SVG file for this part of the project. It was included in the code download at the beginning of this megaproject.
I/O Pin Connections:
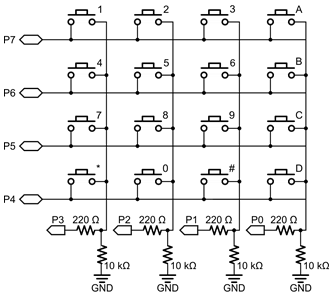
- P0-P7: 4×4 keypad (See 4×4 keypad tutorial if needed)
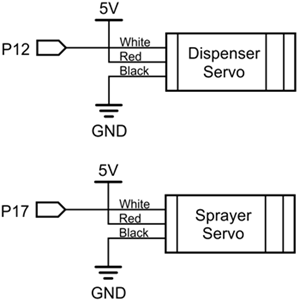
- P12: Dispenser Servo
- P17: Silly String Servo
Note: It is best to run projects from a battery pack or wall supply, Do not try to run them off of the USB cable.
- After completing each element, a number will be displayed on each 7-segment LED. Input those values into the 4×4 keypad correctly, and you get candy!
- But beware, typing incorrect numbers will get you shot with silly string!