Skip to content
Parallax Learn

Parallax Learn

  • Welcome
  • Tutorials
        • Tutorial Series head tag

          Tutorial Series
        • Tutorial Series

          The special, classroom-ready series pages are organized collections of tutorials for our most popular hardware and/or languages. The tutorials for each topic are conveniently accessible from a single page, shown in the order it is recommended that they be completed.
        • Robotics Series Head tag

          Robotics Series
        • Robotics Series

          • Artificial Intelligence
          • Cybersecurity: Radio Data tutorialCybersecurity
          • cyber:bot + Python
          • cyber:bot + MakeCode
          • Boe-Bot Tutorial SeriesBoe-Bot
          • Arduino Shield-Bot
          • ActivityBot with C TutorialsActivityBot + C
          • ActivityBot with BlocklyProp Tutorial SeriesActivityBot + BlocklyProp
          • Scribbler 3 Tutorial SeriesScribbler 3
        • Electronics & Programming Series Head tag

          Electronics & Programming Series
          • BS2 Board of Education Tutorial SeriesBS2 Board of Education
          • Propeller C-Language BasicsPropeller C Basics
          • FLiP Try-It Kit C Tutorial SeriesFLiP Try-It Kit + C
          • FLiP Try-It Kit BlocklyProp TutorialsFLiP Try-It Kit + BlocklyProp
          • Badge WX Tutorial SeriesBadge WX
          • Propeller BlocklyProp Basics and ProjectsPropeller BlocklyProp Basics
          • View All Tutorial Series »
        • Browse Tutorials
        • Browse Tutorials

          Individual tutorials sorted by robot or kit, and language.
        • By Robot or Kit
          • ActivityBot
          • SumoBot WX
          • Boe-Bot
          • Shield-Bot
          • cyber:bot
          • Badge WX
          • ELEV-8
          • ARLO
        • By Language
        • By Language

          • Propeller C
          • Arduino
          • BlocklyProp
          • PBASIC
          • Python
          • MakeCode
          • View All Tutorials »
  • Educators
  • Reference
  • Downloads
  • Home
  • All Courses
  • Tilt-Control Gripper cyber:bot with Feedback 360° Servos

Tilt-Control Gripper cyber:bot with Feedback 360° Servos

Gripper Troubleshooting

If your Gripper passed the Tests section and does not need troubleshooting, continue to the next section. Otherwise, continue below.

In the Gripper 3.0 Assembly Instructions, there’s a Tuning and Programming activity with a Physically Position the Servo and Gripper section.  It has instructions to “Move the servo through its range of motion and make sure it is centered when the Gripper is the closed, lowered position.”  Here are some steps you can follow to make sure this was done correctly:

  • Right-click center_grippper_with_fb360 and select Save link as.

center_grippper_with_fb360.hex

  • In the micro:bit Python Editor editor, click Open to open the file you just downloaded.
  • Click Send to micro:bit..

Script: center_gripper_with_fb360

# center_gripper_with_fb360

from cyberbot import *

display.show('C')

bot(15).servo_angle(90)    # Lower only, leave closed


  • Set the cyber:bot board’s PWR switch to position 2.
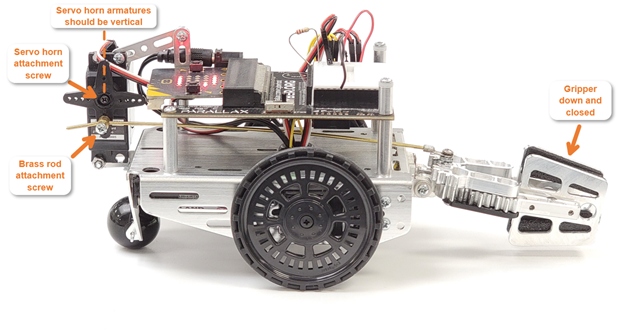
  • For the mechanical connections to work properly, use the picture below as a reference to check two things:
    • First, is the servo horn armature with the brass rod attachment screw pointing straight down?
    • Second, is the Gripper in its lowered and closed position?

If you answered “No.” to either of the two questions, here’s how to fix it:

  • Make sure the center_grippper_with_fb360 script is running, battery power connected, and the 3-position switch is set to 2.
  • If the servo horn armature with the brass rod attachment screw is not pointing straight down:
    • Remove the screw that holds the black 4-arm servo horn to the servo’s output spline.
    • Pull the servo horn off the output spline.
    • Position the horn so that the arm that’s connected to the brass rod attachment is pointing straight down.  (Don’t worry about the Gripper’s open/closed up/down position at this point.)
    • Press the servo horn back onto the output spline and replace the screw that holds the horn to the spline.
  • If you either just finished adjusting the servo horn or if the gripper was not lowered and closed:
    • Loosen the screw that holds the brass rod to the servo horn.
    • Manually position the Gripper in its closed and lowered position.
    • Retighten the screw that holds the brass rod to the servo horn.
  • After completing this, go back to the Script and Tests sections and verify that your Gripper now properly closes and lifts, and lowers and opens.


Printer-friendly version
Gripper Test Script
Prev
How the Gripper Test Works
Next

DISCUSSION FORUMS | PARALLAX INC. STORE

About | Terms of Use | Feedback: learn@parallax.com | Copyright©Parallax Inc. 2024

© 2025 Parallax Learn • Built with GeneratePress