Skip to content
Parallax Learn

Parallax Learn

  • Welcome
  • Tutorials
        • Tutorial Series head tag

          Tutorial Series
        • Tutorial Series

          The special, classroom-ready series pages are organized collections of tutorials for our most popular hardware and/or languages. The tutorials for each topic are conveniently accessible from a single page, shown in the order it is recommended that they be completed.
        • Robotics Series Head tag

          Robotics Series
        • Robotics Series

          • Artificial Intelligence
          • Cybersecurity: Radio Data tutorialCybersecurity
          • cyber:bot + Python
          • cyber:bot + MakeCode
          • Boe-Bot Tutorial SeriesBoe-Bot
          • Arduino Shield-Bot
          • ActivityBot with C TutorialsActivityBot + C
          • ActivityBot with BlocklyProp Tutorial SeriesActivityBot + BlocklyProp
          • Scribbler 3 Tutorial SeriesScribbler 3
        • Electronics & Programming Series Head tag

          Electronics & Programming Series
          • BS2 Board of Education Tutorial SeriesBS2 Board of Education
          • Propeller C-Language BasicsPropeller C Basics
          • FLiP Try-It Kit C Tutorial SeriesFLiP Try-It Kit + C
          • FLiP Try-It Kit BlocklyProp TutorialsFLiP Try-It Kit + BlocklyProp
          • Badge WX Tutorial SeriesBadge WX
          • Propeller BlocklyProp Basics and ProjectsPropeller BlocklyProp Basics
          • View All Tutorial Series »
        • Browse Tutorials
        • Browse Tutorials

          Individual tutorials sorted by robot or kit, and language.
        • By Robot or Kit
          • ActivityBot
          • SumoBot WX
          • Boe-Bot
          • Shield-Bot
          • cyber:bot
          • Badge WX
          • ELEV-8
          • ARLO
        • By Language
        • By Language

          • Propeller C
          • Arduino
          • BlocklyProp
          • PBASIC
          • Python
          • MakeCode
          • View All Tutorials »
  • Educators
  • Reference
  • Downloads
  • Home
  • All Courses
  • Tilt-Controlled Gripper with the cyber:bot Robot

Tilt-Controlled Gripper with the cyber:bot Robot

How The Gripper Test Works

How test_gripper_angles_buttons Works

After importing the cyberbot module, the script uses display.show(Image.ARROW_E)  to point at the micro:bit module’s B button.  

# test_gripper_angles_buttons

from cyberbot import *

display.show(Image.ARROW_E)

The main loop repeatedly checks if either the A or B buttons have been pressed.  If the B button was pressed since the last time it checked, the bot(16).servo_angle(30) call closes and lifts the Gripper paddles.  If the A button was pressed since the last time it checked, the bot(16).servo_angle(150) call lowers and opens the Gripper paddles. 

Both servo_angle calls can be considered “set it and forget it” so the servo will hold the position it was most recently set to.  Whenever a particular button is pressed, the arrow is updated to point at the other button.  

while True:
    if button_b.was_pressed():
        bot(16).servo_angle(30)     # close gripper & lift
        display.show(Image.ARROW_W)
    elif button_a.was_pressed():
        bot(16).servo_angle(150)    # Lower gripper & open
        display.show(Image.ARROW_E)    

Try This

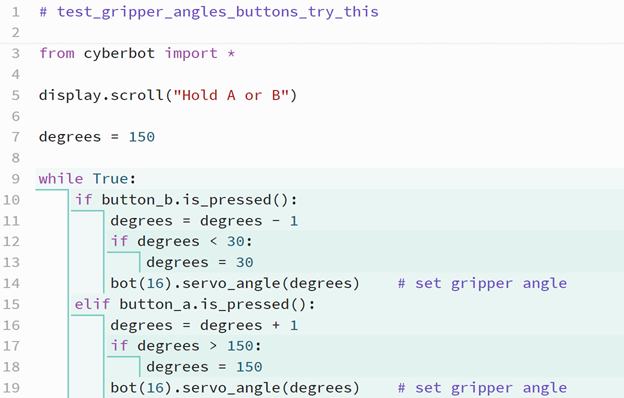
Some objects need to be lifted up and set down more carefully, like objects with narrower bases.  Try modifying the test script to make the Gripper close-lift and lower-open more gradually.  

  • Set the project name to test_gripper_angles_buttons_try_this.  
  • Modify the script as shown below.  
  • Make sure to change was_pressed to is_pressed in the if and elif conditions.
  • Save your work by clicking Save.
  • Click Send to micro:bit.
  • Make sure the batteries and barrel plug are connected and that the cyber:bot board’s PWR switch is set to 2.
  • Test by holding the B button until the gripper goes all the way up, and then holding the A button until the gripper goes all the way down and opens.


Printer-friendly version
Troubleshooting your Gripper
Prev
Automatic Open and Close
Next

DISCUSSION FORUMS | PARALLAX INC. STORE

About | Terms of Use | Feedback: learn@parallax.com | Copyright©Parallax Inc. 2024

© 2025 Parallax Learn • Built with GeneratePress