Extra Blocks for FLiP Kit
Updating the BlocklyProp project to make use of the 7-segment LED and potentiometer circuit requires several tasks. Let’s tackle them one at a time.
- First, click Save As to make a copy of your project and give it a new name.
Let’s add array code for the 7-segment LED, at the beginning of the original program in Play Tilt Tones with Blocks.
- Add a binary set pins block for the 7-segment LED, making P23-P16 outputs with binary value 11111111.
- Add an array initialize block for the 7-segment LED named Edge, and initialize it for 4 elements.
- Add four array set element blocks, one for each element in Edge. Define them with the following binary values:
- element 0 = 10000100
- element 1 = 00000010
- element 2 = 01000000
- element 3 = 00100001
- Save your changes!
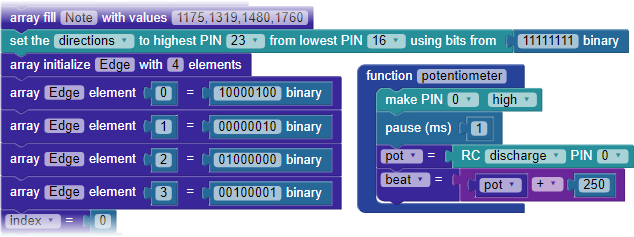
Now, let’s add code for the potentiometer circuit connected to P0. Whenever you call this function, it will take an RC discharge measurement time that indicates the position of the potentiometer’s knob and stores it in a variable named “pot.” In turn, pot is added to 250 to set the variable beat. 250 becomes the minimum tempo, in times when pot measurement yields a zero.
- Delete the set variable block Beat = 500.
- Add a define function block using the name potentiometer, then fill it with four blocks as shown above.
- Save your changes!
Now, the only items left are a few changes to the repeat forever loop that will use the new Edge array and potentiometer function.
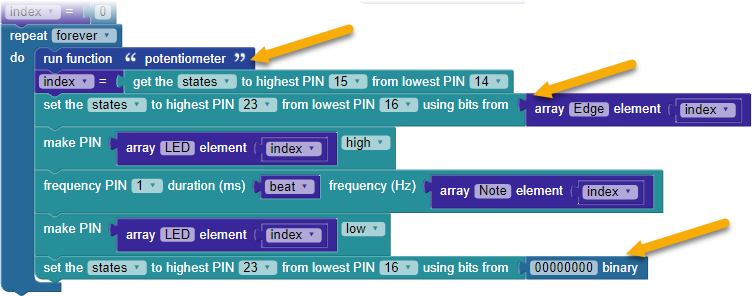
- Add a run function “potentiometer” block first thing inside the repeat forever loop.
- Below the set variable “index” block, add a binary set pins block for P23-P16 as shown below. It will set the states using bits from the array Edge element index.
- The last thing inside the repeat forever loop is to add another binary set pins block for P23-P16, setting the states using bits from 00000000 binary. Doing this turns off all the LED segments before the next trip through the loop.
- Save your changes!
Now you are ready to test drive the additions!
- Reconnect your FLiP module to the USB cable.
- Load and run the project.
- Tilt the board and watch the 7-segment LED light up.
- Turn the potentiometer’s knob to different positions to change the beat. Can you keep up with the fastest tempo?
Evil Challenge
- If you really want to, update the binary values for the Edge array so that instead of indicating the lowest edge, after being played the 7-segment LED displays the note letter: A, b, C, d, E, F. Use the decimal point to indicate a sharp/flat.