Try This: Understanding Options
How forward_three_seconds.py Works
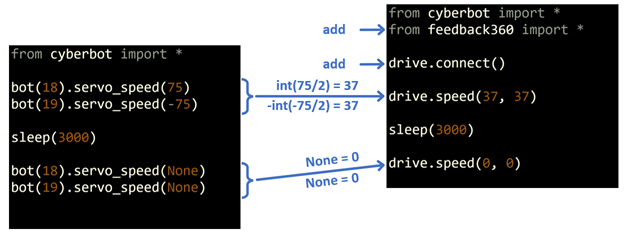
Again, here is a repeat of the summary and diagram of how to adjust an existing cyber:bot script so that it runs with the Feedback 360° servos.
Starting with the feedback_360_template.hex, add from feedback360 import * and drive.connect() just below from cyberbot import *. Then, any time you see bot(18).servo_speed(vL) and bot(19).servo_speed(vR), use the vL and vR values in drive.speed(int(vL/2), -int(vR/2)). The term int(vL/2) means “divide the original vL by 2 and round down.” The term int(-vR/2) means “divide the original vR by 2 and round down, and take its negative value.” Important: replace None with 0.
Next, let’s break it into steps, starting with an existing script to convert from Forward and Backward in the Navigation with the cyber:bot chapter.
# forward_three_seconds.py

from cyberbot import *

bot(18).servo_speed(75)             # Half speed forward
bot(19).servo_speed(-75)
sleep(3000)                         # Wait three seconds

bot(18).servo_speed(None)           # Stop
bot(19).servo_speed(None)
Now, let’s take a look at how the four steps were applied to this script. Read each of the step summaries and examine how they are incorporated into the script.
Step 1 is to start with the feedback_360_template.hex file and add the existing script, and Step 2 is to add from feedback360 import * and drive.connect() immediately below from cyberbot import *. This adds the necessary feedback360 module, and initializes the servos.
# forward_three_seconds_for_fb360

from cyberbot import *
from feedback360 import *           # <-- add

drive.connect()                     # <-- add
For Step 3, recall that the term int(vL/2) means “divide by 2 and round down.” So, vL ÷ 2 = 37.5, and rounded down, the result is 37. Likewise, the result of -int(vR/2) is -(-75 ÷ 2) rounded down is 37 because the two negative signs cancel. These two results are used in adding drive.speed(37, 37). In Step 4, the bot(18).servo_speed(vL) and bot(19).servo_speed(vR) statements are commented with the # symbol.
# bot(18).servo_speed(75)           # <-- comment Half speed...
# bot(19).servo_speed(-75)          # <-- comment
drive.speed(37, 37)                 # <-- add
No changes here:
sleep(3000) # Wait three seconds
REMEMBER: To stop the cyber:bot, make sure to use 0 in place of None! So, in Step 3, add drive.speed(0, 0). Then, in Step 4, just use the # symbol to comment bot(18).servo_speed(None) and bot(19).servo_speed(None).
# bot(18).servo_speed(None)         # <-- comment Stop
# bot(19).servo_speed(None)         # <-- comment
drive.speed(0, 0)                   # <-- add
Try This: Space and Speed Options
Save some Space
Here are some alternate versions of the script you can try. Following the optional Step 5, the final script would look more like this after the servo_speed calls are removed. Remember, comments do take up memory space on your micro:bit RAM, and if you run out you will see a MemmoryError.
# forward_three_seconds_for_fb360_final

from cyberbot import *
from feedback360 import *           # <-- add

drive.connect()                     # <-- add

drive.speed(37, 37)                 # Forward top speed 37 x 3.25mm/s

sleep(3000)                         # Wait three seconds

drive.speed(0, 0)                   # <-- add
Try Different Speeds
Experiment with the speeds to find ones you like. The values of 37 were chosen by taking half of the speed from the original script because the Feedback 360° servos are twice as fast! Your speeds can range between -128 and 128. This example uses 64, which is considerably faster. In fact, that matches the previous servos’ top speeds!
Example Script: forward_three_seconds_for_fb360_speed_scaled
# forward_three_seconds_for_fb360_speed_scaled

from cyberbot import *
from feedback360 import *           # <-- add

drive.connect()                     # <-- add

drive.speed(64, 64)                 # Forward top speed 48 x 3.25mm/s

sleep(3000)                         # Wait three seconds

drive.speed(0, 0)                   # Stop