Remember and Use Values
Variables
Variables are names you can create for storing, retrieving, and using values in the microbit module’s memory. Here are three example variable declarations from the next program:
a = 42
c = "m"
d = 42.06
A variable can hold different kinds of values, such as integers (whole numbers), decimal numbers, and characters. Each of these kinds of values uses a different data type.
The declaration a = 42 creates a variable named a. The value 42 is an integer, so the Python language automatically assigns the int data type to the a variable, and gives a an initial value of 42. If you do not want an initial value, you can assign a value of None to the variable, such as a = None.
Next, c = “m” declares a variable named c and initializes it to the value “m.” Since “m” is a character, Python assigns c the data type str for storing strings or text.
Then, d = 42.06 declares a variable named d. The value 42.06 is a decimal number, so Python assigns d the data type float, which can hold floating-point decimal values.
Example script: variables
Now that you know how code can store values to memory, how can it retrieve and use them? One way is to simply pass each variable to a method’s parameter.
Here is an example, where display.scroll(Val) uses the display to scroll the value of the variable inside the parentheses.
- Enter, name, save, and flash the script variables to your micro:bit.
#variables

from microbit import *

a = 42
c = "m"
d = 42.06

display.scroll(a)
display.scroll(c)
display.scroll(d)
The display will scroll the number 42, then it will scroll the letter m (shown below), then it will scroll the number 42.06.
Custom Images With Variables
Sometimes you might want to create your own images for the the micro:bit module display, which you can do with the Image method. The following example shows us how to make a custom image, and then how to store that image in a variable to make it easy to use in your script.
Example script: fading_H
- Enter, name, save, and flash the script fading_H to your micro:bit.
#fading_H
from microbit import *
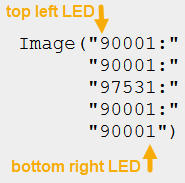
fading_H = Image("90001:"
"90001:"
"97531:"
"90001:"
"90001")
display.show(fading_H)
The example above creates an image of the letter H where the left side of the letter is very bright and the right side is dim. But how?
Notice that inside of the Image method’s parentheses, there are 5 rows of numbers and 5 columns of numbers. Each number corresponds to a different LED on the microbit, as one might expect. The top left number corresponds to the top left LED. The bottom right number corresponds to the bottom right LED.
The number 0 tells the micro:bit to turn the LED off. The number 9 tells the micro:bit to turn the LED on at maximum brightness. Any number between 0 and 9 turns the LED on with a partial brightness where a larger number corresponds to a brighter LED.
The image is then stored in a variable called fading_H. The last line of code uses display.show to show the fading_H image:

Your Turn
- Reverse the fading_H image so that the left hand side of the image is dimmer than the right hand side of the image.
- Create a custom image of a square.
- Create a custom image of a triangle.
- Light up the entire LED matrix with a fading brightness from the left hand side to the right hand side where the left hand side is the dimmest and the right hand side is the brightest.