Item code: 27800
What It Can Do
- Miniature two-axis analog joystick with up/down and left/right action
- Spring-loaded movement always returns joystick to center position
- Easy plug-in module for use in breadboards and custom circuits
The 2-Axis Joystick provides a simple and convenient way to add X-Y control to a project. A potentiometer attached to each axis provides proportional feedback of the up/down and left/right positions. The joystick is spring-loaded, so that it always returns to its centered position when you release it.
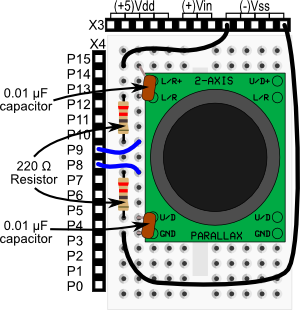
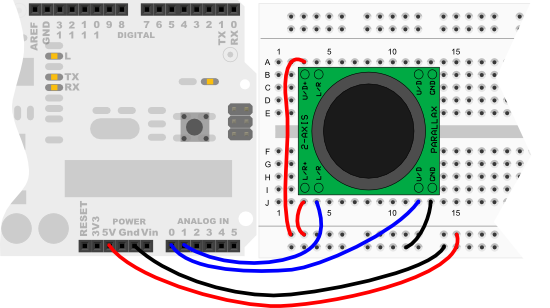
Depending on the microcontroller you use, a small assortment of external components is required to complete the connection. These are noted in the Parts List. Refer to the appropriate diagram under Basic Wiring.
Parts List
- 2-Axis Joystick
- BASIC Stamp HomeWork Board, Propeller QuickStart, or Arduino Uno microcontroller
- 22 gauge solid conductor hookup wire
- (2) 220 Ω resistors, 1/8 or 1/4 watt, 5% tolerance (BASIC Stamp and Propeller interface)
- (2) 0.01 μF ceramic disc capacitors (BASIC Stamp and Propeller interface)
Basic Wiring

- Interface: Dual 10 k Ω potentiometers with common ground
- Power consumption: 0.01W
- Dimensions: 1.64 x 1.2 x 1.1 in (41.67 x 30.54 x 27.7 mm)
Program KickStarts
The examples in this KickStart display the instantaneous values of the X and Y (Left/Right, and Up/Down) axes of the joystick. The values are displayed in a debug window or serial monitor.
The range of values returned is dependent on the type of interface used between the joystick and microcontroller. The values noted below are approximate, and are based on the circuitry described in Basic Wiring.
| Microcontroller | Range | Center Position |
|---|---|---|
| BASIC Stamp | 1–60 | 30 |
| Propeller | 0–6000 | 3000 |
| Arduino | 0–1023 | 512 |
BASIC Stamp HomeWork Board

Download BASIC Stamp 2 code for the 2-Axis Joystick
' {$STAMP BS2}

' {$PBASIC 2.5}

UDPin   CON   8
LRPIn   CON   9
LR      VAR   Word
UD      VAR   Word

DO
  HIGH LRPin
  PAUSE 2
  RCTIME LRPin, 1, LR
  HIGH UDPin
  PAUSE 2
  RCTIME UDPin, 1, UD
  DEBUG HOME, "UD = ", DEC UD, ", LR = ", DEC LR, CLREOL
  PAUSE 50
LOOP
Note: When this program is run the BASIC Stamp Debug Terminal will automatically open.
Propeller QuickStart

Download Propeller Spin code for the 2-Axis Joystick
OBJ

  pst        : "FullDuplexSerial"
  rc         : "RCTime"

CON

  _clkmode = xtal1 + pll16x
  _xinfreq = 5_000_000

PUB Go | UD, LR

  pst.start(31, 30, 0, 115200)

  repeat
    rc.rctime(0, 1, @LR)
    rc.rctime(1, 1, @UD)
    pst.Str(String("UD = "))
    pst.dec(UD)
    pst.Str(String(", LR = "))
    pst.dec(LR)
    pst.tx(13)
    waitcnt(clkfreq / 2 + cnt)       ' 1/2 second delay
Important! This program uses the FullDuplexSerial.spin and RCtime.spin object libraries, which are included with the Propeller Tool software download.
Note: To view the results of the demonstration, after uploading is complete run the Parallax Serial Terminal from the Run menu, or press F12. Momentarily depress the Reset button on the Propeller QuickStart board to restart the program.
Arduino Uno

Download Arduino Code for the 2-Axis Joystick
int UD = 0;
int LR = 0;

void setup() {
  Serial.begin(9600);
}

void loop() {
  UD = analogRead(A0);
  LR = analogRead(A1);
  Serial.print("UD = ");
  Serial.print(UD, DEC);
  Serial.print(", LR = ");
  Serial.println(LR, DEC);
  delay(200);
}
Note: To view the results of the demonstration, after uploading is complete click the Serial Monitor icon in the Arduino IDE. This displays the Serial Monitor window. Momentarily depress the Reset button on the Arduino board to restart the sketch
For More Information
- View the 2-Axis Joystick (#27800) product documentation.
- The Parallax 5-Position Switch (#27801) provides another means of providing navigational control to your project. See the 5-Position Switch KickStart here for additional information.
