")
Item code: 27977
What It Can Do
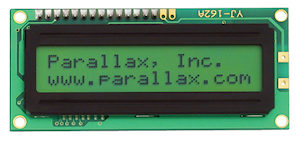
- Displays text on an LCD panel, with two lines, and 16 characters per line
- Built-in speaker for sound effects and musical tones
- Backlighting for operating the display in different environments
- Display custom characters that you design
The 2×16 Serial LCD panel displays up to two lines of text, with up to 16 characters on each line. The module receives simple serial commands from your microcontroller, and is easy to implement in most any project. Using control bytes, you can quickly change the text of the display, sound an attention-getting tone, and control the panel’s built-in backlight.
The LCD display provides a demo mode for verifying operation. Demo mode is set using the two DIP switches on the rear of the panel. The same switches also specify the communications speed between your microcontroller and the LCD display. All examples in this KickStart use the 9600 baud setting.

A control on the rear of the unit allows for adjusting the contrast of the text. As needed, use a small flat-bladed screwdriver to rotate the control so that the text on the display is shown with adequate contrast against the background.
Parts List
- 2×16 Serial LCD, Backlit (Rev F*)
- BASIC Stamp HomeWork Board, Propeller BOE, Propeller QuickStart, or Arduino Uno microcontroller
- 22 gauge solid conductor hookup wire
(* Revision F is the latest vesion of this product. Refer to page 11 of the Parallax Serial LCD Product Guide to determine the version of product you have. Be sure to note the special signal requirements when using Revision E or earlier.)
Basic Wiring

- Power requirements: +5 VDC, 10 mA (backlight off), 50 mA (backlight on)
- Selectable asynchronous serial baud rates: 2400, 9600, 19200
- Dimensions: 1.42 x 3.15 in (36 x 80 mm)
Program KickStarts
Each example program displays two lines of text and sounds a short tone. The backlight is initially turned on, to aid in making the text more visible, and then automatically turned off after a three second delay.
You may re-run the example program from the start by depressing the reset button on your microcontroller.
In addition to displaying text, the example programs demonstrate sending control bytes to the LCD panel. The following table shows the meaning of the control bytes used in the examples; refer to the documentation for the 2×16 Serial LCD for a full list of control bytes.
| Control Byte | What it Does |
| 12 | Clears the display, sets text to start at 0,0 (first character of the first line) |
| 13 | Starts a new line |
| 17 | Turns backlight on |
| 18 | Turns backlight off |
| 212 | Sets up next sound for quarter-length note (about 1/2 second |
| 220 | Sounds and A tone (440 Hz) |
You may test the operation of the LCD panel by setting the mode switches (see back of panel) to Demo. Connect power to the panel as shown in the wiring diagram above — you may leave the signal wire disconnected. In demo mode, the panel will activate its backlight, display text, and play a musical tune. Once operation is verified, remove power from the panel and set its mode switches to 9600 baud.
BASIC Stamp 2 HomeWork Board

Download BASIC Stamp 2 code for the 2×16 Serial LCD
' {$STAMP BS2}
' {$PBASIC 2.5}

TxPin     CON   0
n9600     CON   84

HIGH TxPin                       ' Set serial pin port high
PAUSE 100                        ' Pause to initialize
SEROUT TxPin, n9600, [12, 17]    ' Clear, turn on backlight
SEROUT TxPin, n9600, ["Hello, world...", 13] ' Print text, line feed
SEROUT TxPin, n9600, ["from Parallax!"]
SEROUT TxPin, n9600, [212, 220]  ' Quarter A note
PAUSE 3000                       ' Wait 3 seconds
SEROUT TxPin, n9600, [18]        ' Turn backlight off
The BASIC Stamp HomeWork Board’s 9 V battery powers both the microcontroller and LCD panel.
Propeller BOE and Propeller QuickStart

Propeller BOE Wiring Diagram

Propeller QuickStart Wiring Diagram
Download Propeller Spin code for the 2×16 Serial LCD
OBJ

  LCD : "FullDuplexSerial.spin"

CON
  _clkmode = xtal1 + pll16x
  _xinfreq = 5_000_000
  TxPin = 0

PUB Main

  LCD.start(TxPin, TxPin, %1000, 9_600)
  WaitCnt(ClkFreq / 100 + Cnt)          ' Pause to initialize
  LCD.tx(12)                            ' Clear
  LCD.tx(17)                            ' Turn on backlight
  LCD.str(String("Hello, world..."))    ' First line
  LCD.tx(13)                            ' Line feed
  LCD.str(String("from Parallax!"))     ' Second line
  LCD.tx(212)                           ' Set quarter note
  LCD.tx(220)                           ' A tone
  WaitCnt(ClkFreq * 3 + Cnt)            ' Wait 3 seconds
  LCD.tx(18)                            ' Turn off backlight
This program uses the FullDuplexSerial.spin object library, which is included in the Propeller Tool software download.
Arduino Uno

Download Arduino Code for the 2×16 Serial LCD
const int TxPin = 6;

#include <SoftwareSerial.h>
SoftwareSerial mySerial = SoftwareSerial(255, TxPin);

void setup() {

  pinMode(TxPin, OUTPUT);
  digitalWrite(TxPin, HIGH);

  mySerial.begin(9600);
  delay(100);
  mySerial.write(12);                 // Clear
  mySerial.write(17);                 // Turn backlight on
  delay(5);                           // Required delay
  mySerial.print("Hello, world...");  // First line
  mySerial.write(13);                 // Form feed
  mySerial.print("from Parallax!");   // Second line
  mySerial.write(212);                // Quarter note
  mySerial.write(220);                // A tone
  delay(3000);                        // Wait 3 seconds
  mySerial.write(18);                 // Turn backlight off

}

void loop() {
}
This program uses the SoftwareSerial object library, which is included in the Arduino IDE software.
For More Information
- View the full documentation for the 2×16 Serial LCD module (#27977).
- The Parallax 2×16 LCD (Non-Backlit, #27976) is identical except it lacks the backlight. The Parallax 4×20 Serial LCD (Backlit, #27979) panel works the same way as the 2×16 modules, but allows up to four lines of text with 20 characters per line.
- Non-serial versions of these LCD modules are also available. The 2×16 Parallel LCD provides a 2 by 16 display, whereas the Parallax 4 x 20 Serial LCD offers a 4 by 20 display, with backlighting.They use the standardize 8-bit parallel interface. See the product documention for additional details.