")
Item code: 27801
What It Can Do
- Five switches in one, for adding joystick-style directional input to your project
- Switches are normally open momentary contact—press and release
- Integral pull-up resistors reduce external parts count
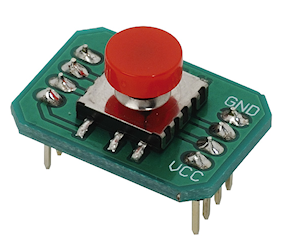
The 5-Position Switch contains five normally open momentary contact switches, mounted as a miniature joystick on an 8-pin breakout board. The switches are arranged so that they can be used for navigational control: Left, Right, Up, Down, and Center depress.
Each of the five switches contains its own 10 kΩ pull-up resistor, so you don’t need to add these to your circuit. Just connect wires from the 5-Position Switch directly to your microcontroller.
- When a switch reads 1 (HIGH), it’s open (not activated)
- When a switch reads 0 (LOW), it’s closed (activated)
All switches are spring-loaded momentary. When you release the switch it returns to its normal (not activated) state.
Note: The 5-Position Switch can detect multiple states at once, such as Up-Left, or Down-Right-Center. How you deal with these multiple states is up to you and the way you write your program.
Parts List
- 5-Position Switch
- BASIC Stamp HomeWork Board, Propeller QuickStart, or Arduino Uno microcontroller
- 22 gauge solid conductor hookup wire
Basic Wiring

- Power requirements: 3.3 to 5 VDC (typical); set supply voltage for compatibility with the input of your microcontroller
- Communication: Single bit HIGH/LOW output for each position
- Dimensions: 0.70 x 0.95 x 0.78 in (17.8 x 24.1 x 19.8 mm)
Program KickStarts
The example programs display the current state of the switch in a terminal/debug window. The switch function — such as Up or Left — is shown. The program is set to repeat indefinitely.
BASIC Stamp HomeWork Board

Download BASIC Stamp 2 code for the 5-Position Switch
' {$STAMP BS2}
' {$PBASIC 2.5}

DO
  IF (IN0 = 0) THEN DEBUG "Left", CR
  IF (IN1 = 0) THEN DEBUG "Down", CR
  IF (IN2 = 0) THEN DEBUG "Right", CR
  IF (IN3 = 0) THEN DEBUG "Center", CR
  IF (IN4 = 0) THEN DEBUG "Up", CR
  PAUSE 200
LOOP
Note: When this program is run, the BASIC Stamp Debug Terminal will automatically open.
Propeller QuickStart

Download Propeller Spin code for the 5-Position Switch
OBJ

  pst : "Parallax Serial Terminal.spin"

CON

  _clkmode = xtal1 + pll16x
  _xinfreq = 5_000_000

PUB Main
  dira[0..4]~                              ' Pins 0-4 to input

  pst.Start(115_200)                       ' Terminal to 115,200 baud
  waitcnt(clkfreq + cnt)

  repeat
    if ina[0] == 0
      pst.Str(String("Down",13))
    if ina[1] == 0
      pst.Str(String("Left",13))
    if ina[2] == 0
      pst.Str(String("Center",13))
    if ina[3] == 0
      pst.Str(String("Right",13))
    if ina[4] == 0
     pst.Str(String("Up",13))

    waitcnt(clkfreq / 3  + cnt)
Note: This program uses the Parallax Serial Terminal object library, which is included with the Propeller Tool software download.
To view the results of the demonstration, after uploading is complete run the Parallax Serial Terminal from the Run menu, or press F12. Momentarily depress the Reset button on the Propeller QuickStart board to restart the program. See Using the Parallax Serial Terminal program for more details.
Arduino Uno

Download Arduino Code for the 5-Position Switch
void setup() {
  Serial.begin(9600);
}

void loop() {
  if(digitalRead(2) == LOW)
    Serial.println("Left");
  if(digitalRead(3)== LOW)
    Serial.println("Down");
  if(digitalRead(4) == LOW)
    Serial.println("Right");
  if(digitalRead(5) == LOW)
    Serial.println("Up");
  if(digitalRead(6) == LOW)
    Serial.println("Center");

  delay(200);

}
Note: To view the results of the demonstration, after uploading is complete click the Serial Monitor icon in the Arduino IDE. This displays the Serial Monitor window. Momentarily depress the Reset button on the Arduino board to restart the sketch.
For More Information
- See the 5-Position Switch (#27801) full documentation.