")
Item code: 555-27401
What It Can Do
- Detects differences between light and dark objects
- Proximity detection to judge relative distance to an object
- Works as an analog sensor, but can be connected to a digital I/O pin
The QTI Sensor uses an infrared light emitting diode and infrared phototransistor to provide simple but effective non-contact detection of patterns and objects. In either case, light emitted by the LED bounces off a surface or object, and is detected by the phototransistor.
For pattern detection, the sensor can differentiate between light and dark surfaces, such as a black line drawn on a piece of white paper (useful as a robot line follower).
For object detection, the sensor can judge whether it’s close to an object by how much infrared light is reflected from it (useful as a tabletop edge detector).

QTI stands for Charge Transfer Infrared, an acronym describing how the sensor uses the charge/discharge time of a capacitor to provide a scaled output, without requiring any additional analog-to-digital circuitry.
In a working circuit, your microcontroller measures the time it takes for the QTI’s capacitor to decay. This decay time is a measurement of the rate of charge transfer through the infrared phototransistor, and indicates how much infrared light is reflecting off a nearby surface.
Parts List
- QTI Sensor
- BASIC Stamp HomeWork Board, Propeller BOE, Propeller QuickStart, or Arduino Uno microcontroller (solderless breadboard as needed)
- 22 gauge solid conductor hookup wire
Basic Wiring

- Power requirements: 3.3 to 5 VDC
- Communication: Analog output of capacitor decay time depending on level of infrared reflectivity
- Dimensions: 1.25 x 0.37 in (31.7 x 9.4 mm)
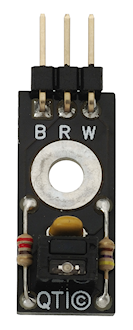
Important! The labeling on the QTI Sensor refers to the colors of a 3-wire servo extension wire: Black, Red, and White. The QTI does not follow the typical arrangement of 3-wire connections where the center (red) wire is power. Be sure not to reverse the +V and Gnd wires!

Program KickStarts
Each of the example programs display current value from the QTI sensor as a number.
- The lower the number, the lighter the surface. Or for object detection, the closer the sensor is to the object.
- The higher the number, the darker the surface. Or for object detection, the farther the sensor is to the object.
The range of values depends on the microcontroller (due to how the microcontroller measures the capacitor transfer decay time), but is typically about 30 to 2000. The range will also depend on the reflectivity of the object.
Some objects, like the black antistatic foam used to protect electronic circuit boards, reflect little or no infrared light, and the QTI cannot reliably detect these.
BASIC Stamp HomeWork Board

Download BASIC Stamp 2 code for the QTI Sensor
' {$STAMP BS2}
' {$PBASIC 2.5}

SnsrIn CON 9                  ' Line sensor input (R)
Duration VAR Word             ' Holds duration value

Read_Sensor:
  HIGH SnsrIn                 ' Discharge QTI cap
  PAUSE 1		            ' Wait 1 ms
  RCTIME SnsrIn, 1, Duration  ' Read sensor value

  Display:		            ' Display value
  DEBUG HOME
  DEBUG "-----", CR
  DEBUG DEC Duration, CLREOL
  PAUSE 250		            ' Wait 250 ms, repeat
  GOTO Read_Sensor
When this program is run, the BASIC Stamp Debug Terminal will automatically open.
Depending on surface reflectivity, values will range from about 60 to 3400.
Propeller BOE and Propeller QuickStart

Propeller BOE Wiring Diagram

Propeller QuickStart Wiring Diagram
Download Propeller Spin code for the QTI Sensor
OBJ

  debug   : "FullDuplexSerial"
  rc      : "RCTime"

CON

  _clkmode = xtal1 + pll16x
  _xinfreq = 5_000_000

VAR

  long RCValue

PUB Go

  debug.start(31, 30, 0, 115200)
  RCValue := 0

  repeat
    rc.rctime(0, 1, @RCValue)      ' Get RC value on 0
    debug.dec(RCValue / 100)         ' Display results
    debug.tx(13)
    WaitCnt(ClkFreq / 4 + Cnt)     ' Delay 250ms, repeat
This program uses the FullDuplexSerial object library, which is included with the Propeller Tool software download. To view the results of the demonstration, after uploading is complete run the Parallax Serial Terminal from the Run menu, or press F12. Momentarily depress the Reset button on the Propeller QuickStart board to restart the program. Depending on surface reflectivity, values will range from about 3 to 2000.
Arduino Uno

Download Arduino Code for the QTI Sensor
void setup() {
  Serial.begin(9600);
}

void loop() {
  Serial.println(RCTime(2));	    // Connect to pin 2, display results
  delay(250);			    // Wait 250 ms
}

long RCTime(int sensorIn){
   long duration = 0;
   pinMode(sensorIn, OUTPUT);     // Make pin OUTPUT
   digitalWrite(sensorIn, HIGH);  // Pin HIGH (discharge capacitor)
   delay(1);                      // Wait 1ms
   pinMode(sensorIn, INPUT);      // Make pin INPUT
   digitalWrite(sensorIn, LOW);   // Turn off internal pullups
   while(digitalRead(sensorIn)){  // Wait for pin to go LOW
      duration++;
   }
   return duration;
}
To view the results of the demonstration, after uploading is complete click the Serial Monitor icon in the Arduino IDE. This displays the Serial Monitor window. Momentarily depress the Reset button on the Arduino board to restart the sketch.
Depending on surface reflectivity, values will range from about 40 to 1300.
For More Information
- Visit the full documentation for the QTI Sensor (#555-27401), available from its product page.
- The QTI Line Follower AppKit contains four QTI sensors, plus mounting hardware to attach to the BOE-Bot robot chassis, and is specifically designed to provide line following capability.
- The Infrared Line Follower Kit is a single module with eight integated infrared sensors, and is also designed to provide line following capbility to the BOE-Bot robot chassis.