")
Item code: 32440
What It Can Do
- Uses a radio link to wirelessly connect two (or more) microcontrollers or other devices, with a range of up to 300 feet*
- Supports the industry-standard IEEE 802.15.4 communications protocol
- Included USB adapter board allows direct connection to a PC
*Effective range depends on numerous factors, such as use indoors or outdoors, antenna type, data speed, obstacles, and nearby objects or equipment that may reflect or interfere with radio transmission. Indoor range may be reduced to 100 feet or less, depending on building construction.
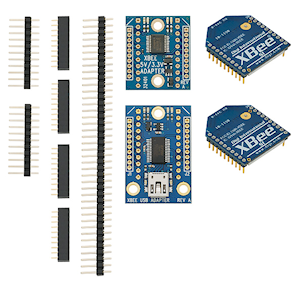
The XBee® Wireless Kit contains two self-contained radio transceivers, enabling two devices, like a microcontroller and sensor, to wirelessly communicate at data rates of up to 115,200 baud — 9,600 baud is the default, and is fast enough for most applications. One use for the XBee Wireless Kit is transmitting sensor data from one microcontroller to another, or from a microcontroller to a personal computer. The remote transmitting station can be located in a different room, even outdoors.

The XBee Wireless Kit comes with the following components in one package:
- (2) Series 1 XBee transceiver modules, with internal PCB-mounted antenna
- (1) 3.3/5V (dual voltage) breadboard adapter
- (1) USB breadboard adapter
- (4) Breakaway headers
Some assembly is required before you can use the XBee Wireless kit. Use a pair of small pliers to break the two 22-pin header strips in half — this results in four (4) strips, each with 11 pins. Use a 25-30 watt soldering pencil to solder the headers onto the two adapter boards. For detailed steps refer to the illustrated documentation for the boards; see For More Information, below.
The XBee Series 1 (“S1”) transceivers are factory set to communicate with one another without the need to modify built-in settings. This simplifies their use, but imposes some restrictions, such as slower communications speed, and the number of XBee transceivers that can be operating simultaneously.
This KickStart assumes you are using only two XBee Series 1 transceivers at a time, and have not changed their factory settings. For more advanced use of XBee transceivers see the book Getting Started with XBee RF Modules (see For More Information).
Parts List
- XBee Wireless Kit
- BASIC Stamp HomeWork Board, Propeller QuickStart, or Arduino Uno microcontroller (with solderless breadboard, as needed)
- Additional solderless breadboard
- 22 gauge solid conductor hookup wire
Basic Wiring

- Power requirements: 3.3 or 5 VDC
- Communication: Serial pass-through to XBee module
Program KickStarts
The example programs send data that you type on your PC keyboard from a local XBee transceiver to a remote transceiver. Keys you press are then echoed back, and displayed in a serial monitor window – press the A key and you see the letter A in the serial monitor.
For the purposes of demonstration, the remote transceiver is wired in loopback mode — its Data Out (DOUT) and Data In (DIN) pins are connected together. Whatever data the remote XBee receives is simply sent back (“echoed”) to you. This way you don’t need a microcontroller on the remote module just to demonstrate communicating between two XBee transceivers.

BASIC Stamp HomeWork Board

Download BASIC Stamp 2 code for the XBee Wireless Pack
' {$STAMP BS2}
' {$PBASIC 2.5}

' Requires remote XBee in loopback mode (DIN connected to DOUT)

Baud  CON     84                        ' 9600 baud non-inverted
Rx    PIN     15                        ' XBee DOUT
Tx    PIN     14                        ' XBee DIN
temp  VAR     Byte                      ' Temporary variable

PAUSE 500                               ' 1/2 second pause to stabilize

DO
  DEBUG CLS, "Type a character: "       ' Prompt for character
  DEBUGIN temp                          ' Catch user response
  SEROUT Tx, Baud, [temp]               ' Send to transmitting XBee
  SERIN Rx, Baud, [temp]                ' Get echo from receiving XBee
  SEROUT 16, Baud,
    [CR, "You entered: " , temp]        ' Display result
  PAUSE 1500                            ' Wait 1-1/2 seconds
LOOP
Note: When this program is run the BASIC Stamp Debug Terminal will automatically open. Press a letter or number key. You know things are working when each key you press is echoed back to you. If you prefer, uncheck the Echo Off box at the bottom of the Debug Terminal to prevent double characters from appearing.
Propeller QuickStart

Download Propeller Spin code for the XBee Wireless Pack
' Requires remote XBee in loopback mode (DIN connected to DOUT)

OBJ

  PC  :  "FullDuplexSerial"
  XB  :  "FullDuplexSerial"

CON

  _clkmode = xtal1 + pll16x
  _xinfreq = 5_000_000

  ' Set pins and Baud rate for XBee communication
  XB_Rx = 0                  ' XBee DOUT   Data coming in from XBee
  XB_Tx = 1                  ' XBee DIN    Data going out of XBee
  XB_Baud = 9600
  ' Set pins and baud rate for PC communication
  PC_Rx = 31
  PC_Tx = 30
  PC_Baud = 115200

VAR

  long stack[50]             ' Stack space for second cog

Pub Go

  PC.start(PC_Rx, PC_Tx, 0, PC_Baud) ' Initialize comms for PC
  XB.start(XB_Rx, XB_Tx, 0, XB_Baud) ' Initialize comms for XBee
  cognew(XB_to_PC,@stack)            ' Start cog for XBee--> PC comms
  PC.rxFlush                         ' Empty buffer for data from PC
  repeat
    XB.tx(PC.rx)                ' Accept data from PC and send to XBee

Pub XB_to_PC

  XB.rxFlush                    ' Empty buffer for data from XB
  repeat
    PC.tx(XB.rx)                ' Accept data from XBee, send to PC
This program uses the Parallax Serial Terminal object library, which is included with the Propeller Tool software download.
To view the results of the demonstration, after uploading is complete run the Parallax Serial Terminal from the Run menu, or press F11, then click Enable. Momentarily depress the Reset button on the Propeller QuickStart board to restart the program.
Press a letter or number key. You know things are working when each key you press is echoed back as you type it. If you prefer, uncheck the Echo On box to prevent double characters from appearing.
Arduino Uno

Download Arduino Code for the XBee Wireless Pack
// Requires remote XBee in loopback mode (DIN connected to DOUT)

#include <SoftwareSerial.h>

#define Rx    6			    // DOUT to pin 6
#define Tx    7			    // DIN to pin 7
SoftwareSerial Xbee (Rx, Tx);

void setup() {
  Serial.begin(9600);               // Set to No line ending;
  Xbee.begin(9600);		    //   type a char, then hit enter
  delay(500);
}

void loop() {
  if(Serial.available()) {          // Is serial data available?
    char outgoing = Serial.read();  // Read character, send to XBee
    Xbee.print(outgoing);
  }

  if(Xbee.available()) {            // Is data available from XBee?
    char incoming = Xbee.read();    // Read character,
    Serial.println(incoming);       //   send to Serial Monitor
  }

  delay(50);
}
To view the results of the demonstration, after uploading is complete click the Serial Monitor icon in the Arduino IDE. This displays the Serial Monitor window. Momentarily depress the Reset button on the Arduino board to restart the sketch.
Press a letter or number key. You know things are working when the character is echoed back as you type. You must press the Enter key after each character, or string of characters. Be sure to choose the Carriage return and line feed option in the Serial Monitor window to enable the Enter key action.
For More Information
- Refer to the XBee Wireless Pack (#32440) page for details regarding this product.
- See the XBee RF Modules page for more information on the various Parallax XBee products, a cross reference chart, and links to documentation and how-to guides.
- View the XBee USB Adapter Board (#32400) documentation
- View the XBee 5V/3.3V Adapter Board (#32401) documentation
- Read the Getting Started with XBee RF Modules text (#122-32450)