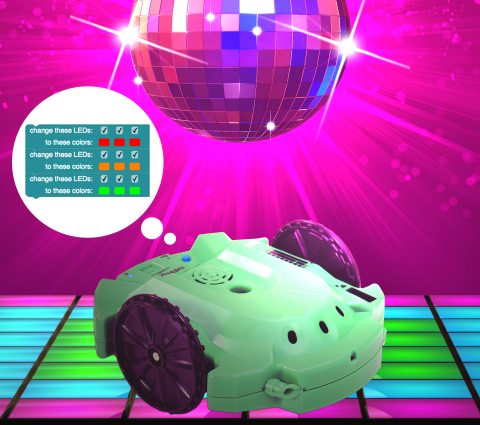
Let’s make some noise (and flash some LEDs)!
You may have already tried out your robot’s 8 pre-programmed demo modes. If so, you’re probably familiar with some of the sounds it can make – most demo programs have some sort of sound or music in them. Did you know that those 3 LEDs underneath the S3 logo can be programmed independently, and in several different colors? This section will introduce you to your S3 robot’s 3 bi-color LEDs and its built-in speaker.
Before you begin, you should have already completed:
When you’re ready to proceed, click the following links to get started!
Now that you’ve gotten BlocklyProp setup to program your S3 robot, we can dive in! Programming, and the ability to change and write new programs, is what makes robotics so amazing. We will begin learning to use BlocklyProp by learning to control the S3’s lights, or LEDs.
You have likely already noticed that your S3 has several lights, especially if you’ve gone through the S3’s 8 pre-programmed demonstration programs. Each of these lights is an LED. There are more inside the shell that you cannot see. What are they for? What do they mean and how can you learn to use them?
Below are photos of some of the S3’s LEDs. We will begin with those that are easiest to find. You can also follow along with the S3 startup guide that came with your robot, which has a section labeling the different parts of your S3.
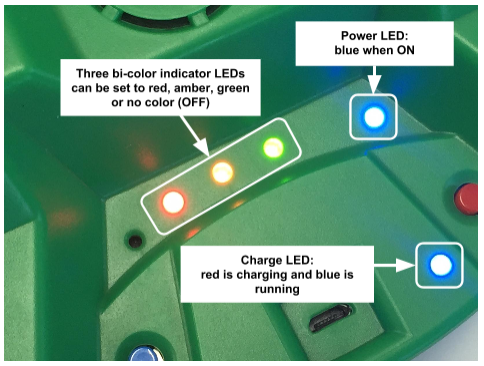
Bi-color Indicator LEDs – These are the three LEDs at the back of the robot, directly below the S3 logo. In this tutorial, you will learn how simple and useful they are to program. In their simplest use they can be off, red, amber, or green. They are called bi-color because they combine the ability to emit two colors (in this case red or green, depending on the direction that electrical current flows through the LED). These two colors can be mixed as well, forming the color amber.
Power LED – When your S3 is powered on, you will see the blue power LED light up and stay on. When it blinks, this means your battery is getting low and needs to be recharged. When you turn off your S3, the power LED turns off along with everything else. This particular LED is also bi-color in blue/red.
Note that if a very short program has been loaded to the S3, this light may not come on.
Charging LED – This LED is solid blue when the power is on, solid red when charging, and blinking blue/red when there is a charge fault or something wrong with your robot. This LED gives you useful feedback for charging your S3’s rechargeable battery. As you might guess, it is bi-color too in blue/red.
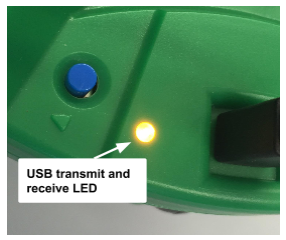
USB TX/RX LED – This is an amber LED that indicates the USB port is transmitting or receiving.
Other LEDs – There are other LEDs on the S3 that are more difficult to see. We will find and learn about them in later tutorials.
A light-emitting diode (LED) is a light source that is also a semiconductor. It emits light when voltage is applied to its leads.
The first LEDs were used in 1962 and emitted low-intensity infrared light. Infrared LEDs are still frequently used today and are more common now than ever before. They are used as sensors when paired with receivers – your TV remote control is a good example of this. The first visible-light LEDs were also of low intensity, and limited to the color red. Modern LEDs are available in virtually all visible (and some invisible) colors – in single, bi-color (two color), or multi-color types, in all kinds of shapes and sizes with greatly varying brightnesses.
Early LEDs were used mostly as indicator lights in electronic devices and replaced small incandescent bulbs. You may be used to seeing them in multi-segment displays like digital clocks or on your microwave. These days, virtually all devices have LED indicators or displays as they are becoming an inexpensive replacement for the light bulbs we all use in our homes. LEDs are dependable and have long lifespans, making replacement less frequent.
BlocklyProp makes programming your S3’s three bi-color indicator LEDs easy. These LEDs are useful for providing visual feedback to the robot programmer. For example, you could use the three LEDs to show which of the S3’s light sensors detects the most light. They are also helpful as turn signal indicators and backup lights. You could use the right green LED for a forward right turn, and make it red for a backwards turn.
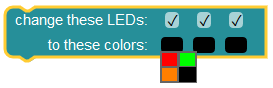

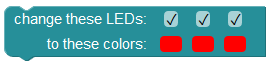
Suppose you wanted to create a program that made all lights turn red, then amber, and finally green (like a reversed traffic light). Your first thought might be to build it like this:
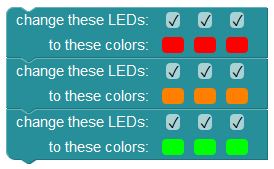
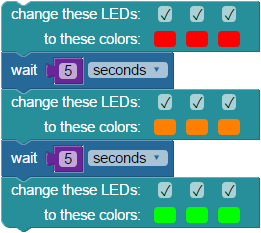
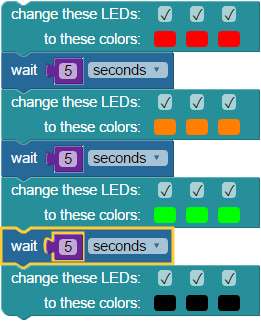
If you create and download this program, you will only see green LEDs. Why? Each change of LED colors takes only a millisecond or less, so you are unable to see the LEDs in their red or amber states. That is how quickly the Propeller Microcontroller inside the S3 executes the program. You could remedy this by adding some wait blocks from the CONTROL category. The wait block has several unit choices which you can use to add delays to slow the program – second(s), tenth(s) of a second, and millisecond(s). Choose the unit you want to use by selecting it in the dropdown menu. Change how long to wait by clicking in that box and typing a number. Simple!
As you saw above, one of the wait block’s time units is millisecond(s). A millisecond (ms) is 1/1000th of a second. Your program is going to pause for period of time and in a unit you set. In order to make programs do what you want them to do and when you want them to, you need to determine how long of a wait you need to create. If you set the wait (or delay) to 5 tenth(s) of a second, that is the same as half of a second or 500 ms. Waits or delays are measured in these tiny increments of time because your robot’s Propeller Multicore processes things very quickly (in a few ms or less).
An MIT study in 2014 found that the human brain can “see” and “process” images flashed before the eyes for as little as 13 milliseconds (remember that a millisecond is 1/1000th of a second). That is eight times faster than scientists previously thought – before, it was believed that it took around 100 milliseconds. Even though our human processing speed is quite fast, the S3’s “brain”, the Propeller Microcontroller, is considerably faster.
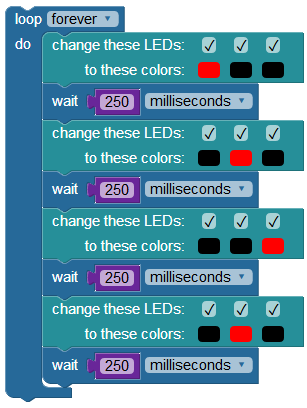
Create a continuous LED “scanner” that bounces a red LED from side to side. This is a simple program to build, as shown below. Notice that to accomplish this, you will use another block and programming tool called a loop block.
There are two basic loop blocks:
We’ll go over more complex loops, and how to break out of a loop, in a later tutorial.
Special thanks to Parallax friend Whit Stodghill for his assistance in writing, editing, and testing material for these S3 tutorials.
Sound has always been an important feature of the Scribbler robot. The ability to easily create a variety of sounds, using built-in hardware, gives the Scribbler robot much of its unique and lovable personality.
The sound design for robots in movies helps give the robots or computers their on-screen personality. Think about the sounds of Optimus Prime in Transformers – heroic and strong; or the friendly and endearing sounds of R2-D2 from Star Wars, and WALL-E from WALL-E. Sounds really do matter.
There are several YouTube videos about the sound design for WALL-E that may give you a better appreciation for the process. Take a look when you have some extra time. You just may learn something neat!
The sounds you choose for your S3 robot are also important. Humans very strongly associate sound with meaning. Certain sounds or music in your S3’s program can be used to provide something simple like feedback on sensor conditions, or they could be used to mimic human emotional states like sadness or happiness.
All of Parallax’s Scribbler robots (original blue (1), red (2), and green (3)) can also be programmed with a simple-to-use GUI Software (GUI – pronounced gooey – stands for Graphical User Interface). One of its fun and useful features is the “sound tile.” All versions of the GUI run on Windows operating systems only.

In the GUI, you can make tunes, trumpet sounds, piano notes, sound effects, Morse code, phone tones, and more. The tempo of playback, and note duration can also be controlled. This resource is fully available to Windows users with the Scribbler S3 GUI Software download.
BlocklyProp requires more of a hands-on approach when working with sound creation blocks. The rest of this tutorial will focus on using BlocklyProp to create sounds with your S3 robot.
One sound that seems to be universally recognizable is the “uh oh” sound. Without any visual indication, we can intuitively understand something has happened simply by hearing this two-tone sound combination. Since everyone runs into problems on occassion (even robots), let’s learn how to program your S3 to make the “uh oh” sound.
In BlocklyProp, we will use the play tone block, found in the ACTIONS > SOUND category, to play a single tone. You may notice that you have the option of setting a second tone, located just underneath the first one. For this program, we will leave the second tone value at 0 (zero). This play tones block is defined by setting frequency (tone in Hz) and duration (time in ms). The wait block is for the “rest” or silent pause (in ms) between the tones. A volume setting is also on this block, and normally it has a numerical value where you can just type a number between 0 and 100. Here, we have introduced a different way to set volume: with a variable.
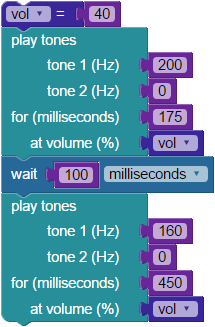
By setting the volume (0-100) using a number value block attached to a set variable block – we control it everywhere it appears in this program. Here, we used the set variable block first to initialize our “vol” variable with a value of 40. Now, anytime you insert a use variable block into your program, every “vol” variable block will actually behave as though you typed in the number 40.
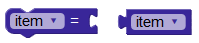
Hint: If using the set variable block, to name a variable (click on “Item” and then on “Rename variable…” in the dropdown). The name you choose will automatically appear in the use variable block dropdown menu. Also, if you create a variable using the set variable block, its matching use variable block will appear in the VARIABLES menu block list.
In short programs like this one, replacing a typed-in number with a variable isn’t always necessary, but it can save a lot of time and simplify troubleshooting in larger, longer programs. Why do you think this is?
Now that you’ve heard it, you will understand how this sound conveys an error or problem without a written message or warning light. That is how powerful sounds are; we can intuitively understand the message without explanation. You have just created a sound that can be used in any BlocklyProp program and with your S3 to indicate a problem! This, and other sounds, can be extremely valuable tools in troubleshooting or autonomous navigation.
In the S3 Demo programs, music was used along with other features to make the programs more appealing and entertaining. We will now take a look at the play note block, BlocklyProp’s other block for creating sound. You will find it in the ACTIONS > SOUND category.
Not familiar with musical notes or vocabulary? Read “A Lesson on Sheet Music“, part of a PBASIC-language project here on Learn called “Playing Sheet Music with a Piezospeaker”.
It doesn’t get much easier than that! With this block you can construct almost any simple tune.
The sound of any given of musical instrument can be represented by its frequency in Hertz (Hz) as used in the play tone block. If you really want to dive into the deep end, you can use the play tone block combined with any number of great online resources to create many fascinating musical programs. This will be covered in future tutorials and BlocklyProp projects.
Special thanks to Parallax friend Whit Stodghill for his assistance in writing, editing, and testing material for these S3 tutorials.
As we learned in the last tutorial, creating simple sounds for the S3 robot is easy with the BlocklyProp programming tool. This is a short collection of additional sounds and short tunes you can quickly program on their own, or add to other S3 BlocklyProp projects.
This sound is a favorite at any age, and is fun to play when your robot completes its assigned task.
In BlocklyProp, use the play tone block and the wait block for the rest, or silent pause, between the tones.
In this program, the volume variable is built into the play tone block itself. However, this is not always the case. Other programs will sometimes require the use of the set variable and use variable blocks to control variables like volume level. For more information on inserting a variable in place of a number value block, see the previous tutorial: Let’s Make Some Noise.
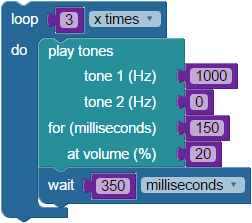
In BlocklyProp, use the play tone block to play a single tone. Note that there are settings for two tones in this block; make sure you set the second tone to 0. As in the previous tutorial, the wait block is the rest, or silent pause. Here, it is used to create a pause between beeps. The loop (x times) block is used to repeat the tone the desired number of times.
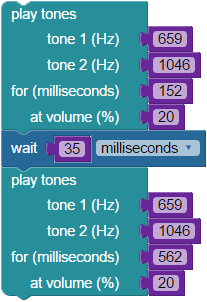
This next sound is one you may recognize from arena sports games like baseball or hockey. Most appropriately played when your robot begins a task, Charge! is a fun sound to add to your programs. In BlocklyProp, you will use the play tone block which lets you play two tones at the same time as well as the wait block for a musical rest.
Sometimes, tunes can take you back to a memory or remind you of childhood. Here is one from when you, or maybe when your parents, were little. This tune will be our version of a childhood classic, but for your S3.
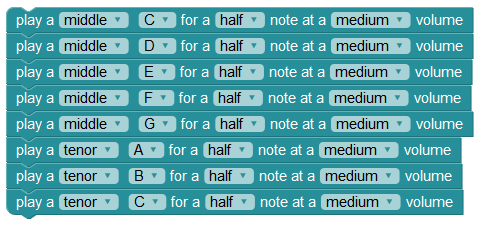
In BlocklyProp, follow the ACTIONS > SOUND catgeory and select the play note block. Remember that in this block we can choose an octave, a note, a note count, and a volume. Pay special attention to all the settings. If you’d like, you can find the original sheet music online through Wikipedia or any search engine.
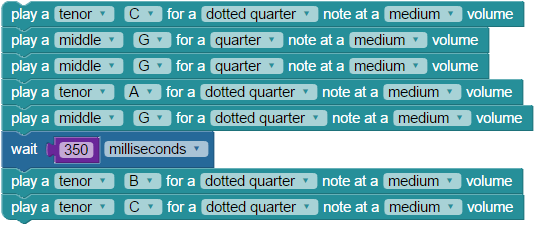
What is a dotted note? It is a note which is tied to half its duration or value. To help make things simpler for our purposes, think of it as a note whose duration is halfway between it and the next note. In music’s written form, a dotted note is literally shown as a note with a dot immediately behind it.
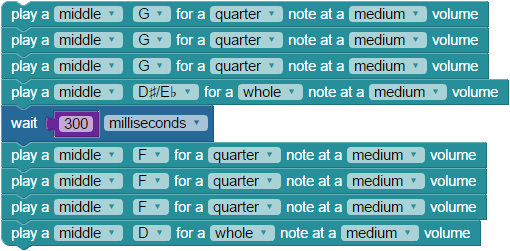
These eight notes are some of the most well known for their ominous sound. Instantly recognizable, you might play this tune on your S3 when peril lies ahead. For example, to warn you of an upcoming obstacle.
To compile this tune in BlocklyProp, use the ACTIONS > SOUND category’s play note block. Search for the sheet music of the tune you want to create on Google or through Wikipedia (in this case, Beethoven’s 5th Symphony) and enter the octave, note, count and volume.
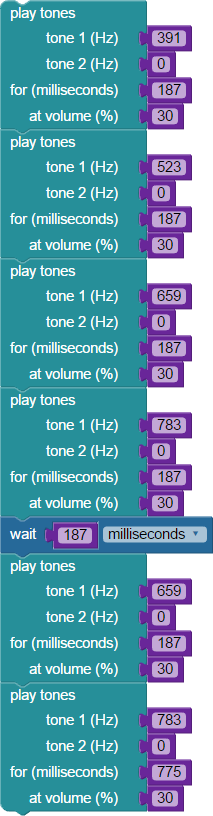
Alternate Version – In this alternate version of the Beethoven’s 5th BlocklyProp code, we use the ACTIONS > SOUND category’s play tone block, and variables to set the note duration count and volume. We play the same notes as above, along with the same length and octave above.

What did you notice about how the alternate version sounded compared to the first version? Unlike the play note block, the play tone block allows us to add a second tone to each sound – essentially, a second note. This second tone can be used, as it is here, to create a sort of chord (a group of harmonious notes played together at the same time). Though true chords are usually 3 or more notes played together, your S3 can still make harmonious sounds with two.
Special thanks to Parallax friend Whit Stodghill for his assistance in writing, editing, and testing material for these S3 tutorials.
