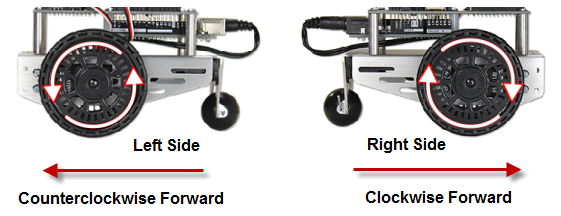
Have you ever thought about what direction a car’s wheels have to turn to propel it forward? The wheels turn opposite directions on opposite sides of the car. Likewise, to make the BOE Shield-Bot go forward, its left wheel has to turn counterclockwise, but its right wheel has to turn clockwise.
Remember that a sketch can use the Servo library’s writeMicroseconds function to control the speed and direction of each servo. Then, it can use the delay function to keep the servos running for certain amounts of time before choosing new speeds and directions. Here’s an example that will make the BOE Shield-Bot roll forward for about three seconds, and then stop.
// Robotics with the BOE Shield - ForwardThreeSeconds
// Make the BOE Shield-Bot roll forward for three seconds, then stop.

#include <Servo.h>                           // Include servo library

Servo servoLeft;                             // Declare left and right servos
Servo servoRight;

void setup()                                 // Built-in initialization block
{
  tone(4, 3000, 1000);                       // Play tone for 1 second
  delay(1000);                               // Delay to finish tone

  servoLeft.attach(13);                      // Attach left signal to pin 13
  servoRight.attach(12);                     // Attach right signal to pin 12

  // Full speed forward
  servoLeft.writeMicroseconds(1700);         // Left wheel counterclockwise
  servoRight.writeMicroseconds(1300);        // Right wheel clockwise
  delay(3000);                               // ...for 3 seconds

  servoLeft.detach();                        // Stop sending servo signals
  servoRight.detach();
}

void loop()                                  // Main loop auto-repeats
{                                            // Empty, nothing needs repeating
}
First, the Servo library has to be included so that your sketch can access its functions:
#include <Servo.h> // Include servo library
Next, an instance of Servo must be declared and uniquely named for each wheel:
  Servo servoLeft;                     // Declare left & right servos
  Servo servoRight;
Instance of an Object
An object is a block of pre-written code that can be copied and re-used multiple times in a single sketch. Each copy, called an object instance, can be configured differently. For example, the two Servo declarations create two instances of the object’s code, named servoLeft and servoRight. Then, functions within each instance can be called and configured individually. So, servoLeft.attach(13) configures the servoLeft object instance to send its servo control signals to pin 13. Likewise, servoRight.attach(12) tells the servoRight object instance to send its signals to pin 12.
A sketch automatically starts in its setup function. It runs the code in there once before moving on to the loop function, which automatically keeps repeating. Since we only want the BOE Shield-Bot to go forward and stop once, all the code can be placed in the setup function. This leaves the loop function empty, but that’s okay.
As with all motion sketches, the first action setup takes is making the piezospeaker beep. The tone function call transmits a signal to digital pin 4 that makes the piezospeaker play a 3 kHz tone that lasts for 1 second. Since the tone function works in the background while the code moves on, delay(1000) prevents the BOE Shield-Bot from moving until the tone is done playing.
void setup()                           // Built-in initialization
  {
    tone(4, 3000, 1000);               // Play tone for 1 second
    delay(1000);                       // Delay to finish tone
Next, the servoLeft object instance gets attached to digital pin 13 and the servoRight instance gets attached to pin 12. This makes calls to servoLeft.writeMicroseconds affect the servo control signals sent on pin 13. Likewise, calls to servoRight.writeMicroseconds will affect the signals sent on pin 12.
    servoLeft.attach(13);              // Attach left signal to pin 13
    servoRight.attach(12);             // Attach right signal to pin 12
Remember that we need the BOE Shield-Bot’s left and right wheels to turn in opposite directions to drive forward. The function call servoLeft.writeMicroseconds(1700) makes the left servo turn full speed counterclockwise, and the function call servoRight.writeMicroseconds(1300) makes the right wheel turn full speed clockwise. The result is forward motion. The delay(3000) function call keeps the servos running at that speed for three full seconds. After the delay, servoLeft.detach and servoRight.detach discontinue the servo signals, which bring the robot to a stop.
   // Full speed forward
   servoLeft.writeMicroseconds(1700);  // Left wheel counterclockwise
   servoRight.writeMicroseconds(1300); // Right wheel clockwise
   delay(3000);                        // ...for 3 seconds

    servoLeft.detach();                // Stop sending servo signals
    servoRight.detach();
}
After the setup function runs out of code, the sketch automatically advances to the loop function, which repeats itself indefinitely. In this case, we are leaving it empty because the sketch is done, so it repeats nothing, over and over again, indefinitely.
void loop()                   // Main loop auto-repeats
{
}
Want to change the distance traveled? Just change the time in delay(3000). For example, delay(1500) will make the BOE Shield-Bot go for only half the time, which in turn will make it travel only half as far. Likewise, delay(6000) will make it go for twice the time, and therefore twice the distance.
All it takes to get other motions out of your BOE Shield-Bot are different combinations of us parameters in your servoLeft and servoRight writeMicroseconds calls. For example, these two calls will make your BOE Shield-Bot go backwards:
 // Full speed backwards
 servoLeft.writeMicroseconds(1300);   // Left wheel clockwise
 servoRight.writeMicroseconds(1700);  // Right wheel counterclockwise
These two calls will make your BOE Shield-Bot rotate in place to make a left turn:
 // Turn left in place
 servoLeft.writeMicroseconds(1300);   // Left wheel clockwise
 servoRight.writeMicroseconds(1300);  // Right wheel clockwise
These two calls will make your BOE Shield-Bot rotate in place for a right turn:
 // Turn right in place
 servoLeft.writeMicroseconds(1700);   // Left wheel counterclockwise
 servoRight.write Microseconds(1700); // Right wheel counterclockwise
Let’s combine all these commands into a single sketch that makes the BOE Shield-Bot move forward, turn left, turn right, then move backward.
// Robotics with the BOE Shield - ForwardLeftRightBackward
// Move forward, left, right, then backward for testing and tuning.

#include <Servo.h>                           // Include servo library

Servo servoLeft;                             // Declare left and right servos
Servo servoRight;

void setup()                                 // Built-in initialization block
{
  tone(4, 3000, 1000);                       // Play tone for 1 second
  delay(1000);                               // Delay to finish tone

  servoLeft.attach(13);                      // Attach left signal to pin 13
  servoRight.attach(12);                     // Attach right signal to pin 12

  // Full speed forward
  servoLeft.writeMicroseconds(1700);         // Left wheel counterclockwise
  servoRight.writeMicroseconds(1300);        // Right wheel clockwise
  delay(2000);                               // ...for 2 seconds

  // Turn left in place
  servoLeft.writeMicroseconds(1300);         // Left wheel clockwise
  servoRight.writeMicroseconds(1300);        // Right wheel clockwise
  delay(600);                                // ...for 0.6 seconds

  // Turn right in place
  servoLeft.writeMicroseconds(1700);         // Left wheel counterclockwise
  servoRight.writeMicroseconds(1700);        // Right wheel counterclockwise
  delay(600);                                // ...for 0.6 seconds

  // Full speed backward
  servoLeft.writeMicroseconds(1300);         // Left wheel clockwise
  servoRight.writeMicroseconds(1700);        // Right wheel counterclockwise
  delay(2000);                               // ...for 2 seconds

  servoLeft.detach();                        // Stop sending servo signals
  servoRight.detach();
}

void loop()                                  // Main loop auto-repeats
{                                            // Empty, nothing needs repeating
}
TIP — To enter this sketch quickly, use the Arduino software’s Edit menu tools (Copy and Paste) to make four copies of the four lines that make up a maneuver (comment, servoLeft.writeMicroseconds, servoRight.writeMicroseconds, and delay). Then, modify each one with individual values
You can make the BOE Shield-Bot turn by pivoting around one wheel. The trick is to keep one wheel still while the other rotates. Here are the four routines for forward and backward pivot turns:
 // Pivot forward-left
 servoLeft.writeMicroseconds(1500);   // Left wheel stop
 servoRight.writeMicroseconds(1300);  // Right wheel clockwise

 // Pivot forward-right
 servoLeft.writeMicroseconds(1700);   // Left wheel counterclockwise
 servoRight.writeMicroseconds(1500);  // Right wheel stop

 // Pivot backward-left
 servoLeft.writeMicroseconds(1500);   // Left wheel stop
 servoRight.writeMicroseconds(1700);  // Right wheel counterclockwise

 // Pivot backward-right
 servoLeft.writeMicroseconds(1300);     // Left wheel clockwise
 servoRight.writeMicroseconds(1500);    // Right wheel stop
