Game On!
Now that we have a high-resolution timer, let’s make a little game. The purpose of this game is to test our reaction time. When the LED goes on, we press a button – the time between these two events will be measured with our background milliseconds timer.
- Locate the “ReactionTimerGame” svg file from the archive you downloaded before, and upload it into a new project.
Let’s have a look at the main program loop:
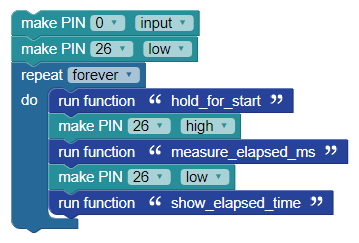
Pin 0 is defined as an input; this is where we will connect a normally open button; when the button is pressed this input will read “1.” Pin 26 controls the LED. We chose pin 26 because the FLiP module and the Propeller Activity Board both have an LED connected to pin 26. The main loop runs “forever” – that is, until we reprogram or shut-down the Propeller.
As you can see, the program is broken into five processes:
- Hold until time to start
- Turn on the LED to indicate the start
- Measure the elapsed time between start and button press
- Turn off the LED to indicate the end of the timing window
- Display the elapsed time
By using a structure like this we can easily adapt the program to a wide variety of projects and devices.
In the reaction timer program, we want to put a message on the terminal window and then create a random delay. The random delay prevents us from anticipating the start of timing. It is a game, and it’s supposed to be a challenge.
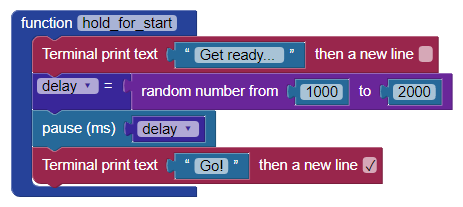
In this function we send a “Get ready…” message to the terminal and then generate a random number in delay that is between 1000 and 2000 – this value will be in milliseconds for use in a pause block; the result is a random delay after the message of one to two seconds. At the end we display “Go!” and the program returns to the main loop where the LED is turned on.
The next process is measuring the reaction time:
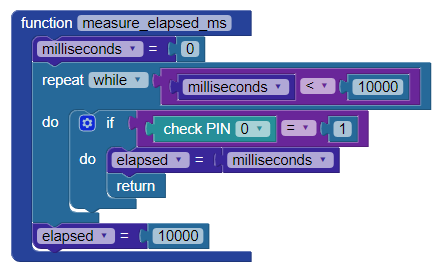
We begin by setting the milliseconds timer to zero. Some will wonder how we can do this if the milliseconds value is updated in the background cog. While that is true, the location of milliseconds is in the shared variable space of the Hub.
Now we can drop into a repeat while loop that will run until while milliseconds is less than 10000 – we’re setting a time limit of ten seconds for the reaction. Inside that loop, we look for the button to be pressed. If that happens, the value of milliseconds is copied into elapsed and we return to the main loop. If ten seconds passes, we move 10000 into elapsed and return.
In the main loop the LED is turned off to mark the end of the timing cycle.
The final step is to display the reaction time:
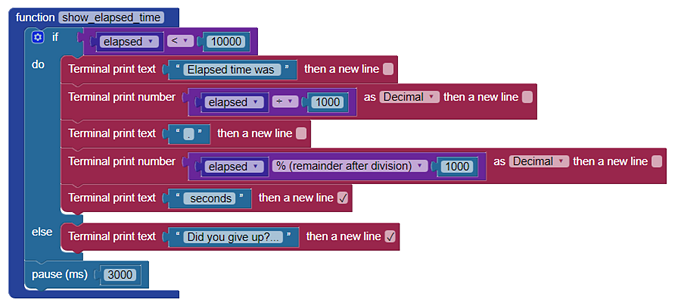
You’ll remember that the program gives up if the timer reaches ten seconds, so we check for that first. Assuming a good reaction, we display the time in fractional seconds. This is accomplished by dividing the elapsed milliseconds by 1000 for whole seconds, then using the modulo (%) operator to extract the fractional part. For example, if the elapsed time was 1234 milliseconds, the display would should 1.234 seconds.
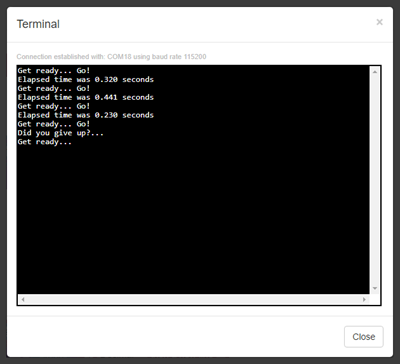
If there was no input, the program will ask if we gave up. In either case, the display will hold for three seconds, and then will run again. Here’s what we see when the program is running:
As you can see, the program is designed to make changes for other timing applications very simple. How about a pinewood derby timer? What changes would you make?
Ideas for other uses:
- Add a solenoid to release the car when the button is pressed
- Start timing when car is released
- Monitor an optical sensor at the finish line-to-line
- Stop timing when the optical sensor is blocked
Precision timing is useful in a wide variety of applications, and now you have simple tool for timing high-speed events. What will you do with it?