Driving Distances
The Robot drive distance block tells the ActivityBot 360° how far each wheel should turn. It is intended for projects where the goal is to drive specific distances and turn specific angles. You can use positive values for forward distances and negative values for backward ones.
The default distance unit for Robot drive distance is 3.25 mm ticks. Inches and centimeters are also options in the drop-down menu. The example below shows how to make the ActivityBot roll forward 208 mm by setting the left and right distances for 64 ticks. We’ve used this value because 64 x 3.25 mm = 208 mm.
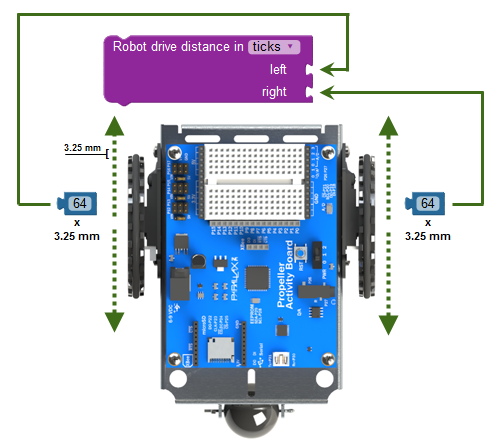
The Robot drive distance block will make the ActivityBot move:
- Forward with positive distance values
- Backward with negative distance values
- Turn right with a positive left distance value and a negative right distance value
- Turn left with a negative left distance value and a positive right distance value
Here are some examples – look carefully at the sign (+/-) of each value:

Ticks and the ActivityBot Wheel
The ActivityBot 360° wheel circumference is 208 mm, so a full turn makes the wheel travel that far. A single tick is equal to 1/64th of a full turn, and 1/64th of 208 mm works out to 3.25 mm.
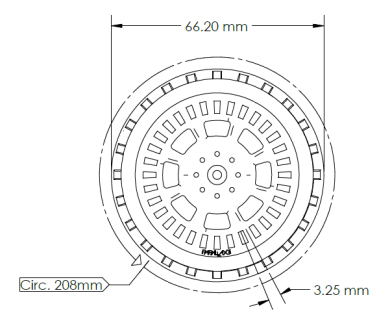
If you know how far you want your ActivityBot 360° to roll, you could divide the distance by 3.25 mm (or 0.325 cm or 0.00325 m) to find out how many ticks your program needs to tell the ActivityBot to travel.
ticks = distance mm ÷ 3.25 mm/tick
Ticks and Turning Radius
The ActivityBot 360° pivot turning radius is the distance between the wheels. Ideally, it’s 105.8 mm, but that will vary slightly with the shape of each aluminum chassis and also with how the servos are mounted. The left wheel will have to turn 2 × π × r to make the ActivityBot pivot by a full circle while holding the right wheel still. In this case, the r is the turning radius, so that’s 2 × π × 105.8 mm ≈ 664.76 mm.
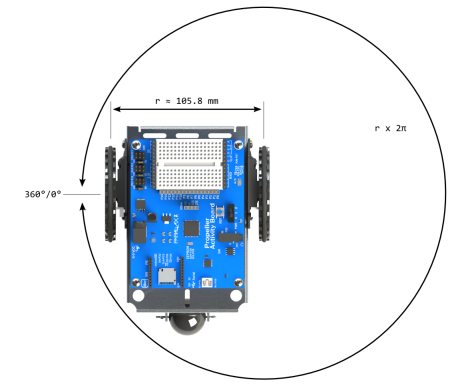
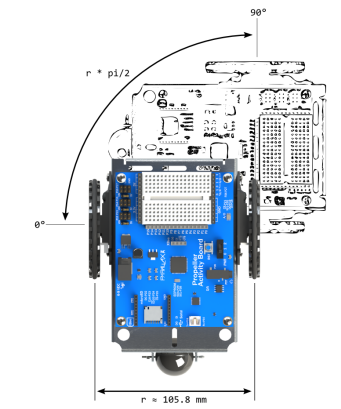
Keep in mind that the turning radius will be slightly different for each ActivityBot 360°, so you may have to tune the number of ticks for a 1/4 turn. For example, your robot’s turning radius might need 50, 52, or 53 ticks to get as close as possible to a 1/4 turn.
Test Code
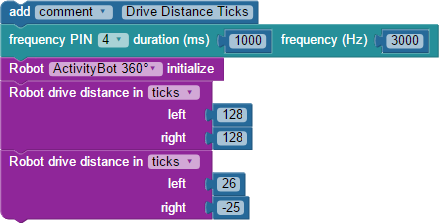
This test code makes your robot go forward 128 ticks, and then make a 51-tick, 1/4 turn, to face 90- degrees to the right.
- In BlocklyProp make a new Propeller Activity Board WX project and name it Drive Distance Ticks.
- Build the project shown below, and save it.
- Connect your robot to your computer and set the power switch to 1.
- Set the COM port and click Load and run (save to EEPROM).
- Disconnect your robot and put it on the floor in an open area.
- Press, hold, and release the reset button as you set the power switch to 2.
- Verify that the ActivityBot 360° goes forward two full wheel turns, stops, and faces right.
How it Works
First comes the comment block noting the project name. Next, the frequency out block for the piezospeaker on P4 acts as a low-battery brown-out indicator.
After the required Robot initialize block, there are two Robot drive distance blocks, set to measure distance in ticks.
The first Robot drive distance block moves both wheels forward with left 128 and right 128. Since 128 is enough ticks for two full wheel revolutions, the forward distance traveled is 3.25 x 128 = 416 mm, or about 16 inches.
The second Robot drive distance block uses left 26 and right -25 to move the wheels in opposite directions. As explained above, that is a combined 51 ticks, causing the ActivityBot 360° to rotate in place, turning 90 degrees to the right.
Did You Know?
Drive the distance, no distractions — The Robot drive distance block must complete the wheel turns for its target distance before it stops the motors. Only then will it allow the cog’s code execution to continue to the next block. This behavior is called blocking, meaning that it makes the cog wait until it is complete before allowing the program the cog is running to continue. It’s a lot like pause and frequency out, except that we know precisely how long each of those blocks will take. With Robot drive distance, we don’t necessarily know the exact amount of time a given maneuver will take.
Set your speed limit! — The Robot drive speed block is introduced on another page. Unlike the Robot drive distance block, the Robot drive speed block is non-blocking. It sets the speed and then immediately moves to the next block as it maintains the wheel speeds you have set.
Unit Options — The Robot drive distance block’s inches and centimeters options work only with the wheels that come with the ActivityBot robot. If you use wheels with a different circumference, the distance traveled per tick will change.
Line, arc, pivot, rotate in place — The values you use affects the path the ActivityBot takes. Use the same values for a straight line. For example 64, 64 makes the ActivityBot go forward. -64, -64 makes it go backward. Use different values for arcs, like 128, 64. To pivot on one wheel, set one of the two values to 0. To make the ActivityBot rotate in place, use positive values, like 26, -26.
Try This – Shapes
Let’s try making the ActivityBot 360° navigate some basic shapes:
Square
By repeating the forward and 90-degree turn maneuver 4 times, the program can make the ActivityBot draw a square.
- In BlocklyProp, make a new Propeller Activity Board WX program, and name it Drive Distance Ticks Try This.
- Get a repeat forever block from the CONTROL menu.
- Change its dropdown from forever to x times.
- Get a number block from the VALUES menu, and set it to 4.
- Use the number block to set the repeat x times block to repeat 4 times.
- Insert your repeat 4 times block just below Robot initialize.
- Move the two Robot drive distance blocks into the repeat 4 x times loop.
- Be sure to set the Robot initialize block’s drop-down menu to your robot: ActivityBot or ActivityBot 360°.
- Set the power switch to 1, and then use Load and run (save code to EEPROM) to load the program.
- Set the power switch to 0. Take your ActivityBot to a test area, then set the power switch to 1.
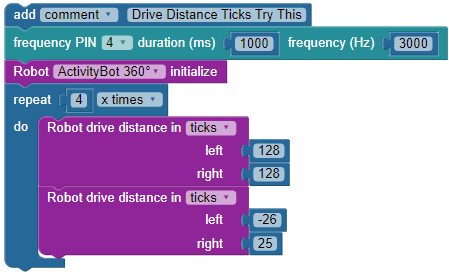
- Does it draw a square? You might need to adjust the -26 and 25 values to tune the 90-degree turns.
- For a larger square, try increasing the 128 values to 150. Or, for a smaller one, reduce to 100.
Triangle
Repeat x times need to change from 4 to 3, and -26 and 25 values need to change to make 120 degree turns instead of 90-degree turns.
- Start by changing the (-26 and 25) to -34 and 34
- Change repeat 4 x times to repeat 3 x times.
- Test to see how close your ActivityBot got to a triangle.
- Adjust the turns (-34 and 34) to fine tune. Larger values for a greater turn at each corner, smaller ones for less turn.
Arc and Circle
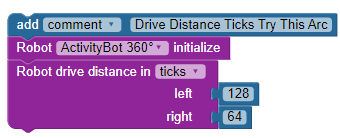
Here is some arc code.
- Try it as-is first.
- Also, try values of 256 and 128 instead. What happened?
- Test, and then increase the values until it closes a circle.
Your Turn
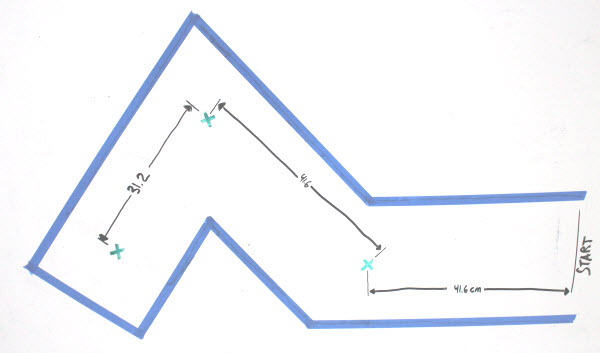
- Make a waypoint maze and write a program to navigate from start to finish. Use the speed and acceleration values that work best for your particular robot. Masking tape corridors work well for this.
An example course is shown below. To run this particular course, the ActivityBot must perform the following maneuvers:
- From START, go straight 41.6 cm forward to X.
- Turn 45 degrees right, and 41.6 cm to the next X.
- Turn 90-degrees left, and go 31.2 cm to finish X.
