Roaming with Infrared Flashlights
With your IR object sensors built and tested, you are ready to make your ActivityBot roam and avoid obstacles without bumping into them.
IR Roaming Example Code
The IR Roaming code example makes the ActivityBot go forward until it detects an obstacle. If it sees an obstacle on the left, it will turn right. Likewise, if it sees one on the right, it will turn left. And if it sees obstacles on both left and right, it will back up.
Remember, not all obstacles are visible to this infrared system.
Many dark colored objects will absorb infrared light instead of reflecting it. If in doubt, use your LED indicator program from the previous page. The red LEDs on the breadboard will show you if an object is visible to the IR object detectors.
- In your BlocklyProp account, create a new project named IR Roaming.
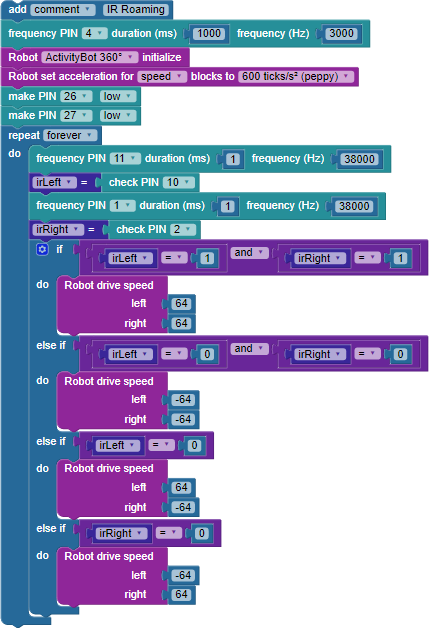
- Build the project shown below.
- Be sure to set the Robot initialize block’s dropdown to your particular robot: ActivityBot or ActivityBot 360° before you save your project.
- Connect your ActivityBot to your computer and set the power switch to 1.
- Set the COM port and click Load and run (save code to EEPROM).
- Disconnect your robot and put it on the floor in an open area.
- Press, hold and release the reset button as you set the power switch to 2.
- As your ActivityBot starts roaming around, hold your hand in front of the IR LEDs on either side.
Your ActivityBot should promptly turn away from your hand and roam in a different direction until it detects another obstacle.
How the IR Roaming Code Works
The project begins with the now familiar frequency out block for the piezospeaker brownout alarm on P4. Next comes the required Robot ActivityBot initialize block, and a Robot set acceleration block. As we learned from previous projects, 600 ticks/s2 is a moderate acceleration value that works well with the Robot drive speed block’s default value 64.
Remember that the make PIN…low blocks for P26 and P27 are needed to connect the IR LED cathodes to ground.
The rest of the code blocks are in a repeat forever loop. The next four blocks are the same as in the IR Detectors project. For each IR LED/Receiver pair, a frequency out block sends a 1 ms pulse of infrared light at 38 kHz; then a check PIN block immediately stores the IR receiver’s response in a variable. The variables irLeft and irRight will each store a zero if that receiver detects an infrared reflection off of an object, and 1 if no object is detected. (Remember, the IR receivers are set up as active-low circuits.)
A single if…do block with four conditions and potential actions makes up the rest of the repeat forever loop. Those conditions check the combined state of the irLeft and irRight variables. The possible conditions are:
- Neither sensor detects an object.
- Both sensors detect an object.
- Only the left sensor detects an object.
- Only the right sensor detects an object.
The conditions are tested one at a time in order. The first condition that is true runs the code in its …do section, and then the program flow returns to the top of the repeat forever loop.
The first if… condition uses a boolean comparison block to test whether it is true that both irLeft and irRight variables are storing a 1. That means neither IR receiver detected an object, and the ActivityBot can drive forward with Robot drive speed left 64, right 64.
The second if… condition also uses a boolean comparison block to test whether it is true that both irLeft and irRight variables are storing a zero. That means both IR receivers detected an object, and the ActivityBot can back up with Robot drive speed left -64, right -64.
If the first two conditions get skipped, it must mean that the two variables are not storing the same value. So, the next two conditions test each variable alone to see if either one detects an object.
The third if… condition checks whether irLeft is storing a zero. That means an object is detected on the left, and the ActivityBot can turn right to avoid it with Robot drive speed left 64, right -64.
The fourth if… condition checks whether irRight storing a zero. That means the an object was detected on the right, and the ActivityBot can turn left to avoid it with Robot drive speed left -64, right 64.
Did You Know?
Conserving Conditions — Since this project has only four possible conditions to check for, your if….do loop did not really need to test for the fourth. Logic tells us, if the first three conditions are false, the fourth condition must be true. So the last else…if in the if…do loop could have just been an else containing the Robot drive speed left -64, right 64 block.
Compact vs. Easy to Read — Using all four conditions is an example of building code so that it is easy to understand, rather than as short as it can possibly be. When you are first developing a project, it can be helpful to make the code as easy to understand as possible. Then save a copy, and work on making it more compact by eliminating blocks that are not necessary. However, if you will be sharing your code, or if it is a very complex project, it may be wiser to keep it readable.
Try This
Adding visible light feedback for the IR recivers can help you understand what is happening if your robot seems to behave in unexpected ways.
- Save a copy of the project and name it IR Roaming Try This.
- Add blocks to the project so that the red LED on the left side of the breadboard lights up only when the left IR receiver detects an object. Likewise, the right red LED should light up only when the right IR receiver detects an object. HINT: you will need to make a change to each …do section in the if…do block.
- Save your modified project, reconnect your ActivityBot, and load the code to EEPROM.
- Test drive your modified code. Your ActivityBot should be driving around as before, but with the red LEDs flashing as objects are detected and avoided.
Your Turn
If your sensor input, light and motion output system logic is now working well, it’s time to tune it for performance. Your goal is to get your ActivityBot navigating as rapidly as it can without running into objects or doing nose-wheelies.
- Save a copy of the project as IR Roaming Your Turn.
- Iteratively increase the drive speeds and acceleration, test driving after each change until your ActivityBot is optimally tuned.