Only for FEEDBACK 360° SERVOS!
If you are using external encoders, go to External Encoder Calibration instead.
If your ActivityBot is using Feedback 360° servos, calibration is optional, but it will improve the accuracy of driving maneuvers. This is a one-time calibration that the AB360.h library can use for measuring and correcting distances and speeds, using information from the servo's feedback connection.
Circuit
- If you haven’t already, complete the Electrical Connections first, then return here.
Test Code
The calibration code takes about a minute to collect all of its data. You will need a smooth, and obstacle-free, floor area. While the calibration program is running, the ActivityBot will pivot forward and backward, using only one wheel at a time. It will let you know when its done by turning off its P26 and P27 lights (below the breadboard). The video shows an ActivityBot correctly performing the calibration.
IMPORTANT! USE FRESH BATTERIES FOR THIS STEP!
- In SimpleIDE, open
/*
 ActivityBot 360 Calibrate.c
*/

#include "simpletools.h"
#include "abcalibrate360.h"

int main()
{
 cal_servoPins(12, 13);
 cal_encoderPins(14, 15);

 high(26);
 high(27);
 cal_activityBot();
 low(26);
 low(27);
}
- Click the Load EEPROM & Run button. (Important: this program needs to be in EEPROM.)
- When the program is finished loading, the P26 and P27 lights will turn on. When they come on, turn off the robot's power (Slide PWR switch to 0).
- Disconnect the ActivityBot from its programming cable and set it in a 1 meter square (3 ft. x 3 ft.), obstacle-free, smooth floor area.
- Set the power switch to 2 and move back to give it room to spin in place and slowly roam while it gathers wheel speed data.
- Leave it alone until the P26 and P27 lights turn off. After that, calibration is complete and you can turn the power off again.
- IMPORTANT: Complete the Try This section on this page before doing anything else with your ActivityBot.
What if it Didn't Work?
If your robot didn't move when you started the calibration program, or it started going backwards first instead of forwards, or if it started and stopped right away or just twitched, double-check your electrical connections. You may have a servo cable or feedback signal wire plugged in wrong.
What if I need to re-start or repeat the calibration?
To re-start the calibration process, just push the reset button any time while the P26 and P27 lights are on.
To repeat the calibration process once it has fully completed, you will need to use BlocklyProp to re-load the program. That is because the program modifies itself at the end so that it cannot run a second time. This keeps your ActivityBot from trying to re-calibrate the next time you turn power on to load a new program.
How it Works
This example program turns on the P26 and P27 LEDs with high(26) and high(27). It then calls the abcalibrate360 library’s cal_activityBot function, which takes the robot through the sequence of motions you just observed. While performing the maneuvers, the cal_activityBot function gathers data that corresponds to the various drive levels it applies to the servos. It stores this data n EEPROM so that every ActivityBot navigation program can use it to fine-tune the drive level needed for going a given speed. When the cal_activityBot function is done, the program turns off the P26 and P27 lights with low(26) and low(27).
Did You Know?
Encoders - An encoder converts information from one format to another. The ActivityBot's encoders convert wheel rotation or position into digital information that the Propeller microcontroller can use.
Encoder Ticks are not insects - Throughout this tutorial, you will see the term "ticks" when used to describe the ActivityBot's wheels turning. In this context, a tick means 1/64th of a wheel revolution. When the wheel makes one complete revolution, it has turned 64 ticks. We use ticks per second to note how fast the wheels are turning. Ticks can also refer to distance traveled, when considering the circumference of the ActivityBot wheel.
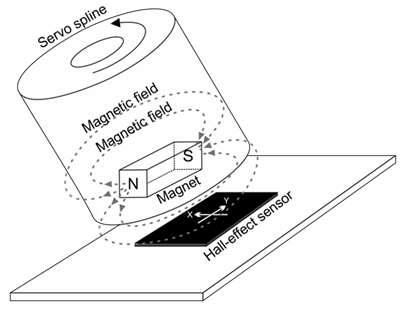
Feedback 360° Servo's Internal Encoders - Each Feedback 360° servo has a tiny magnet inside that is attached to the motor shaft. Also inside the servo's case is a Hall-effect sensor, which can detect changes in the position of the magnetic field as the motor shaft rotates. A tiny processor monitors the Hall-effect sensor and sends position information to the Propeller I/O pin. (For more details, see the Feedback 360° Servo product guide.)
Try This
There's a block that can check the ActivityBot's calibration data and tell you if there are any mistakes or problems with the ActivityBot's servo, encoder and battery connections. If this test says the calibration was successful, your ActivityBot will be ready to run navigation programs. If not, it will tell you what problem(s) it detected. After finding it and fixing it, make sure to run both the calibration and this test again. Your ActivityBot won't be ready for navigation until it has been calibrated AND passes this test!
/*
  ActivityBot360 Display Calibration Results.c
*/

#include "simpletools.h"
#include "abcalibrate360.h"

int main()
{
  cal_displayResults();
}
- Set the ActivityBot's PWR switch to 0, and re-connect the USB cable.
- Set the PWR switch back to 1, then, click the Run with Terminal button.
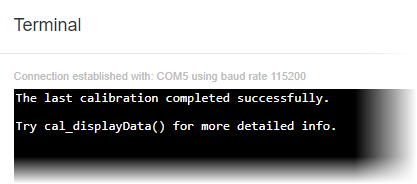
If the terminal output says "...calibration completed successfully...", you can skip to the Your Turn section because the servos, encoders, and power are all connected correctly. So, your ActivityBot is ready to run navigation programs.
- If the results in the Terminal say "...one or more problems were detected", it means that there is probably a mistake in the servo, encoder, or power connections. Check them!
- When you find and fix the first problem, re-run the calibration program (above). Then, then re-run this test. Repeat until you get the "calibration completed successfully" message.
Your Turn
Now that your ActivityBot has been calibrated, it is time to run a simple test program to make it drive straight forward. The test code below makes both wheels turn forward at 64 encoder ticks per second for 4 seconds. This should make your ActivityBot roll forward about 1 meter (3 ft.)
- Open the program Forward then Stop.c
/* Forward then Stop.c */
#include "simpletools.h"
#include "abdrive360.h"

int main()
{
  drive_speed(64, 64);
  pause(4000);
  drive_speed(0, 0);
}
- Reconnect your ActivityBot to your computer with the USB cable, and set the power switch to 1.
- Set the COM port, then click the Load EEPROM & Run button.
- After the program is done loading, set the power switch to 0 and disconnect the USB cable.
- While holding the reset button down, set the power switch to 2, and set the robot down on a hard, smooth floor.
- Release the reset button, and monitor the robot’s travel.
Your robot should travel forward for about 1 meter (3 ft.) in a straight line. You may see slight shifts as the robot adjusts its course based on encoder feedback.
How it Works
First, the lines #include "simpletools.h"and #include "abdrive360.h" make the functions of these two libraries available to the program. ALL of the programs for your ActivityBot 360 will need abdrive360.h specifically. abdrive.h will not work.
Then, inside main, the function drive_speed(64, 64) starts the ActivityBot wheels rotating at a rate of 64 ticks per second. Once you send your ActivityBot a drive_speed instruction, its servos will turn at the specified rate until it receives another drive... instruction, even while other functions are being executed. For example, the function pause(4000) elapses while the ActivityBot drives forward at that rate for 4 seconds. Finally, drive_speed(0, 0) makes the wheels stop turning.
- Skip over the External Encoder testing and calibration pages. Go directly to the lesson Set Certain Speeds.