Edit the Firmware for Servos
An Intermediate Firmware & Hardware Hack
Connecting a servo to the Parallax Flight Controller on your ELEV-8 v3 quadcopter, and editing the firmware, gives you more control of the servo.
The original Parallax Flight Controller firmware only generates servo pulses ranging from 1000 μs to 2000 μs (1.0 ms to 2.0 ms) wide. Many servos operate over a wider range, ~700 μs to ~2300 μs. So, the original Parallax Flight Controller firmware will only drive the servo through a portion of its full range:
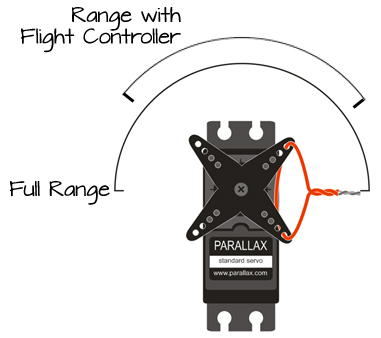
This is important to note if the servo you are driving with the Parallax Flight Controller is part of a mechanism attached to your ELEV-8 v3.
- Make sure that at least 6 channels from your receiver are connected to the Flight Controller and that you have successfully mapped one of the switches or knobs on your transmitter to the 6th channel (usually marked Aux 1).
Editing the Firmware to Support Additional Servos
If you haven’t done so already, follow the directions here (/courses/elev-8-v3-quadcopter-assembly-guide/step-22-install-software) to open the ELEV-8 v3 firmware using SimpleIDE. Make sure you understand how to upload firmware to your ELEV-8 v3. This project was tested with firmware version 1.0.2 and 1.0.3.
- Follow the instructions in step 23 to find and open the Flight Controller Firmware.
- With elev8-main.side open, click on the “Open Project Manager” icon in the lower left corner of the window:
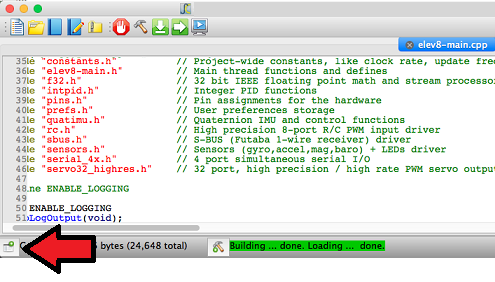
A list of files will appear on the left side of the window.
- Click on elev8-main.cpp to make sure you are editing that file.
- Scroll down until you find the following code (around line 135):
static long LEDModeColor;
- After that line, add the following code:
static int servoPosition = 8000; // create a variable to store the servos position, also tells servo where to start
- Next, scroll down until you you find the following code (around line 385):
  Servo32_Init( 400 );
  for( int i=0; i<4; i++ ) {
    Servo32_AddFastPin( MotorPin[i] );
    Servo32_Set( MotorPin[i], Prefs.MinThrottle );
  }

  Servo32_Start();
- On the line before Servo32_Start(); insert the following code:
Servo32_AddSlowPin( PIN_MOTOR_AUX1 );     // Add a standard servo on PIN_MOTOR_AUX1
Servo32_Set( PIN_MOTOR_AUX1, servoPosition );      // Set the starting position
- Next, scroll down until you find the following code (around line 492):
S4_Define_Port(3, 115200, PIN_MOTOR_AUX2, TXBuf4, sizeof(TXBuf4), 32, RXBuf4, sizeof(RXBuf4));
- Change the line to:
S4_Define_Port(3, 115200, 32, TXBuf4, sizeof(TXBuf4), 32, RXBuf4, sizeof(RXBuf4));
- Next, scroll down until you find the line (around line 620):
UpdateFlightLEDColor();
- After that line, add the following four lines of code:
if( Radio.Aux1 < -512 ) servoPosition = servoPosition - 12;  // if the switch/knob is low/down, turn counterclockwise
if( Radio.Aux1 >  512 ) servoPosition = servoPosition + 12;  // if the switch/knob is high/up, turn clockwise

servoPosition = clamp( servoPosition, 8000, 16000 );         // don't let the variable go outside of the 8000 to 16000 range!!
Servo32_Set( PIN_MOTOR_AUX1, servoPosition );                // set the servo position
- Save your project.
DO NOT CONNECT YOUR ELEV-8’s Battery. Make sure the propellers have been removed from your ELEV-8 quadcopter before continuing.
- Plug your ELEV-8 v3 Flight Controller into your computer and select the corresponding port from the drop-down menu.
- Click the Upload to EEPROM button.