Use Pitch and Roll from the IMU
An Advanced Firmware Hack
Although it is useful to use a spare channel on your transmitter to drive a servo, you can drive a servo using other variables in the Flight Controller’s firmware instead. For instance, a useful application for servos is a sensor gimbal. You may have a sensor that needs to stay level or that always points straight down. Since the Flight Controller always knows its orientation, you can use its computed pitch and roll to drive servos in use as a gimbal.
Edit the Firmware to Compute Pitch and Roll
The latest version of the Firmware available on GitHib includes code for computing Pitch and Roll – if you download your firmware from GitHub after April 5, 2016, you can skip to the section titled “Edit the elev8-main.cpp file” below.
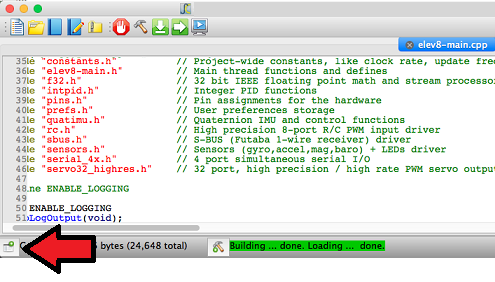
- With elev8-main.side open, click on the “Open Project Manager” icon in the lower left corner of the window:
A list of files will appear on the left side of the window.
- Click on quatIMU.h to edit that file
- Scroll down to a blank line near line 50 and add the following code:
//Add containers for Pitch and Roll measurements
int QuatIMU_GetPitch(void);
int QuatIMU_GetRoll(void);
- Go to the project tab on the left side of the window and click the quatIMU.cpp file to edit that file
- Scroll down to a blank line near line 95 and add the following code:
    //Add variables for Pitch and Roll and associated scaling constants
    Pitch,
    Roll,
    const_outAngleScale,
    const_outNegAngleScale,
- Scroll down to a blank line near line 230 and add the following code:
  //Define the scaling constants
  IMU_VARS[const_outAngleScale]     =    65536.0f / PI;
  IMU_VARS[const_outNegAngleScale]  =   -65536.0f / PI;
- Scroll down to a blank line near line 300 and add the following code:
//Create functions to retrieve the calculated Pitch and Roll Measurements
int QuatIMU_GetPitch(void) {
  return INT_VARS[Pitch];
}

int QuatIMU_GetRoll(void) {
  return INT_VARS[Roll];
}
- Scroll down to a blank line near line 745 and add the following code:
//Calculate the Pitch and Roll
        F32_opASinCos, m12,  const_1, temp,
        F32_opMul, temp,  const_outAngleScale, temp,
        F32_opTruncRound, temp,  const_0, Pitch,

        F32_opASinCos, m10,  const_1, temp,
        F32_opMul, temp,  const_outNegAngleScale, temp,
        F32_opTruncRound, temp,  const_0, Roll,
Edit the elev8-main.cpp file
- Go to the project tab on the left side of the window and click the elev8-main.cpp file to edit that file.
- Scroll down to line 388.
- Delete you changes you made earlier in the tutorial and insert the following code before the line Servo32_Start(); :
  Servo32_AddSlowPin( PIN_MOTOR_AUX1 );  // Add a servo to this pin for Pitch
  Servo32_AddSlowPin( PIN_MOTOR_AUX2 );  // Add a servo to this pin for Roll

  Servo32_Set( PIN_MOTOR_AUX1, 12000 );  // Set this servo to center (1.5 ms)
  Servo32_Set( PIN_MOTOR_AUX2, 12000 );  // Set this servo to center (1.5 ms)
- Scroll down to line 620
- Delete you changes you made earlier in the tutorial and insert the following code after the line UpdateFlightLED.Color(); :
  int servoRoll  = QuatIMU_GetRoll()  / 5;  // divide by 5 to match the servo's movement to the actual roll, may need to adjust
  int servoPitch = QuatIMU_GetPitch() / 5;  // divide by 5 to match the servo's movement to the actual pitch, may need to adjust;

  servoPitch = servoPitch + ( Radio.Aux1 << 1);  // Add the Aux1 channel to the pitch to control the gimbal's tilt.
                                                 // You can delete this line if you don't want to do this

  servoRoll  = clamp( (12000 - servoRoll),  8000, 16000 );  // Make sure the Roll and Pitch don't go out of range
  servoPitch = clamp( (12000 - servoPitch), 8000, 16000 );

  Servo32_Set( PIN_MOTOR_AUX1, servoRoll  );  // Send the values to the servos
  Servo32_Set( PIN_MOTOR_AUX2, servoPitch );
- Save your project.
DO NOT CONNECT YOUR ELEV-8’s Battery yet! Make sure the propellers have been removed from your ELEV-8 quadcopter before continuing!
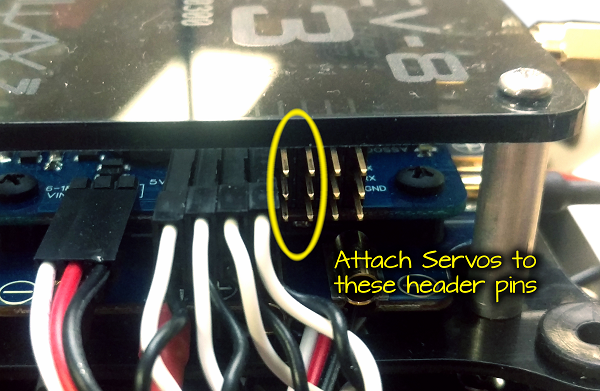
- Plug two servos into the ports shown in the photo below with the white (signal) wire upward:
- Plug your ELEV-8 v3 Flight Controller into your computer and select the corresponding port from the drop-down menu.
- Click the Upload to EEPROM button.
- Once the edited firmware has uploaded, turn on your transmitter.
- Plug the ELEV-8 v3’s battery in to turn it on.
- Tilt and twist your ELEV-8 v3 to cause the Roll and Pitch driven servos to move.
DO NOT Fly your ELEV-8 v3 with attached servos unless they are connected through a separate power supply!
DO NOT Fly your ELEV-8 v3 with modified firmware or hardware until you have followed the procedure to test it safely on the last page of this tutorial!