Skip to content
Parallax Learn

Parallax Learn

  • Welcome
  • Tutorials
        • Tutorial Series head tag

          Tutorial Series
        • Tutorial Series

          The special, classroom-ready series pages are organized collections of tutorials for our most popular hardware and/or languages. The tutorials for each topic are conveniently accessible from a single page, shown in the order it is recommended that they be completed.
        • Robotics Series Head tag

          Robotics Series
        • Robotics Series

          • Artificial Intelligence
          • Cybersecurity: Radio Data tutorialCybersecurity
          • cyber:bot + Python
          • cyber:bot + MakeCode
          • Boe-Bot Tutorial SeriesBoe-Bot
          • Arduino Shield-Bot
          • ActivityBot with C TutorialsActivityBot + C
          • ActivityBot with BlocklyProp Tutorial SeriesActivityBot + BlocklyProp
          • Scribbler 3 Tutorial SeriesScribbler 3
        • Electronics & Programming Series Head tag

          Electronics & Programming Series
          • BS2 Board of Education Tutorial SeriesBS2 Board of Education
          • Propeller C-Language BasicsPropeller C Basics
          • FLiP Try-It Kit C Tutorial SeriesFLiP Try-It Kit + C
          • FLiP Try-It Kit BlocklyProp TutorialsFLiP Try-It Kit + BlocklyProp
          • Badge WX Tutorial SeriesBadge WX
          • Propeller BlocklyProp Basics and ProjectsPropeller BlocklyProp Basics
          • View All Tutorial Series »
        • Browse Tutorials
        • Browse Tutorials

          Individual tutorials sorted by robot or kit, and language.
        • By Robot or Kit
          • ActivityBot
          • SumoBot WX
          • Boe-Bot
          • Shield-Bot
          • cyber:bot
          • Badge WX
          • ELEV-8
          • ARLO
        • By Language
        • By Language

          • Propeller C
          • Arduino
          • BlocklyProp
          • PBASIC
          • Python
          • MakeCode
          • View All Tutorials »
  • Educators
  • Reference
  • Downloads
  • Home
  • All Courses
  • Arlo Robot Assembly Guide

Arlo Robot Assembly Guide

Step 37 – Connecting Power & Encoders

  • The CENTER wire should be stripped and connected to one of the +6.5V plus side terminals on the Power Distribution Board, and the other wire (ground) should be connected to the GND terminal.
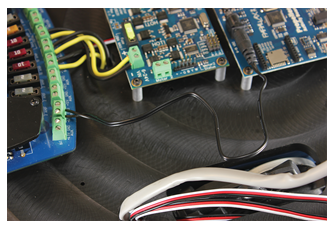
  • Take one of your motor wires. Remove the connector, you will not require it.

Note: If you prefer not to have excess motor wire on your Arlo you can trim the length, or you can leave them long and just tuck the excess under the DHB-10’s PCB. How much wire to remove is up to your preference, but be careful not to cut the wires too short or they may not connect to the DHB-10 properly. Measure and double-check that your connections can still be made properly before trimming anything!

  • Next, you will need to carefully remove part of the jacket covering the wires so that you can get to the ends of the wires underneath.
  • Once you have exposed the wire ends, strip 1/4″ from each.
  • Connect the motor wires to the DHB-10 Motor Controller.
  • Repeat for the second set of motor wires.
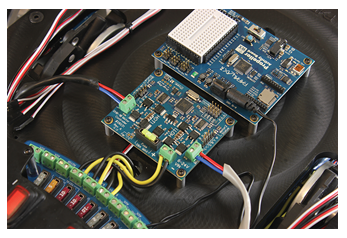
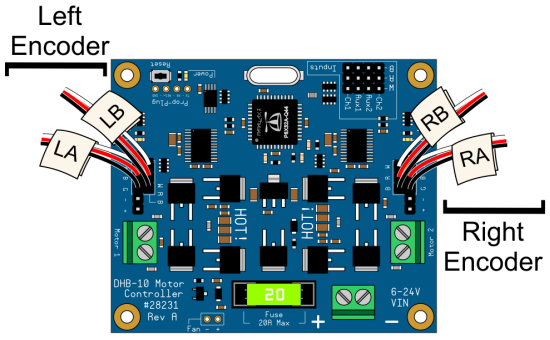
  • If you labelled your encoder cables as recommended in Step 6, you can use the labels to plug your encoder cables into the DHB-10 according to the image below. If you did not label them, then connect your outside encoder cables to the headers labeled RA/LA in the image below, and the inside cables to RB/LB. Remember that your right/left is the robot’s right/left when the power distribution board is on the side closest to you. Double-check your connections!
 

Electrical Connections, Test Code, and Troubleshooting

For making electrical connections specific to your control board, test code, and troubleshooting choose your board type from the list below:

  • Propeller Activity Board WX/Original (#32912, included in Arlo Complete Robot System, or #32910)
  • BASIC Stamp Board of Education (#28803)
  • Board of Education Shield for Arduino (#35000, Arduino Uno also required – not included)

If using a custom board, complete the connections and then optionally move on to Section 8: Mounting the Arlo Top Deck.


Printer-friendly version
Step 36 – Prep the Barrel Jack Connection
Prev
Step 38 – Mount Top Deck
Next

DISCUSSION FORUMS | PARALLAX INC. STORE

About | Terms of Use | Feedback: learn@parallax.com | Copyright©Parallax Inc. 2024

© 2025 Parallax Learn • Built with GeneratePress