Skip to content
Parallax Learn

Parallax Learn

  • Welcome
  • Tutorials
        • Tutorial Series head tag

          Tutorial Series
        • Tutorial Series

          The special, classroom-ready series pages are organized collections of tutorials for our most popular hardware and/or languages. The tutorials for each topic are conveniently accessible from a single page, shown in the order it is recommended that they be completed.
        • Robotics Series Head tag

          Robotics Series
        • Robotics Series

          • Artificial Intelligence
          • Cybersecurity: Radio Data tutorialCybersecurity
          • cyber:bot + Python
          • cyber:bot + MakeCode
          • Boe-Bot Tutorial SeriesBoe-Bot
          • Arduino Shield-Bot
          • ActivityBot with C TutorialsActivityBot + C
          • ActivityBot with BlocklyProp Tutorial SeriesActivityBot + BlocklyProp
          • Scribbler 3 Tutorial SeriesScribbler 3
        • Electronics & Programming Series Head tag

          Electronics & Programming Series
          • BS2 Board of Education Tutorial SeriesBS2 Board of Education
          • Propeller C-Language BasicsPropeller C Basics
          • FLiP Try-It Kit C Tutorial SeriesFLiP Try-It Kit + C
          • FLiP Try-It Kit BlocklyProp TutorialsFLiP Try-It Kit + BlocklyProp
          • Badge WX Tutorial SeriesBadge WX
          • Propeller BlocklyProp Basics and ProjectsPropeller BlocklyProp Basics
          • View All Tutorial Series »
        • Browse Tutorials
        • Browse Tutorials

          Individual tutorials sorted by robot or kit, and language.
        • By Robot or Kit
          • ActivityBot
          • SumoBot WX
          • Boe-Bot
          • Shield-Bot
          • cyber:bot
          • Badge WX
          • ELEV-8
          • ARLO
        • By Language
        • By Language

          • Propeller C
          • Arduino
          • BlocklyProp
          • PBASIC
          • Python
          • MakeCode
          • View All Tutorials »
  • Educators
  • Reference
  • Downloads
  • Home
  • All Courses

Arlo with an Arduino Uno & BOE Shield Brain

Curriculum

  • 1 Section
  • 14 Lessons
  • Lifetime
Expand all sectionsCollapse all sections
  • Arlo with an Arduino Uno & BOE Shield Brain
    14
    • 1.1
      ArloRobot Arduino Library
    • 1.2
      Connect BOE Shield to DHB-10
    • 1.3
      Test Shield Electrical Connections
    • 1.4
      Clear the Arduino Sketch
    • 1.5
      Test Arduino to DHB-10 Communication
    • 1.6
      Test BOE Shield Arlo Motor Connections
    • 1.7
      Test BOE Shield Arlo Encoder Connections
    • 1.8
      Try & Tune Some BOE Shield-Bot Code
    • 1.9
      Increase BOE Shield Arlo’s Top Speed
    • 1.10
      Control BOE Shield Arlo with the Terminal
    • 1.11
      More Precise BOE Shield Maneuvers with Encoders
    • 1.12
      Connect & Test BOE Shield + Arlo Ping))) Sensors
    • 1.13
      BOE Shield + Arlo Control System Adjustments
    • 1.14
      Troubleshooting Your Arlo + BOE Shield

Test Arduino to DHB-10 Communication

Test Arduino to DHB-10 Communication

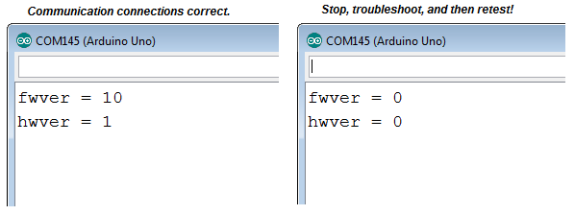
This next sketch asks the DHB-10 for its hardware and firmware versions, and displays the results in Terminal.  Here is what you’ll see if your Arduino communicates successfully with the DHB-10 (left) alongside messages you might see if communication fails (right).

IMPORTANT: Your Arlo will not be ready for the next step until it displays nonzero values for fwver and hwver. 

NOTE: If your terminal output resembles the one on the right, try the Arlo Failed the Communication Test section in Troubleshooting.

  • Make sure your programming cable is connected, the Arlo’s Main power is on, and the BOE Shield’s power switch is set to 2.
  • Turn on the Arlo’s Motors power.
  • Verify that the DHB-10’s indicator lights blink on/off orange once every second.
    • If not, go back to the Arlo Assembly Tutorial and start checking wiring connections.
  • Open and run Arlo-Test-Arduino-DHB-10-Communication.ino.
    • If the Terminal displays only 0 values (like fwver = 0, hwver = 0), recheck the cables connecting the BOE Shield servo ports to the DHB-10’s Ch1 and Ch2 ports.
    • If the Terminal displays the hardware and firmware versions (like fwver = 10, hwver = 1), make a note of the firmware version, and then proceed to the Test Motor Connections section.
/*
Arlo-Test-Arduino-DHB-10-Communication
You'll be ready for the next step when the Arduino Terminal displays:
fwver = 10
hwver = 1
*/

#include <ArloRobot.h>                     // Include Arlo library
#include <SoftwareSerial.h>                   // Include SoftwareSerial library

ArloRobot Arlo;                            // Declare Arlo object

SoftwareSerial ArloSerial(12, 13);            // Declare SoftwareSerial object
                                              // DHB-10 -> I/O 12, DHB-10 <- I/O 13
void setup()                                  // Setup function

{
 tone(4, 3000, 2000);                        // Piezospeaker beep
 Serial.begin(9600);                         // Start terminal serial port

 ArloSerial.begin(19200);                    // Start DHB-10 serial communication
 Arlo.begin(ArloSerial);                     // Pass to Arlo object

 int fwver = Arlo.readFirmwareVer();         // Check DHB-10 firmware
 Serial.print("fwver = ");                   // Display firmware version
 Serial.println(fwver, DEC);

 int hwver = Arlo.readHardwareVer();         // Check DHB-10 hardware
 Serial.print("hwver = ");                   // Display hardware version
 Serial.println(hwver, DEC);
}

void loop() {}                                // Nothing for main loop

Printer-friendly version
Clear the Arduino Sketch
Prev
Test BOE Shield Arlo Motor Connections
Next

DISCUSSION FORUMS | PARALLAX INC. STORE

About | Terms of Use | Feedback: learn@parallax.com | Copyright©Parallax Inc. 2024

© 2026 Parallax Learn • Built with GeneratePress