Skip to content
Parallax Learn

Parallax Learn

  • Welcome
  • Tutorials
        • Tutorial Series head tag

          Tutorial Series
        • Tutorial Series

          The special, classroom-ready series pages are organized collections of tutorials for our most popular hardware and/or languages. The tutorials for each topic are conveniently accessible from a single page, shown in the order it is recommended that they be completed.
        • Robotics Series Head tag

          Robotics Series
        • Robotics Series

          • Artificial Intelligence
          • Cybersecurity: Radio Data tutorialCybersecurity
          • cyber:bot + Python
          • cyber:bot + MakeCode
          • Boe-Bot Tutorial SeriesBoe-Bot
          • Arduino Shield-Bot
          • ActivityBot with C TutorialsActivityBot + C
          • ActivityBot with BlocklyProp Tutorial SeriesActivityBot + BlocklyProp
          • Scribbler 3 Tutorial SeriesScribbler 3
        • Electronics & Programming Series Head tag

          Electronics & Programming Series
          • BS2 Board of Education Tutorial SeriesBS2 Board of Education
          • Propeller C-Language BasicsPropeller C Basics
          • FLiP Try-It Kit C Tutorial SeriesFLiP Try-It Kit + C
          • FLiP Try-It Kit BlocklyProp TutorialsFLiP Try-It Kit + BlocklyProp
          • Badge WX Tutorial SeriesBadge WX
          • Propeller BlocklyProp Basics and ProjectsPropeller BlocklyProp Basics
          • View All Tutorial Series »
        • Browse Tutorials
        • Browse Tutorials

          Individual tutorials sorted by robot or kit, and language.
        • By Robot or Kit
          • ActivityBot
          • SumoBot WX
          • Boe-Bot
          • Shield-Bot
          • cyber:bot
          • Badge WX
          • ELEV-8
          • ARLO
        • By Language
        • By Language

          • Propeller C
          • Arduino
          • BlocklyProp
          • PBASIC
          • Python
          • MakeCode
          • View All Tutorials »
  • Educators
  • Reference
  • Downloads
  • Home
  • All Courses

BlocklyProp Robotics with the ActivityBot (Legacy Version)

Curriculum

  • 1 Section
  • 47 Lessons
  • Lifetime
Expand all sectionsCollapse all sections
  • BlocklyProp Robotics with the ActivityBot (Legacy Version)
    47
    • 1.1
      Build the ActivityBot
    • 1.2
      Hardware Check
    • 1.3
      Step 1 – Prepare External Encoders
    • 1.4
      Step 2 – Prepare Tires
    • 1.5
      Step 3 – Prepare Chassis
    • 1.6
      Step 4 – Prepare Servos
    • 1.7
      Step 5 – Mount Right Servo
    • 1.8
      Step 6 – Mount Left Servo
    • 1.9
      Step 7 – Mount Right Encoder
    • 1.10
      Step 8 – Mount Left Encoder
    • 1.11
      Step 9 – Mount Battery Pack
    • 1.12
      Step 10 – Mount Tail Wheel
    • 1.13
      Step 11 – Mount Drive Wheels
    • 1.14
      Step 12 – Mount the Activity Board
    • 1.15
      Electrical Connections
    • 1.16
      Software and Programming Check
    • 1.17
      Circuit Training
    • 1.18
      Power & Connect Circuits
    • 1.19
      Blink Lights
    • 1.20
      Make a Beep
    • 1.21
      Navigation Basics
    • 1.22
      Feedback 360° Servo Test
    • 1.23
      Feedback 360° Encoder Calibration
    • 1.24
      External Encoder Test
    • 1.25
      External Encoder Calibration
    • 1.26
      Driving Distances
    • 1.27
      Driving Speeds
    • 1.28
      Taking Turns
    • 1.29
      Acceleration and Speed Limits
    • 1.30
      Navigate with Touch
    • 1.31
      Build the Whisker Switches
    • 1.32
      Test the Whisker Switches
    • 1.33
      Whisker-Wheel Response
    • 1.34
      Roaming with Whiskers
    • 1.35
      Navigate with Ultrasound
    • 1.36
      Build and Test the Ping))) Sensor Circuit
    • 1.37
      Roaming with Ultrasound
    • 1.38
      Maintain Distance with Ultrasound
    • 1.39
      Navigate with Visible Light
    • 1.40
      Build the Light Sensor Circuits
    • 1.41
      Make the Measurements Useful
    • 1.42
      Roaming with Light Sensors
    • 1.43
      Navigate with Infrared Flashlights
    • 1.44
      Build the IR Sensor Circuits
    • 1.45
      Test the IR Sensor Circuits
    • 1.46
      Roaming with Infrared Flashlights
    • 1.47
      ActivityBot Troubleshooting

Step 6 – Mount Left Servo

Mounting the Left Servo in the Chassis

For all ActivityBot robots, but read carefully. Directions are slightly different for robots with external encoders.

Parts needed for this step:

  • (1) Parallax mini combo wrench (#700-10025)
  • (1) Parallax screwdriver (#700-00004)
  • (2) #4-40 nylon core lock-nuts (#700-00024)
  • (2) 3/8-inch pan-head steel screws (#700-00028
  • (1) Servo with horn removed; High-Speed (#900-00025) or Feedback 360° (#900-00360)
  • Position the left servo inside its chassis mounting hole so the spline is towards the middle of the robot and the servo cord is next to the grommet.

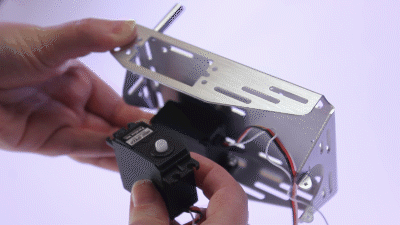
  • Find the two servo mounting holes that are closer to the outer edge of the chassis.
  • Using two 1/2 inch metal pan-head screws and two lock-nuts, attach the servo to the outer-edge mounting holes.

  • Tighten securely.

STOP! READ! 

  • If your ActivityBot Robot Kit has external encoders, go to Step 7 – Mount Right Encoder.
  • If your ActivityBot Robot has Feedback 360° servos, keep going here.

Parts needed to complete:

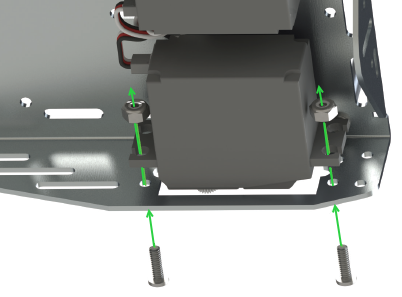
  • (2) #4-40 Nylon core lock-nuts (#700-00024)
  • (2) 3/8-inch pan-head steel screws (#700-00028
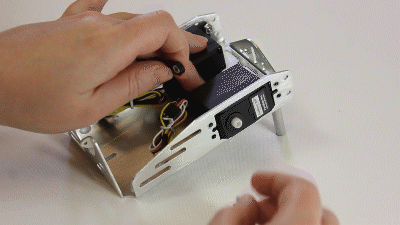
  • Use two more screws and lock-nuts to finish mounting the left servo — four screws in all.
  • Then, skip Steps 7 & 8 and go straight to Step 9 – Mount Battery Pack.


Printer-friendly version
Step 5 – Mount Right Servo
Prev
Step 7 – Mount Right Encoder
Next

DISCUSSION FORUMS | PARALLAX INC. STORE

About | Terms of Use | Feedback: learn@parallax.com | Copyright©Parallax Inc. 2024

© 2026 Parallax Learn • Built with GeneratePress