Skip to content
Parallax Learn

Parallax Learn

  • Welcome
  • Tutorials
        • Tutorial Series head tag

          Tutorial Series
        • Tutorial Series

          The special, classroom-ready series pages are organized collections of tutorials for our most popular hardware and/or languages. The tutorials for each topic are conveniently accessible from a single page, shown in the order it is recommended that they be completed.
        • Robotics Series Head tag

          Robotics Series
        • Robotics Series

          • Artificial Intelligence
          • Cybersecurity: Radio Data tutorialCybersecurity
          • cyber:bot + Python
          • cyber:bot + MakeCode
          • Boe-Bot Tutorial SeriesBoe-Bot
          • Arduino Shield-Bot
          • ActivityBot with C TutorialsActivityBot + C
          • ActivityBot with BlocklyProp Tutorial SeriesActivityBot + BlocklyProp
          • Scribbler 3 Tutorial SeriesScribbler 3
        • Electronics & Programming Series Head tag

          Electronics & Programming Series
          • BS2 Board of Education Tutorial SeriesBS2 Board of Education
          • Propeller C-Language BasicsPropeller C Basics
          • FLiP Try-It Kit C Tutorial SeriesFLiP Try-It Kit + C
          • FLiP Try-It Kit BlocklyProp TutorialsFLiP Try-It Kit + BlocklyProp
          • Badge WX Tutorial SeriesBadge WX
          • Propeller BlocklyProp Basics and ProjectsPropeller BlocklyProp Basics
          • View All Tutorial Series »
        • Browse Tutorials
        • Browse Tutorials

          Individual tutorials sorted by robot or kit, and language.
        • By Robot or Kit
          • ActivityBot
          • SumoBot WX
          • Boe-Bot
          • Shield-Bot
          • cyber:bot
          • Badge WX
          • ELEV-8
          • ARLO
        • By Language
        • By Language

          • Propeller C
          • Arduino
          • BlocklyProp
          • PBASIC
          • Python
          • MakeCode
          • View All Tutorials »
  • Educators
  • Reference
  • Downloads
  • Home
  • All Courses
  • Breadboard Setup and Testing for micro:bit

Breadboard Setup and Testing for micro:bit

What is a Breadboard?

A breadboard is a device that allows you to connect electronic components together on a flat, stable surface. Components are plugged into the grid of holes on the board. Metal clips behind the holes hold the components in place and connect them together.

You might have already built a few simple circuits with alligator clip leads and the micro:bit.  That normally works for a few connections, but with more circuits, the project can end up looking like a bowl of spaghetti.  This can make keeping track of which parts are connected to each other really challenging.  So, the breadboard has become the tool of choice for building circuit prototypes, because it’s way easier to build any number of circuits and still be able to clearly see which parts are connected.

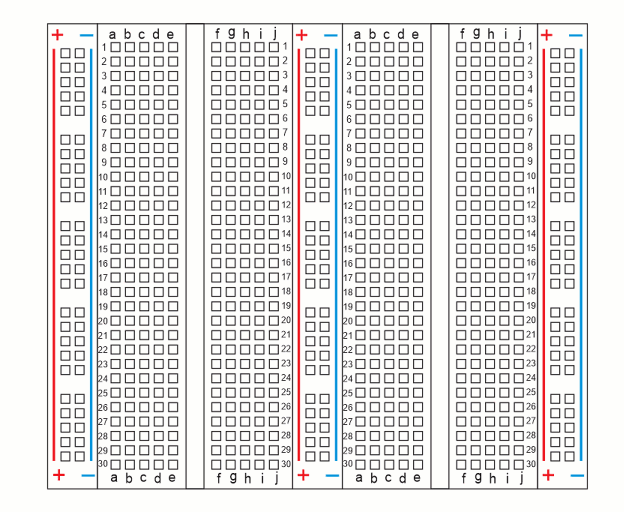
The breadboard you are using in these activities has two terminal strips, each with column labels (a through j) along the top and bottom, and row labels 1 through 30 on each side.  Those column and row labels can be used to identify each socket.  For example, in the right terminal strip, there’s only one (g, 16) socket.  That’s where the g column intersects with the 16th row.  The breadboard you’ll be working with also has three bus strips.  Each bus strip has two columns, one labeled with a (+) sign and a red stripe, and the other with a (-) sign and a blue stripe.  

(View full-size: terminal-strips-row-column-coordinates.mp4)


Printer-friendly version
Connect the micro:bit to a Breadboard
Prev
Parts & Circuit
Next

DISCUSSION FORUMS | PARALLAX INC. STORE

About | Terms of Use | Feedback: learn@parallax.com | Copyright©Parallax Inc. 2024

© 2025 Parallax Learn • Built with GeneratePress