Sub-system Ping))) and Servo Testing
Program the micro:bit to Use the Ping))) Ultrasonic Sensor
This project has several subsystems that we’ll test independently before we program to work together. First, we need to check the Ping))) Ultrasonic Sensor to see that it is wired properly and produces accurate measurements.
Hardware Setup
- Set the cyber:bot board’s power (PWR) switch to Position 0.
- Make sure the battery holder is loaded with 5 AA batteries.
- Make sure the battery holder’s barrel plug is firmly plugged into the cyber:bot board’s barrel jack.
- Connect your micro:bit module to your computer with a USB cable.
Software Setup
- In a Google Chrome or Microsoft Edge browser, go to python.microbit.org to open the micro:bit Python Editor.
- Add two modules to the project: cyberbot.py, qti.py, and intbits.py.
- Go to Add modules to your micro:bit.
- Skip the Quick Start section, and instead start at the section titled Adding a Module to micro:bit Filesystem.
- Watch the video and then add the cyberbot.py module to the project by following the instructions from there to the end of the page.
- Next, follow the same steps to add the ping.py module to the project. It will be in the same folder with cyberbot.py.
Script: ping_test_with_serial_monitor
- Make sure that you have completed the Hardware Setup and Software Setup tasks.
- Set the project’s name to ping_test_with_serial_monitor, enter the script below, and then click Save.
(See Save & Edit Scripts and Flash Scripts with Python Editor.) - Click Send to micro:bit.
(See Flash Scripts with Python Editor.)
# ping_test_with_serial_monitor

from cyberbot import *
from ping import *

bot(22).tone(2000, 300)

while True:
    distance = ping(16).distance('cm')
    print('Distance:', distance, 'cm')
    sleep(750)
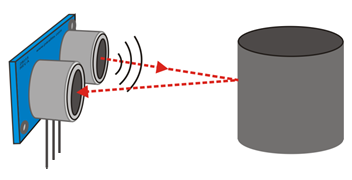
The Ping))) sensor has a range of approximately 3 cm to 3 m in a controlled environment with both the sensor and a single target elevated well above the floor. For these tests, we’ll work on a range of 10 cm to 1 m, which is more realistic for a cyber:bot roaming close to the floor with multiple objects nearby.
- Set the cyber:bot board’s PWR switch to position 2.
- Click Show serial to open the serial monitor.
(See Use the Serial Monitor.) - Place an object in front of the Ping))) sensor as shown. Start at 10 cm, and try a few distances like 10, 20, 30, 40, and 50 cm. Then try 1 m.
- Verify that the serial monitor displays distances that match the actual object distances within a few cm.
- Set the cyber:bot board’s PWR switch to position 0.
Theremin
Once the Ping))) is working you could easily add code for the piezospeaker and create a theremin. A theremin is an electronic musical instrument where the tone is changed by the movement of your hand between two antennas. You will substitute the Ping))) Ultrasonic Sensor for the antennas.
- Change the project’s name from ping_test_with_serial_monitor to ping_theremin.
- Enter the script below, and then click Save.
- Click Send to micro:bit.
- Set the cyber:bot board’s PWR switch to 2.
- Vary the distance of an object (or your hand) from the Ping))) to create theremin-like sound effects.
- Set the cyber:bot board’s PWR switch to 0.
# ping_theremin

from cyberbot import *
from ping import *

bot(22).tone(2000, 300)

while True:
    distance = ping(16).distance('cm')
    # print('Distance:', distance, 'cm')
    bot(22).tone((distance*50),50)
Program the micro:bit to Control the Ping))) Bracket’s Servo
The next subsystem to test is the Ping))) bracket’s servo. The Parallax Standard Servo is able to sweep 180 degrees, positioning the Ping))) at near-exact angles along the way so the micro:bit can take distance measurements on the sides and front of the cyber:bot.
- Change the project’s name from ping_theremin to ping_servo_test.
- Enter the script below, and then click Save.
- Click Send to micro:bit.
# ping_servo_test

from cyberbot import *
from ping import *

# angles for L/R sweep scan
theta = [0, 30, 60, 90, 120, 150, 180, 165, 135, 105, 75, 45, 15]
# Offset from CW limit to actual 0 degree theta is 12 degrees
offset = 12

index = 0
bot(22).tone(2000, 300)

while True:
    for index in range(0, 13):
        bot(17).servo_angle (theta[index] + offset)
        angle = theta[index] - 90
        display.scroll (angle)
Tests and Adjustments
The ping_servo_Test script programs the micro:bit to position the bracket’s servo through the entire range of motion, testing only the servo motor. If you find that your servo turns beyond the range shown in the picture below you will follow some instructions in this section to adjust it.
- Set the cyber:bot board’s PWR switch to 2.
- Compare the range of motion your servo points the ping against the diagram below.
- If you find that your servo turns beyond the range shown in the picture:
- Set the cyber:bot board’s PWR switch to 0 when the micro:bit starts to display 0.
- This is the point where the script thinks the Ping))) should be pointing straight ahead.
- Remove the single screw that holds servo horn to the servo’s output spline.
- Pull the Ping))) upwards and off the Ping))) Mounting Bracket.
- Position the Ping))) so that it is pointing straight ahead, and press it back onto the servo spline.
- Replace the screw that holds the servo horn to the servo.
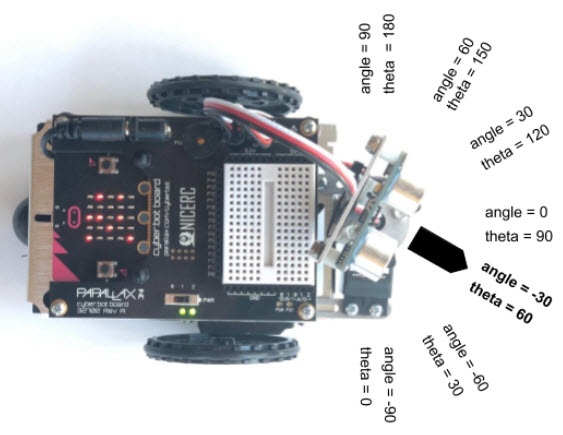
The Ping_Servo_Test code example creates a list of values named theta, which represent the position the micro:bit will use to control the servo. The value of 0 degrees is far right and 180 degrees is far left. However, to make the next program easier to read and useful for navigation, we will create a variable named angle which calculates the straight-ahead value as 0 degrees, far right as -90 degrees and far left as 90 degrees from this line of code:
angle = theta[index] - 90
The angle value is simply 90 degrees less than the servo position controlled by the micro:bit. The image shows how this adjustment makes it so that an angle of 0 degrees is straight ahead. Anything on the left is a positive angle, and anything on the right is negative. This comes in handy for navigation programming because your code can check if the object’s angle is greater or less than zero to decide which direction to turn.