Skip to content
Parallax Learn

Parallax Learn

  • Welcome
  • Tutorials
        • Tutorial Series head tag

          Tutorial Series
        • Tutorial Series

          The special, classroom-ready series pages are organized collections of tutorials for our most popular hardware and/or languages. The tutorials for each topic are conveniently accessible from a single page, shown in the order it is recommended that they be completed.
        • Robotics Series Head tag

          Robotics Series
        • Robotics Series

          • Artificial Intelligence
          • Cybersecurity: Radio Data tutorialCybersecurity
          • cyber:bot + Python
          • cyber:bot + MakeCode
          • Boe-Bot Tutorial SeriesBoe-Bot
          • Arduino Shield-Bot
          • ActivityBot with C TutorialsActivityBot + C
          • ActivityBot with BlocklyProp Tutorial SeriesActivityBot + BlocklyProp
          • Scribbler 3 Tutorial SeriesScribbler 3
        • Electronics & Programming Series Head tag

          Electronics & Programming Series
          • BS2 Board of Education Tutorial SeriesBS2 Board of Education
          • Propeller C-Language BasicsPropeller C Basics
          • FLiP Try-It Kit C Tutorial SeriesFLiP Try-It Kit + C
          • FLiP Try-It Kit BlocklyProp TutorialsFLiP Try-It Kit + BlocklyProp
          • Badge WX Tutorial SeriesBadge WX
          • Propeller BlocklyProp Basics and ProjectsPropeller BlocklyProp Basics
          • View All Tutorial Series »
        • Browse Tutorials
        • Browse Tutorials

          Individual tutorials sorted by robot or kit, and language.
        • By Robot or Kit
          • ActivityBot
          • SumoBot WX
          • Boe-Bot
          • Shield-Bot
          • cyber:bot
          • Badge WX
          • ELEV-8
          • ARLO
        • By Language
        • By Language

          • Propeller C
          • Arduino
          • BlocklyProp
          • PBASIC
          • Python
          • MakeCode
          • View All Tutorials »
  • Educators
  • Reference
  • Downloads
  • Home
  • All Courses

Cybersecurity: Radio Tilt Control

Curriculum

  • 1 Section
  • 37 Lessons
  • Lifetime
Expand all sectionsCollapse all sections
  • Cybersecurity: Radio Tilt Control
    37
    • 1.1
      Measure Accelerometer Tilt
    • 1.2
      Test Tilts
    • 1.3
      A Bit About Acceleration
    • 1.4
      Inside the micro:bit Accelerometer
    • 1.5
      How the Script Works
    • 1.6
      Try This: Take X and Y Rotation Samples
    • 1.7
      Your Turn: Combine Tilt and Rotation
    • 1.8
      Measure Rotation Angles
    • 1.9
      Measuring Rotation Angles
    • 1.10
      How Measuring Rotation Angles Works
    • 1.11
      Did You Know? Trigonometry and Rotation Angles
    • 1.12
      Measure How Far from Vertical or Level
    • 1.13
      How It Works
    • 1.14
      Z-Axis: Which Way Is Up?
    • 1.15
      How it Works: Z axis
    • 1.16
      Did You Know? This Way Up
    • 1.17
      Try This: Get Familiar Z-Axis Angle Measurements
    • 1.18
      Your Turn: All Together Now
    • 1.19
      Display Tilt Direction
    • 1.20
      Try This: Negative Hour Values
    • 1.21
      Your Turn: Display Tilt Direction
    • 1.22
      Tilt Radio Tests
    • 1.23
      Radio-Transmit Tilt
    • 1.24
      Radio-Receive Tilt
    • 1.25
      How the Tilt Radio Tests Work
    • 1.26
      Tilt Control Forward and Backward
    • 1.27
      Rapid Radio-Transmit Tilt Data
    • 1.28
      Rapid Radio-Receive Tilt Plus Forward/Backward Control
    • 1.29
      Adding a Stop Range
    • 1.30
      Transmitter Displays Stop Range
    • 1.31
      Receiver Full Tilt Control and Stop Range
    • 1.32
      Add Left/Right Tilt Control
    • 1.33
      Update the Receiver cyber:bot Script
    • 1.34
      How the Receiver Works
    • 1.35
      Radio Tilt Controlled cyber:bot App
    • 1.36
      Radio Tilt Controlled cyber:bot Code
    • 1.37
      Radio Tilt Controller Code

Z-Axis: Which Way Is Up?

Did you remember that the micro:bit module’s accelerometer also has a z-axis? 

Like the hyp calculation from the previous activity, the accelerometer’s z sensing axis can give your script information about the overall level of tilt. 

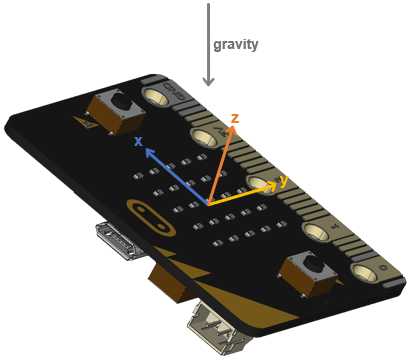
The main advantage of using the z-axis is that it can also tell your script whether the accelerometer is facing up or down.  In fact, the hyp calculation is normally only used with two-axis (x-y) accelerometers.  Since the micro:bit has a three-axis (x-y-z) accelerometer, scripts can use a combination of atan2(y, x) and z-axis measurements and calculations to get both rotation and tilt level. 

In other words, the script can know exactly how the micro:bit is oriented in space.  

Example script: test-z-axis-tilt

  • Enter, name, and save test-z-axis-tilt.  
  • Click the Send to micro:bit button.
# test-z-axis-tilt

from microbit import *

sleep(1000)

while True:

    z = accelerometer.get_z()
    
    print("z =", z)

    sleep(750)
  • Check the results in the serial monitor, and experiment with various levels of tilt and rotation.
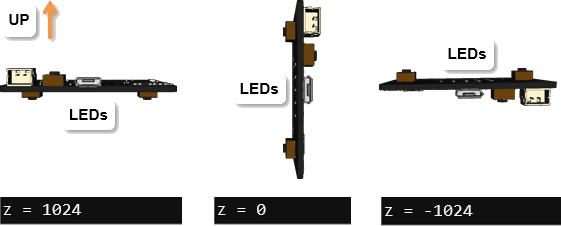
  • Try holding the micro:bit level with its LEDs facing the floor.  Were you able to get a z-axis measurement in the neighborhood of 1024?
  • Next, try holding the micro:bit vertical.  Is the z-axis measurement close to zero?
  • Last, try holding the micro:bit level, but with the LEDs facing up.  Verify that the z-axis measurement is in the 1024 neighborhood.


Printer-friendly version
How It Works
Prev
How it Works: Z axis
Next

DISCUSSION FORUMS | PARALLAX INC. STORE

About | Terms of Use | Feedback: learn@parallax.com | Copyright©Parallax Inc. 2024

© 2026 Parallax Learn • Built with GeneratePress