About Dictionaries
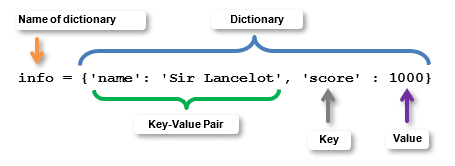
In MicroPython, a dictionary is a collection of key-value pairs enclosed by curly braces. For example {’name’: ’Sir Lancelot’, ’score’ : 1000} is a dictionary that contains two key-value pairs ’name’: ’Sir Lancelot’ and ’score’ : 1000. Sir Lancelot is the string value that’s paired with the ’name’ key, and 1000 is the int value paired with the ’score’ key.
Storing information in key-value pairs really helps when one device collects the information and then sends it to another device that processes it. The device that processes the information can use keys to get the values it needs out of the dictionary it receives.
Collections of key-value pairs are important for making data exchanges between devices more manageable. Phone and browser apps that communicate with servers make extensive use of key-value pairs. As you will soon see, it’s an essential ingredient in scripts where one micro:bit sends data that another micro:bit uses to accomplish a robotic task.
The Cybersecurity tutorials make two micro:bit modules work together like a browser and server would, by using dictionaries. To get ready, this activity will guide you through some of the basics, practicing these operations on a dictionary:
- Create a dictionary
- Add key-value pairs
- Use keys to access values
- Use keys to modify values
First Dictionary
Here’s an example of a statement that creates a dictionary and names it info.
info = {’name’: ’Sir Lancelot’, ’score’ : 1000}
The dictionary itself is {’name’: ’Sir Lancelot’, ’score’ : 1000}. The dictionary has two key-value pairs. One is ’name’: ’Sir Lancelot’, and the other is ’score’ : 1000}. The value paired with the ’name’ key is ’Sir Lancelot’. The value paired with the ’score’ key is 1000.
A script can use a key to look up a value like this:
number = info[’score’]
Since the value paired with the ’score’ key is 1000, the number variable will now store 1000.
A script can change a value that’s paired with a key like this:
info[’score’] = 1234
Keep in mind that 1234 could also be a variable that contains 1234. Like this:
number = 1234
info[’score’] = number
Adding a key is almost the same as changing a key’s value. The only difference is that you have to use a key name that’s different from any of the keys that are already in the dictionary. The two keys already in the dictionary are ’name’ and ’score’. So, if you use a new name and assign it a value, a new key-value pair will appear in the dictionary.
info[’goal’] = 2000
To see how the dictionary looks after the changes and additions, just print it.
print(“info = “, info)
The dictionary will always keep each value with its key. But, it might totally rearrange the key-value pairs. For example the print statement might look like this. All the keys and values are correct, but their order is different. That’s fine because you will always use the key to look up or change a value.
info = {’goal’: 2000, ’score’: 1234, ’name’: ’Sir Lancelot’}
Let’s try this in a script.
Example script: first_dictionary
- Connect your micro:bit module to your computer with its USB cable.
- In a Google Chrome or Microsoft Edge browser, go to python.microbit.org to open the micro:bit Python Editor.
- Enter, name, and save the first_dictionary script.
(See Save & Edit Scripts.) - Flash the script into the micro:bit
(See Flash Scripts with Python Editor.)
# first_dictionary

from microbit import *

sleep(1000)

info = {'name': 'Sir Lancelot', 'score' : 1000}

print("info = ", info)

number = info['score']

print("number = ", number)

info['score'] = 1234

print("info = ", info)

info['goal'] = 2000

print("info = ", info)
- Click Show serial to check the results in the serial monitor.
(See Use the Serial Monitor.) - Verify that:
- The initial dictionary print is info = {’score’: 1000, ’name’: ’Sir Lancelot’}
- After changing the ’score’ key’s value to 1234, the second dictionary print is: info = {’score’: 1234, ’name’: ’Sir Lancelot’}
- After adding the ’score’: 1234 key-value pair, the last dictionary print is: info = {’goal’: 2000, ’score’: 1234, ’name’: ’Sir Lancelot’}
